

Time Sink not only tracks everything you do, but provides some built-in reports for analyzing that usage data, and for exporting it other apps for even more analysis.
Basic Usage
Time Sink keeps a constantly updated usage report available for you at a moment's notice. Select Window > Activity Report (or press Command-R, or use the Activity Report button in menu bar mode) to see this report. Here's what a default report might look like. (Note that the General Usage section of help also contains an annotated screenshot of a standard report window.)
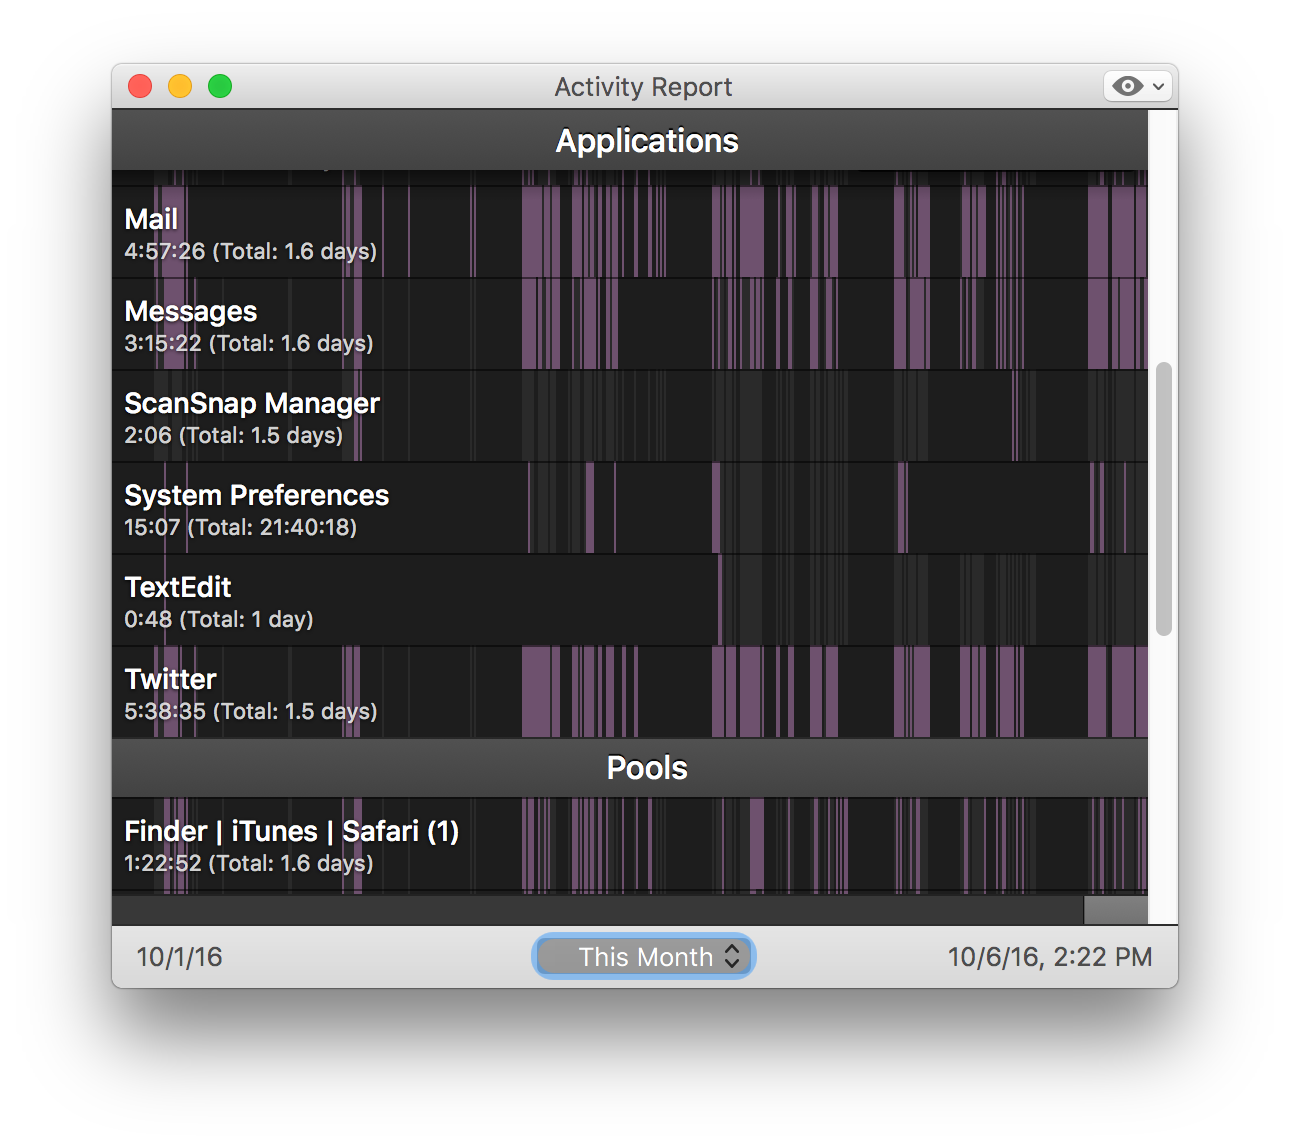
This image is a graphical representation of the "time slices" of your activities over time, with the left and right edges defined as the dates at the bottom left and right of the window. (Time Sink calls this its Time Lapse view.) The button in the bottom middle lets you quickly select a preset timeframe; in this case it's been set to "this month."
Each purple bar indicates that the app or window was in the foreground; gray means running but not foreground; and black means the app or window wasn't present.
By default, Time Sink displays time increments in hh:mm:ss format. Once you've had it running for over a day, though, you may prefer to see times with days in them, which makes the numbers easier to read. To do this, select the View > Display ≥24-Hour Interval as Days menu item.
If you're running Time Sink in Menu Bar mode (see Settings for more on this mode), click the gear icon in the Time Sink drop-down to get to the menu items.
Another way you might like to see your time usage is in terms of total usage—either foreground or total. To do that, choose View > as Time Portions (or press Command-2). When you do, the Activity Report will instantly modify itself, grouping its data by whichever column you've highlighted in the Organizer window—Foreground (purple bars) or Total (gray bars).
For example, the above report looks like this in Time Portions view, when the Organizer view is sorted by the Foreground column:
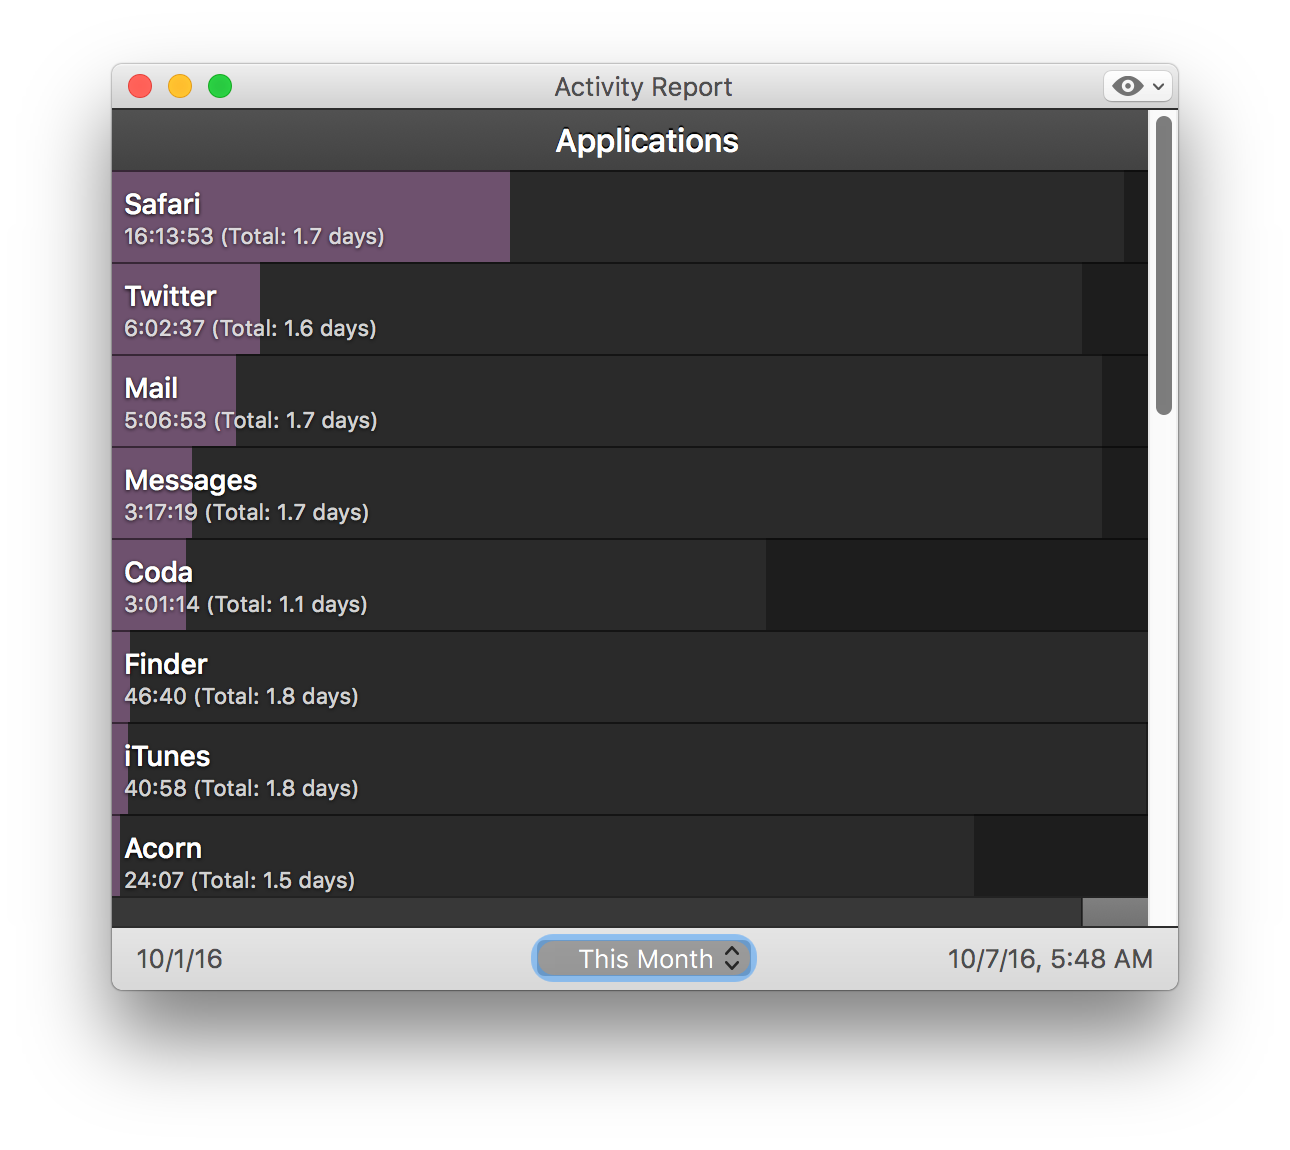
Notice that the sort order is by "most foreground time," as indicated by the decreasing size of the purple bars. Change the Organizer to sort by the Total column (by clicking on the column header), and the chart would switch to decreasing size of the gray bars. Click on the Name column to sort the report by app name.
You can also control what's shown in the report, using the View menu. The above report shows both foreground and total time; uncheck View > Total Time, though, and you'll get a foreground-only report:

See the Menus section of help for more help on each of the options available in the View menu.
Time Period
By default, Time Sink shows the "today" view, as indicated by the "Today" text at the bottom center of the window. You can change this, though, to focus in on any particular timer period.
The easiest way to change the date range is to click the "today" text in the bottom center of the window; doing so will reveal this pop-up menu:
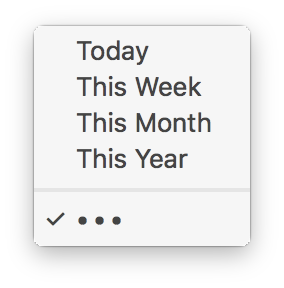
Select one of the predefined periods, and the report will change to reflect that selection. To return to the all data view, select the three dots at the bottom of the contextual menu.
If you'd like to set a custom time period for a report, click on the date/time at the bottom right (start period) or left (end period) corner of the Activity Report window. This will put you into edit mode on that date field, where you can enter the precise day and time you're interested in seeing:
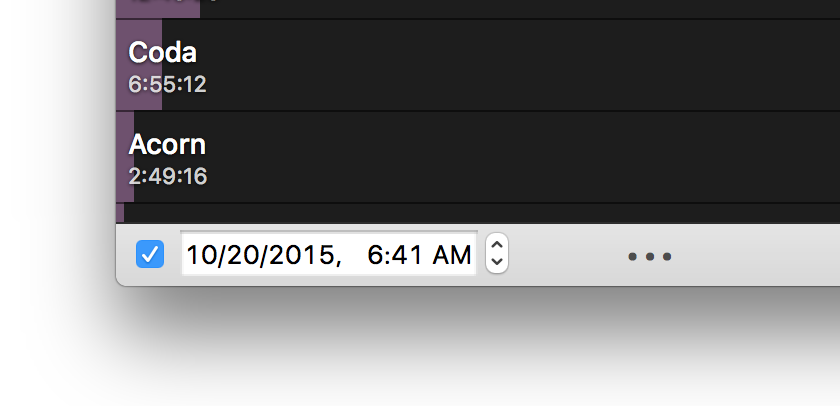
Once you've modified a date, notice the checkmark in the box next to the date—these indicate a modified date, and you can revert to the default time period by simply removing the checkmark.
When you're viewing something less than all of Time Sink's data, you'll also see a subtle horizontal scroll bar of sorts at the bottom of the window—just above the window border:
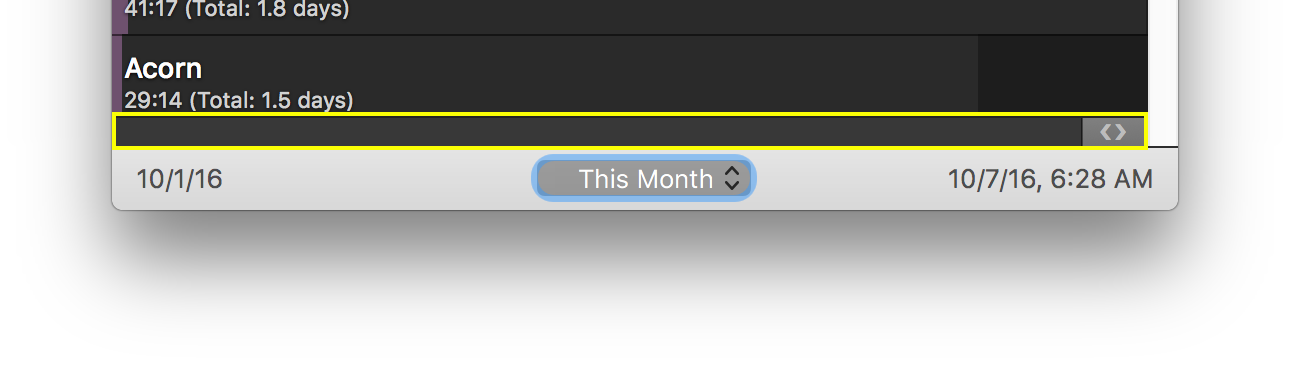
The thumb on the scroll bar represents the portion of total time represented by your selected dates. You can drag the thumb around to view that same time period for different periods of Time Sink's history.
If you use the pop-up menu to pick a defined period of time, i.e. "This Month," dragging the thumb around does not change the total amount of time you're seeing. That is, if today is the 15th day of the month, when you select This Month as the report's duration, you're seeing 15 days of activity. When you drag the thumb, it will show that same 15 day interval, just moving slowly back through time. It will not switch to showing you a full month at a time as you drag the thumb.
You can also change the report's time period by dragging across the graph itself, instead of using the date fields or pop-up at the bottom of the menu. Once you've dragged out a time selection, the horizontal scroll bar and thumb will appear.
Contextual Menus
If you right-click (or Control-click, if you're old school) on an app name in the Activity Report window, and you'll see a convenient contextual menu:
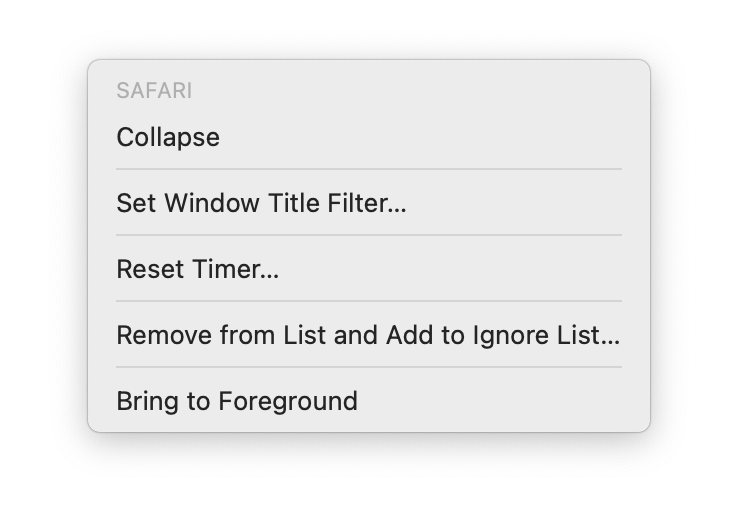
The top entry, , will hide an app's windows in the Activity Report window. (If windows are currently hidden, this will read , and do exactly what you think it will do.)
lets you combine windows that would be otherwise distinct, i.e. Adobe apps add "@nn%" to every window title, making them appear as distinct windows in Time Sink. Please see the Combining windows in the Organizer entry in the General Usage section of help for more information on window title filters.
The other three options are self explanatory—reset the app's timer, remove the app and add it to the Ignore list so it never shows again, and bring the app to the foreground.
If you right-click on a window's name in the Activity Report, instead of on the app name, you'll get a sub-set of the app-level contextual menu:
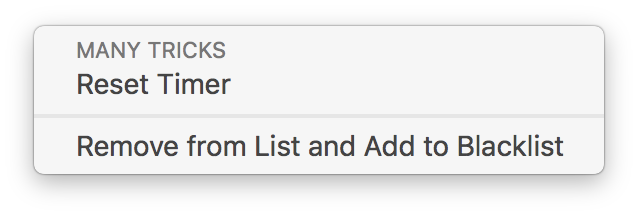
These two contextual menus provide a lot of control over the Activity Report without having to leave the report to change settings elsewhere.
Exports
There are a few ways to get data out of Time Sink. First, as covered in Settings, you can have Time Sink auto-export a snapshot each day. (You can also export individual pools via their contextual menu—see Pools - Contextual Menus for more about exporting pools).
Second, you can use the File > Export Snapshot menu item. Which data fields get exported, and in what format, is set in Time Sink's Settings, on the Export tab.
When exporting data, Time Sink exports whatever time period you've specified in the current report. If you haven't set a stop or start date for the report, then that time period is all of Time Sink's recorded history. So if you just want to export one day's activities, make sure you set the start and stop date and time before exporting.
Once exported, you'll probably want to analyze your data in another app. When you try that, you'll find that the date/time values seem to be really weird: try 1285592961.18, for example. What exactly do you do with that?
Technical aside: Those figures are dates in Unix timestamp format. We do this to keep the data as compact as possible while avoiding time zone problems. If your chosen language uses commas for the decimal separator, these values will be put in quotation marks—123.45 would be exported as "123,45", for example.
To make the exported Unix timestamp dates useful in other apps, they must be converted into traditional date/time values—something that Excel (or Numbers or most any other app) can read. In Excel and Numbers, you can do that using this formula:
=(((timecell/60)/60)/24)+DATE(1970, 1, 1)+(gmtoffset/24)
Replace timecell with the cell address of the cell containing the Unix timestamp, and replace gmtoffset with your location's hour offset from Greenwich Mean Time. (The US west coast, for instance, is -8.) Apply that formula to all dates in your exported file, and they'll convert to more-traditional date/time fields.