

This section of help covers Usher's library structure, adding media, playing media, the main Usher interface, and using the search feature.
Library Structure
Usher uses libraries to manage your media collection. Part of what makes Usher so powerful is that you can have as many libraries as you wish: One for home videos, another for landscape photography, a third for how-to videos from the internet, etc.
In addition to multiple top-level libraries, Usher also supports satellite libraries. When you create a satellite library, it's linked to the library in use at the time you create the satellite. Satellite libraries are a great way to never run out of storage room—you can create them on external drives, for example, so you can add more over time as your collection grows.
Each top-level Usher library resides in its own folder, and the information about the library is stored in a file named Usher.library within that folder. (If you set up Usher to physically organize your media collection, you will also find your media files in these library folders.)
The Usher.library file is critically important to Usher, as it stores all the information about the media in your collection. All metadata that you add about your media files goes into the Usher.library file—it's not written directly to the media files. Please back up the Usher.library file regularly. (We also create internal backups, but you shouldn't rely solely on those.)
Here's some information (and tips) on how Usher works with its library files and folders:
- On first run, Usher creates an Usher folder (and the corresponding Usher.library file) in your user's Movies folder. This is the default library location. You can use Usher's Library settings panel to point to another library location.
- You can create a new library at any time by choosing the → → menu item. This will open a standard macOS dialog, from which you can navigate your hard drive (and create a new folder, if necessary). Click Choose, and Usher will switch to the newly-created library.
- Once you've created multiple libraries, use the → menu to select between them.
- We strongly recommend that you create top-level libraries only on your boot drive or on always-mounted external volumes. By doing so, Usher will always be able to find the right library folder when you launch the app.
- If you have files that will reside on a hard drive that's not always present—a portable hard drive, for example—we recommend that you set up those drives as satellite libraries.
- As noted above…back up your Usher.library files! Given the amount of important data these files will eventually contain for a large media collection, you do not want to have to rebuild one by hand. So please, include your Usher libraries in your backup plan—even if you don't back up the physical media, at least back up the file.
Enough about the behind-the-scenes stuff…
Library Section
The Library section of Usher's sidebar shows the sources for all the media in Usher's library. Depending on how you use Usher, this section can appear somewhat differently…
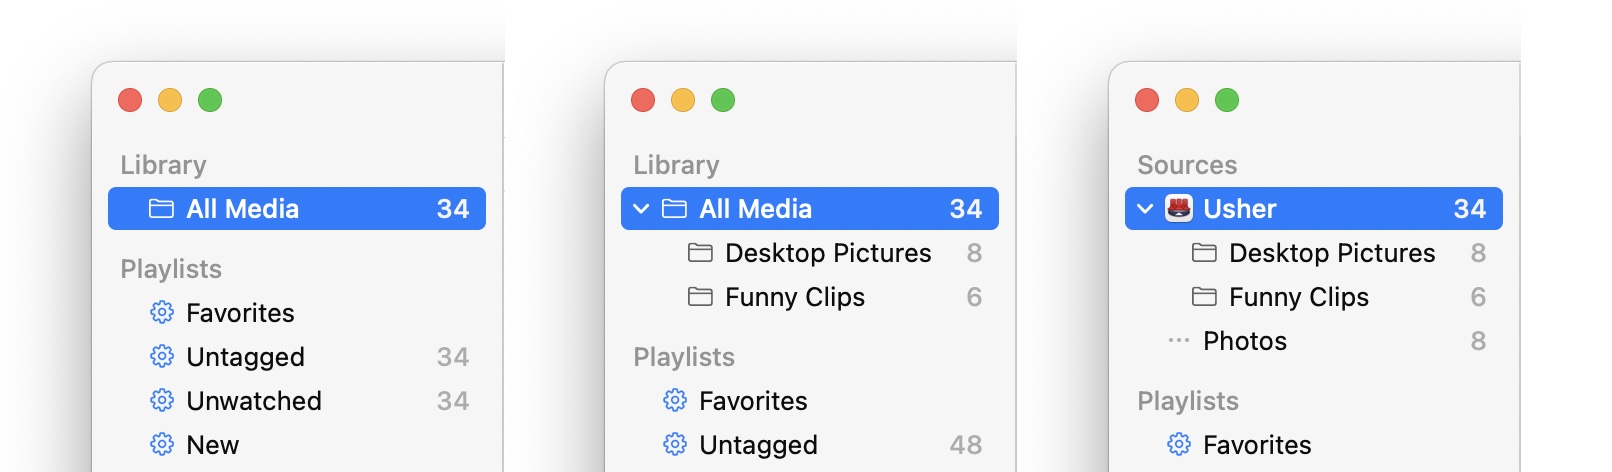
On first launch, Usher simply displays All Media (leftmost image), as there's only one media source.
If you create any folders in Usher, i.e. using → (or by dragging them in from Finder), then the Library section will reflect those folders (middle image).
Finally, if you enable any of the external sources on the External Media tab of Usher's settings, those sources will also appear in this section (rightmost image).
The numbers next to each entry in the Library section are the number of media items in those libraries. (These can be disabled in Usher's settings.)
Depending on how you use Usher, you may not pay much attention to the Library section—it's basically just a list of all your tracked media, separated by source (and possibly folders, if you use those).
Adding Media
To add media to Usher, you can drag and drop them—individual files or folders full of files—onto Usher's sidebar or Dock icon. You can also use the → menu item, or drop files in Usher's library folder in Finder. (By default, Usher keeps its library in your user's Movies folder, in a folder named Usher Library.)
If you wish, you can move the main library folder anywhere you wish, though we advise you to keep it on a boot volume. The location of the library is controlled, via the Library location setting on the Library tab of Usher's setttings.
Usher is not designed to be used with media files stored on a networked drive—Usher may become dramatically slower at indexing, playing, and arranging your media files. Please store your media files on a locally-connected drive.
Dragging Media
One of the more oft-asked questions we get is "How come I can't drag media files around in Usher?" The answer is that you can drag media files around, but it takes a slightly different action than you're probably used to (except in list view mode, where it works as it does in Finder). Here's how to do it:
- Click and hold on the media file's preview or cover image.
- Wait until the file's image shrinks to a smaller preview of itself.
- Now you can drag; Usher will display a translucent dot that indicates the drop target.

If you drag without waiting, you'll drag out a selection box, which will select anything it touches…and then you can follow the above steps to drag the entire selection to a new location.
The Main Window
Once you've added some media, you'll probably want to do something with them—watch the videos or look at the images, obviously, but Usher has many skills beyond simply playing and viewing media. Usher's goal is to be the ultimate media organization tool.
Here's a quick look at the features in Usher's main window:
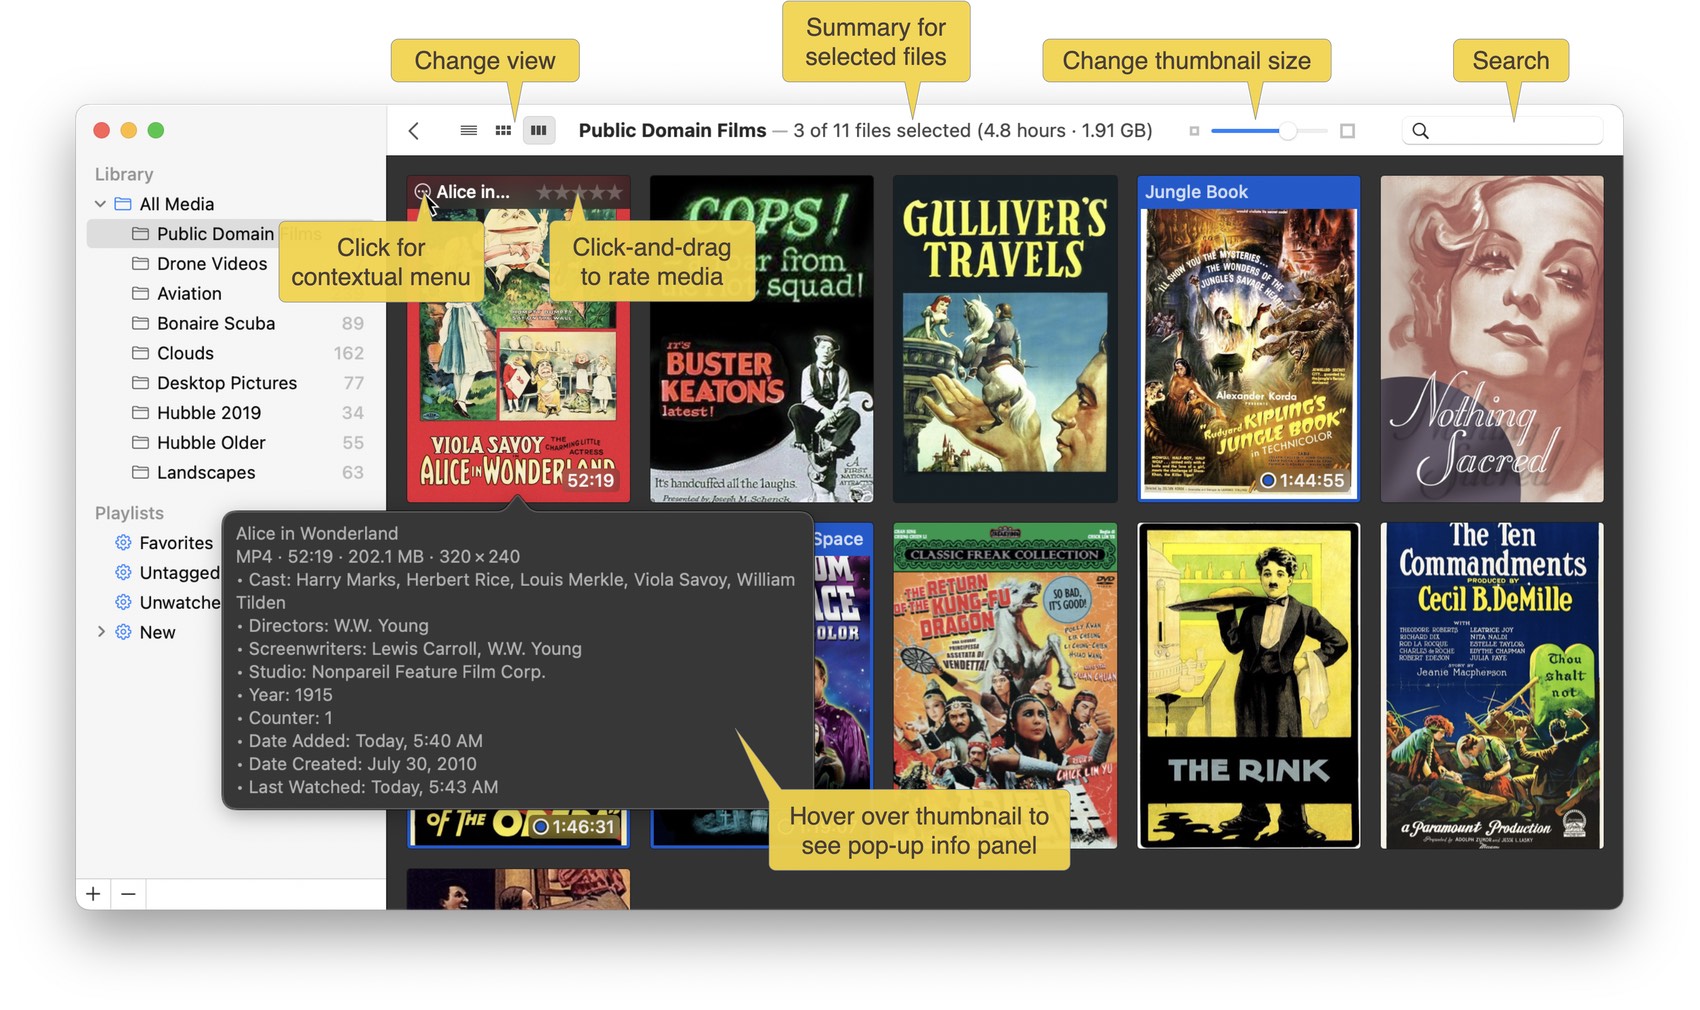
By default, Usher will open a media file when you click on its thumbnail. You can select media files (to perform operations on them) by either dragging from an open area of the library window, or by Command-clicking on one or more of the thumbnails. (You can change Usher's click behavior on the General tab of its settings.)
Right-click on any thumbnail (or click on the gear icon that appears when hovering over its header) to reveal a contextual menu for interacting with the selected media file(s). (Some of the commands in the contextual menu appear only in the contextual menu, so make sure you read about contextual menus in the Menu Items help page.)
Rate any media file by clicking-and-dragging the mouse over the row of dots that appears in that media file's thumbnail header when hovering.
One of the most-powerful features in Usher is its ability to help you sort and filter your media collection, via metadata. You can see the metadata for any media file by hovering over its thumbnail, as seen in the above screenshot for the Alice in Wonderland movie.
To quickly jump to the end of a long list of media files, right-click on the title bar at the top of Usher's window. The first click will jump to the bottom, and the next click will jump back to the top.
Metadata in Usher is comprised of Tags (simple true/false variables), Properties (multiple-item variables, such as Cast), and Notes (free-form text to associate with your videos). Taken as a whole, the metadata gives you complete control over how your collection is organized and sorted, and helps you create truly useful Smart Playlists. See the Properties chapter for much more on metadata.
Finally, notice that you can create folders in the Library section of Usher's sidebar using → , or by pressing Command-Option-N. These folders can contain anything you like, including other folders. You don't have to use folders, though, as the combination of Smart Playlists and Usher's Tags and Properties will let you categorize your collection in many ways.
The Playlists section of Usher's window contains a few pre-made Smart Playlists, and you can add your own (regular and smart) playlists here to help sort through your media collection. You can read much more about this feature in the Playlists section of this help.
Playing Media Files
To play a video or view a still image, just click its thumbnail (or double-click it, depending on your setting in Usher's settings).
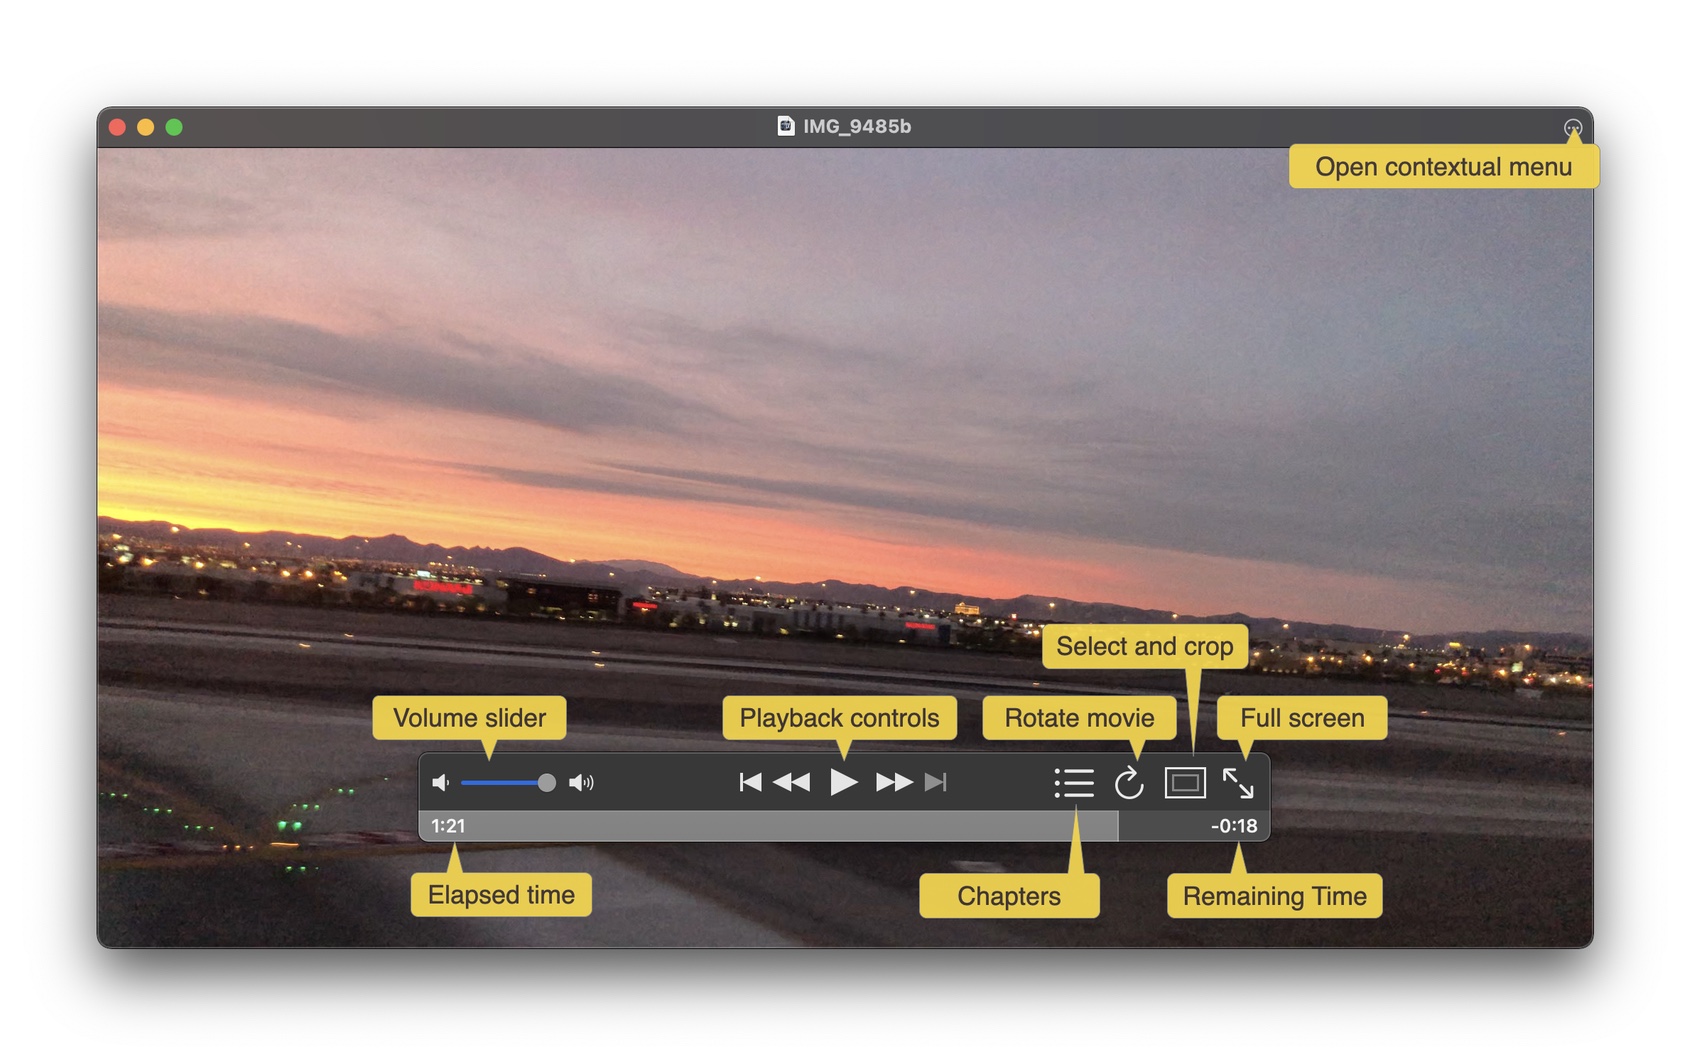
 You can also control playback using a Usher's Remote Control interface—activate it by selecting → . Once activated, you'll see the onscreen controller as shown at right.
If you have a Mac that still has an infrared receiver port, you can use it to navigate the interface; if you don't, you can use your keyboard's arrow keys and Enter key to navigate and select items for viewing.
If the file is a video, it will either play back with floating controls, or with controls fixed outside the frame (see Menu Items help for more on these controller options).
Movies can be viewed in a window, or in full screen mode by selecting → (or by pressing Command-F). You can also change how Usher modifies videos for Full Screen mode (if they're not formatted to fit your resolution) by using the → menu item; you can choose between Scale to Fit and Crop to Screen.
When playing videos, the controller bar provides useful functionality and information:
If you choose to use non-floating controls ( → uncheck ), they'll appear basically as above, but will be permanently visible below the bottom of the video player window.
The playback window has some invisible control zones that ease navigating and pausing/playing your media files. These zones can be especially useful if looking at photos, for instance, as they make it easy to move from one photo to the next. You can find these zones around the edges of the playback window, as shown here:
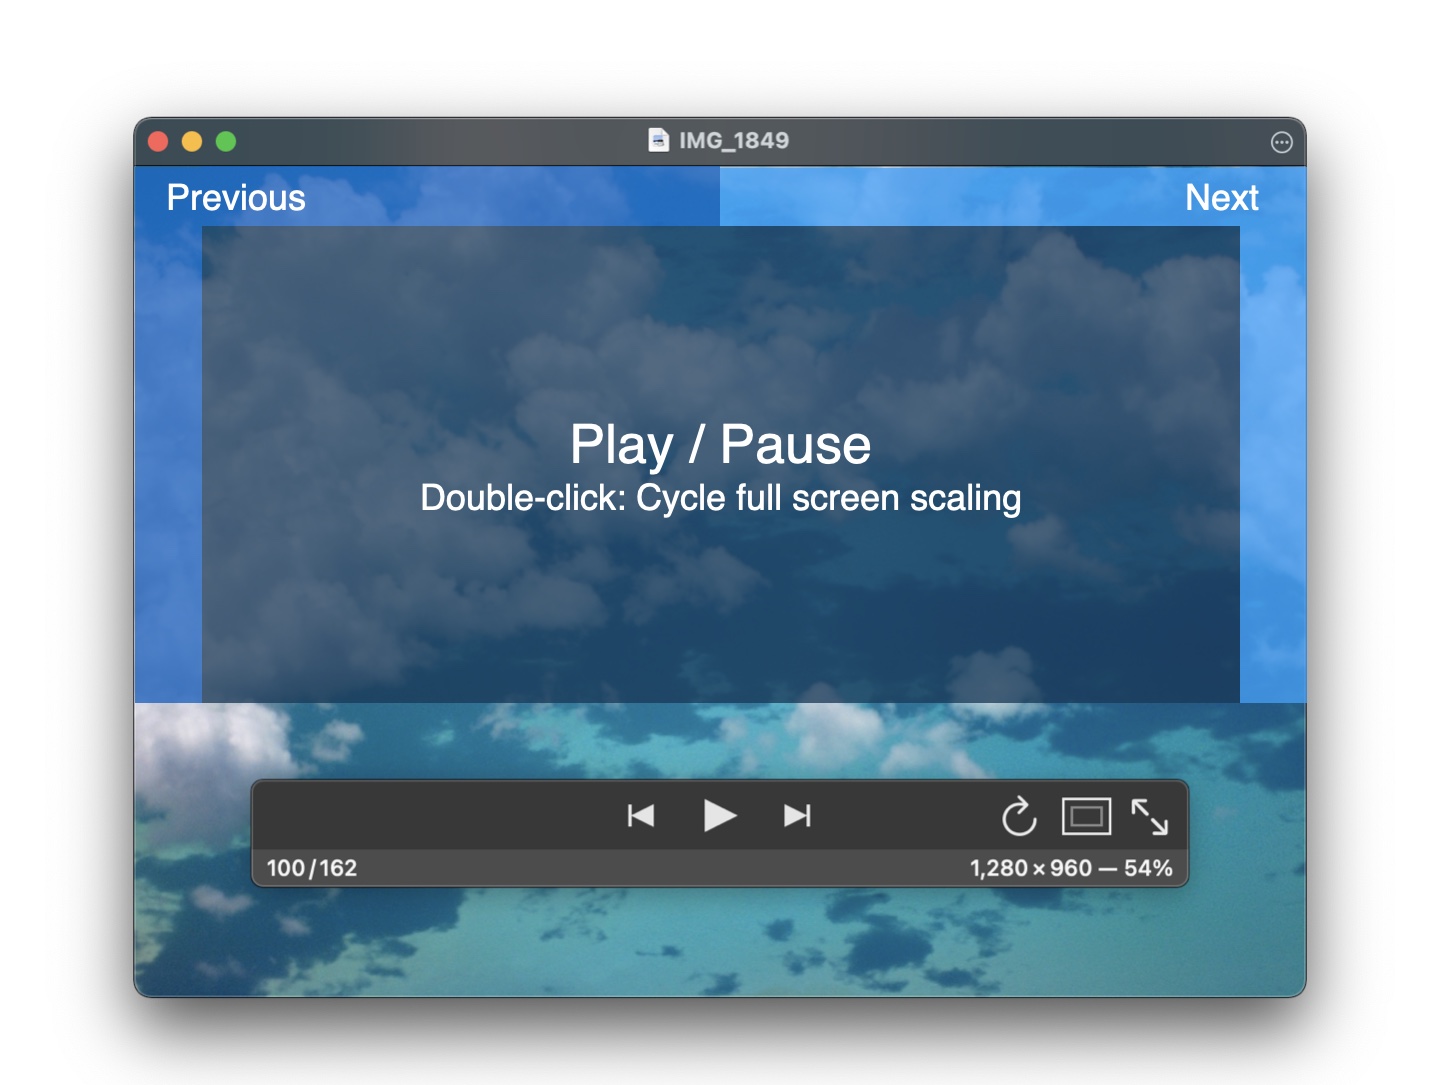
If you keep your mouse near the top center of the window, you should be able to click Next or Previous with minimal mouse movement, regardless of whether a photo's layout is landscape or portrait.
Usher's playback window features a small circular icon at the upper right of the screen. Click that icon to access a pop-up menu that matches the video player contextual menu. See that section for everything you can do with this pop-up menu.
If a video is in a format that macOS itself (and hence, Usher) can't play—or if it's a protected movie purchased from Apple—Usher has the ability to open another player to view the video. There are some rules in the Advanced section of Usher's settings that control this behavior. You can also use the contextual menu's Open With entry to open a given video in another player.
Using Search
If you have a large collection of media files, you'll probably find Usher's Search box invaluable. Using it, you can search your collection using words in media files' titles, or in any of your metadata.
The search box is located at the top right of Usher's window, just below the title bar. You can start a new search by clicking in the search box, pressing Command-Option-F, or selecting → . Here's a look at a simple search for "book," showing one match:
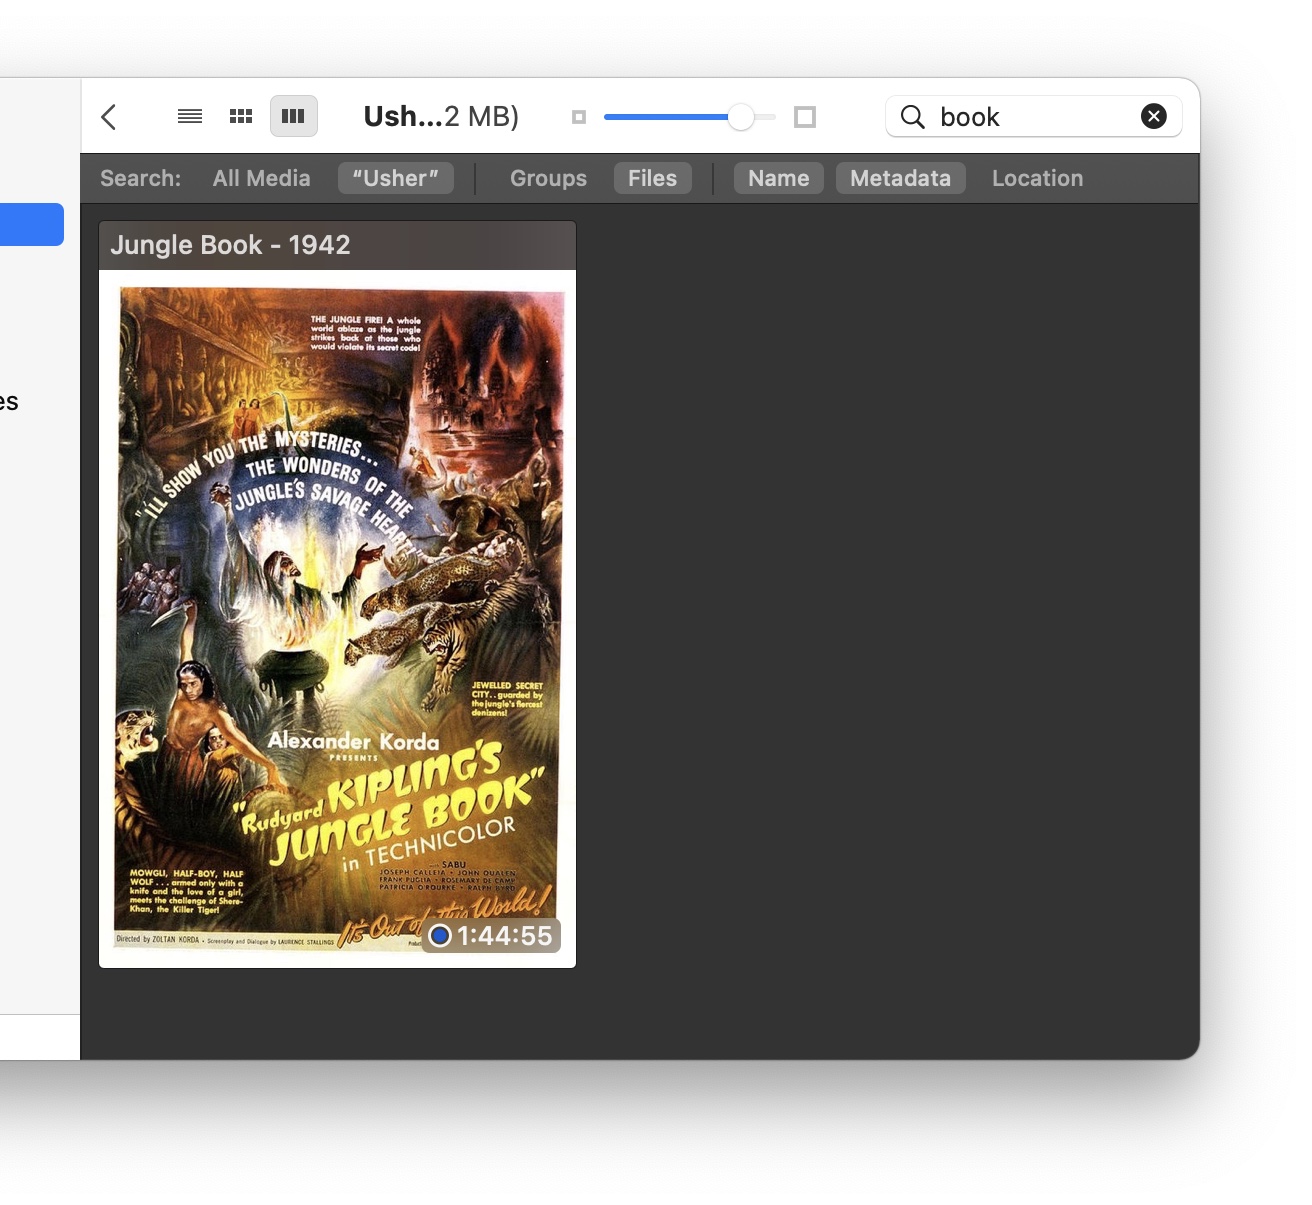
The search bar buttons at the top of the results lets you change the scope of the search, separated into three distinct sections.
The leftmost group lets you select at which level you'd like to search—the selected folder or all your media. In the center section, click the Groups button to have Usher search for groups (playlists and Smart Playlists) whose names contain your search terms; Files is the default. Finally, the rightmost group controls where Usher searches for matches. Name and Metadata are self-explanatory; Location will search the path to the media files for matches.
Usher searches are "and" searches—Usher will match only those media files whose title and metadata includes all of the words in your search terms.
Union and intersection searches
When you select multiple folders or playlists/Smart Playlists, Usher's titlebar will change, and the search bar will appear below, like this:

The titlebar shows that you have selected more than one item via the addition of a small symbol between each of the selections—you'll see either ∪ or ∩. For those of you who don't recall your mathematics education, those are (respectively) the symbols for union (everything in all sets) and intersection (only the items common to all sets).
The search bar has a new group, too, that lets you select between union (the default) and intersection. As expected, the union view shows you everything in all selected items. If you then enter a value in the search field, Usher will show only those files in the selected items that match the search term.
If you switch to intersection mode, then only items that appear in two or more of the selected items will be shown. For example, this library contains images of clouds and landscapes, identified by keywords in two Smart Playlists. Some photos have both cloud and landscape, so they appear in both Smart Playlists.
Here's a union of those two playlists, showing all the photos in both Smart Playlists:
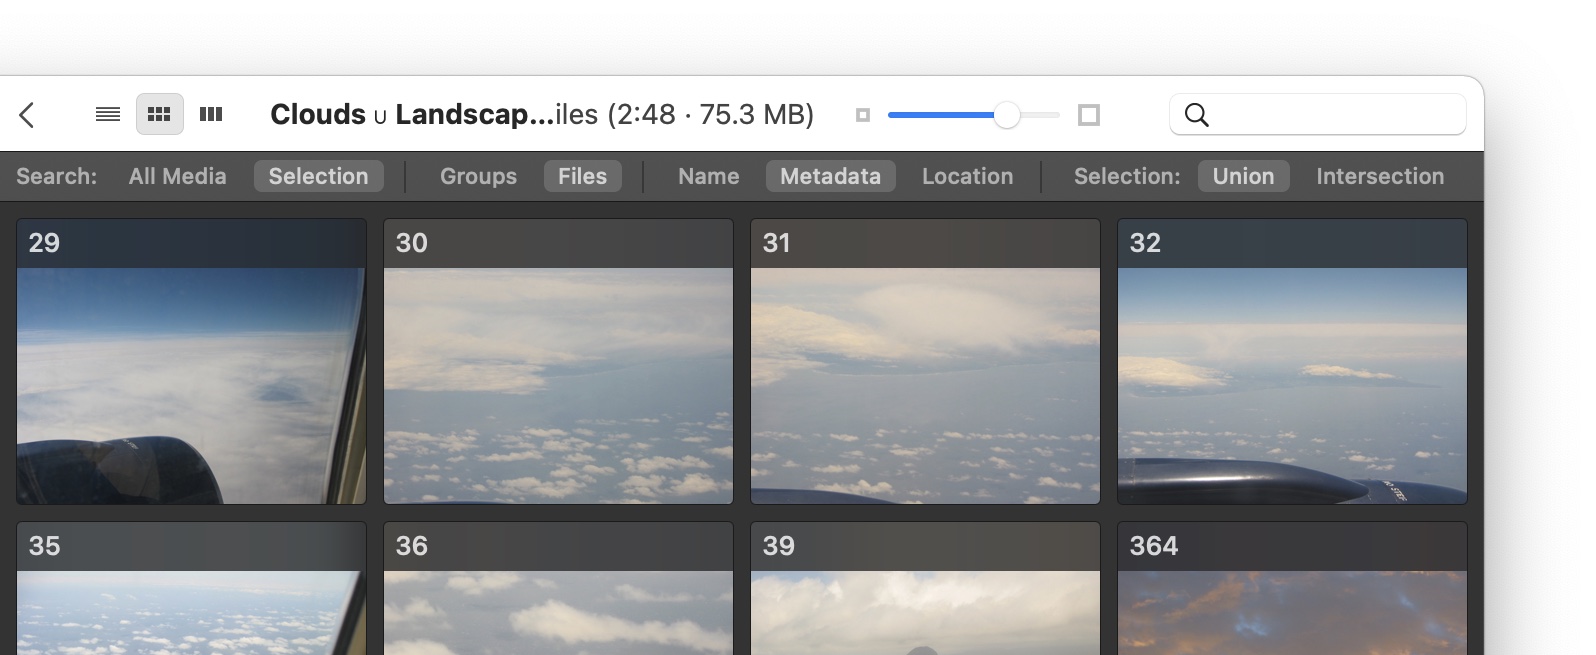
The titlebar displays the number of files in the selection and their total size—this window is too narrow for everything to fit, so the data has been truncated. Still, it's easy to see the difference when the mode is switched to intersection:
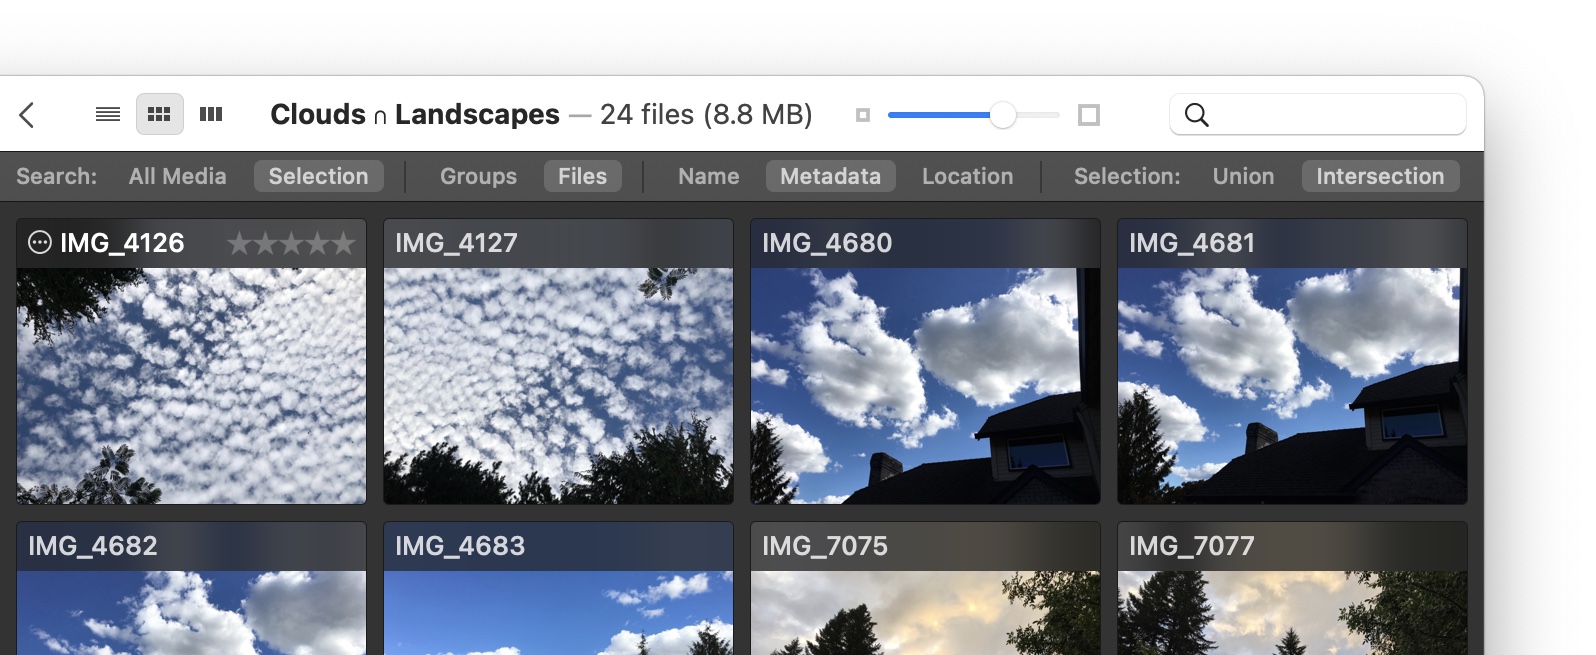
Notice that the size of the selection has changed from 75.3MB in the union to 8.8MB in the intersection—these are the only photos that appear in both the cloud and landscape groups.
Special search features
Usher's search feature includes some special search terms that can help you find duplicates in your library:
-
?=location Find all media files that have the same location.
-
?=name Find all media files with the same name.
-
?=size Find all media files with the same size.
-
?=time Find all media files that have the same duration.
After running one of these searches, use → to sort by the search you just performed (i.e. sort by Location, Name, Size or Time). You can now easily see duplicates based on your search criteria.
Remember to clear the search field when you're done searching, so you're not left wondering why you can't see all the files in your library…not that that's ever happened to the author.