

Usher is a large, complex program, and there are quite a few settings you can set to control its behavior. Here's a look at what each settings tab handles, along with a description of key items within that tab.
To start, here's a simple one that won't be covered in more detail below: The Updates tab checks for updates, and let's you enable or disable automatic update checking. So much for the simple ones…
Note: All settings are shown with their default values. Self-explanatory items will not be described—as an example, a preference named Open files in a separate window conveys what will happen when it's selected simply by reading its name.
General
The General tab is sort of a catch-all for settings that don't fit into one of the other categories. Here's a look at each section of the General panel.

The only option here that requires some explanation is the first one, Show main window on launch. You might wonder why you'd want Usher running without an open window…it may be that you use multiple libraries (see the Library topic), and want to choose a different one each time you launch Usher. Or you may still have an old Apple Remote, and want to use it to control Usher.

Usher creates a "slideshow" preview of your media files, which will appear when hovering over a media file; unless you uncheck Show movie frames when hovering thumbnail. You can also set the delay for anywhere between 0.5 seconds and 5.0 seconds.
The Click thumbnail once to setting controls what happens when you click a thumbnail image. By default, Usher will open the associated media file on a single click. Use the pop-up to change this to either select (double-click to open) or toggle selection (double-click to open) to change that behavior.

Usher has lots of flexibility as to when it auto-resumes movie playback; by default, it will Resume [any movie] if last open [within 48 hours]. Click either pop-up, though, and you'll see many more choices:
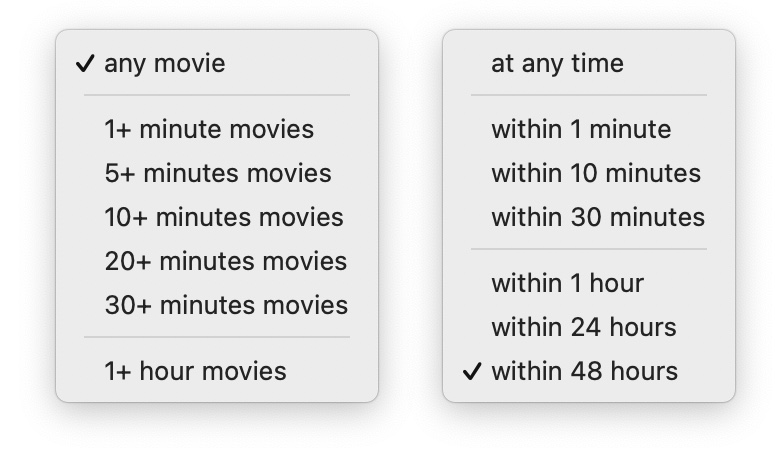
Choose whatever combination works best for your viewing style and media collection.
If you check the Monitor external viewer box, Usher will try to watch when a moving playing in an external viewer ends, and then automatically start the next movie.
The [Stop at group's end] when determining next file pop-up menu contains a number of choices as to how Usher determines the next file to play when the prior one ends. In addition to the default of stopping at the group's end, Usher can also [Loop within the group], [Loop across Smart Playlist subdivisions], and [Loop across all sibling folders or playlists]. (Looping across sibling folders or playlists merely means that Usher will loop through any other folders or playlists that are at the same level as the currently-playing movie.)
For more information on playlists and subdivisions, see the Playlists chapter.

[Scale to fit] in full screen mode is Usher's default for full-screen movie playback; change the pop-up to [Crop to screen] if you prefer your full-screen movies be cropped instead.
Appearance
The Appearance tab controls how Usher looks—what you see in the library sidebar (the standard Usher sidebar, on the left side of the window), how to show movie counts, where to show nested groups, and settings for previews and the remote control interface.

For those running on older versions of macOS—or who simply prefer non-blobbed icons, here you can restore Usher's pre-blob icon. You can also pick from two different blob-style icons.
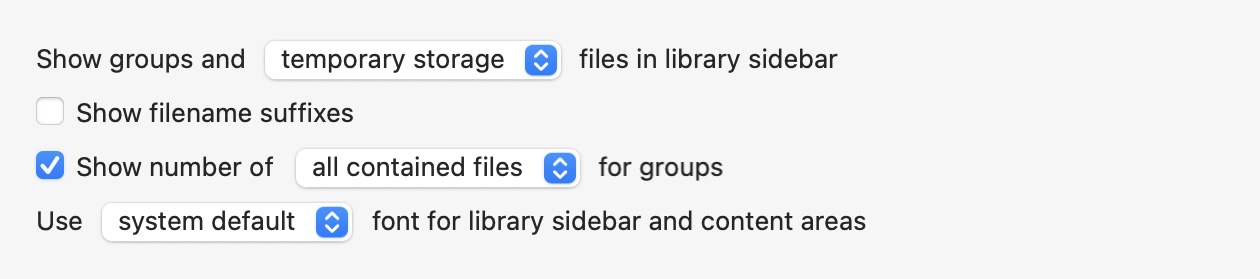
The first pop-up menu controls what you'll see in the library sidebar: Show groups and [temporary storage] files in library sidebar. When set to temporary storage, you'll only see folders, playlists, and files in temporary storage (see below) in the library sidebar.
If you change this pop-up to all, you'll see everything in the sidebar. This means you'll be able to expand folders and playlists directly in the library sidebar, to see the movies contained in each, as seen in the rightmost side of this screenshot:
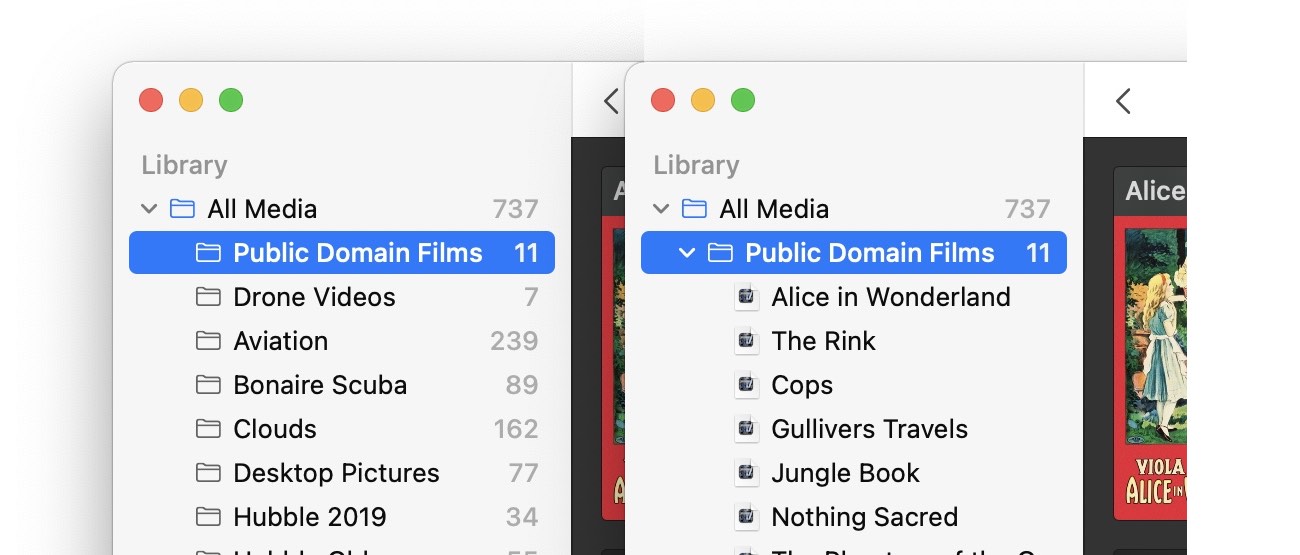
Being able to expand folders in the sidebar makes it easy to move a media file from one folder to another.
Temporary Storage
 What exactly is Usher's temporary storage? Media files in temporary storage are those that are not permanently managed as part of your Usher library, but they're being, well, temporarily managed by Usher.
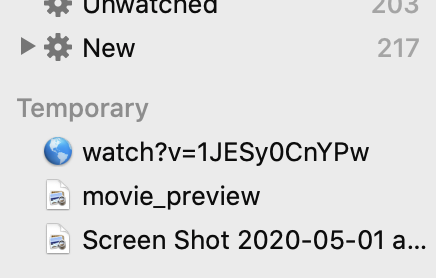
They'll appear as in the screenshot at right. So how do media files get here? There are three ways…
Using Usher's → menu item.
Dragging a media file onto the Temporary section of Usher's sidebar.
Dragging a media file onto Usher's Dock icon.
The Temporary header indicates just that: This movie is only temporarily in Usher. When you quit, it will go away. (Unless you disable that feature on the Library tab in settings.)
To keep a temporary movie forever, drag it into the Sources area of Usher's Library sidebar, which will add it to your library.
 The Show number of [all contained files] for groups pop-up needs some explanation. If you disable this item, Usher won't show the number of movies in each folder or playlist in the library sidebar.
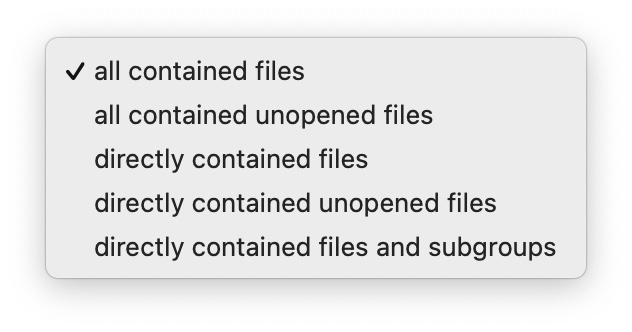
However, if you do want to see media file counts in the sidebar, then you have a choice of five separate options in the pop-up menu, as seen at right. Here's what each option does:
-
Select all contained files to see totals for all media files in all your sources, folders, and playlists. Similarly, all contained unopened files does the same, but only for media files you haven't yet viewed.
-
Select directly contained files and directly contained unopened files do the same things, but only for media files that are directly contained within another item.
For example, if you have a folder in the Library section of Usher, then any movies in that folder will not be included in the count shown next to Usher if you use one of the "directly contained" options:
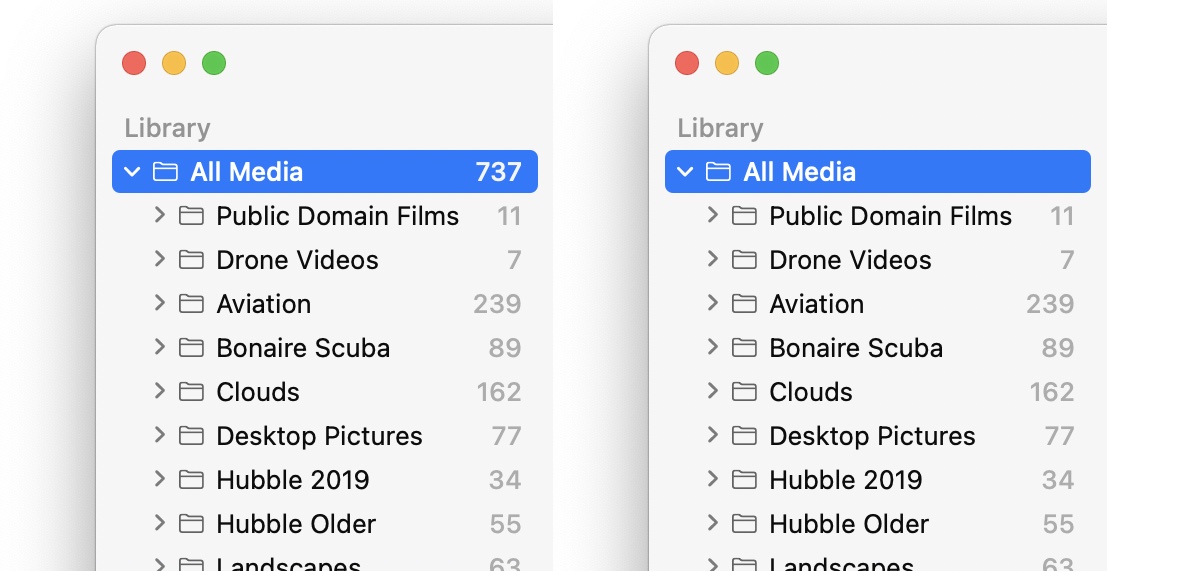
Notice how the All Media total of 737 files in the left image (all files) goes away in the right image (directly contained files).
-
The directly contained files and subgroups adds any directly-contained subgroups to the count of contained files.

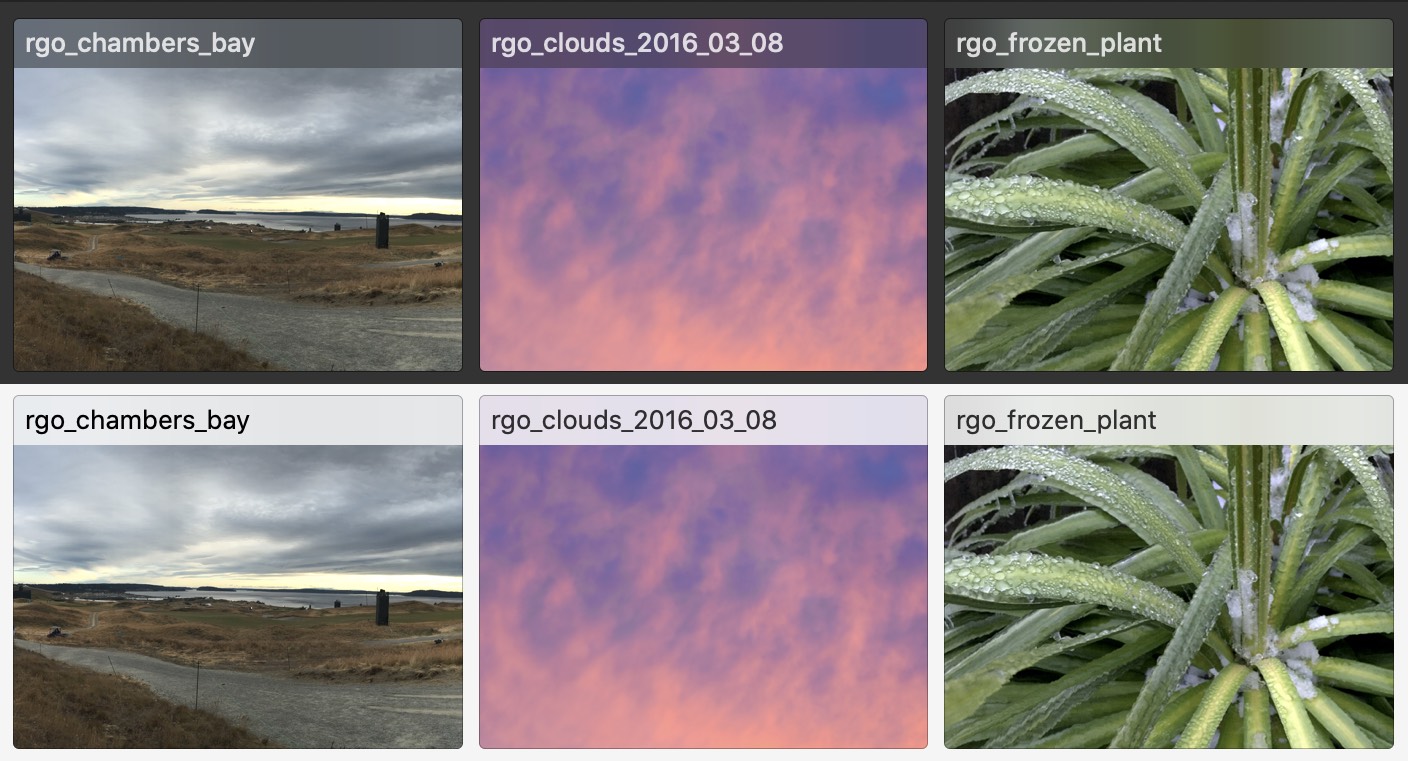
The first setting in this section controls whether Usher will Use [dark] appearance for thumbnails; alternatively, you can change the pop-up to system default, and Usher's thumbnails will match your systems light or dark theme setting; here's how each setting looks:
The Show nested groups [above] thumbnails pop-up menu controls where nested groups—that is, any object containing other objects—will appear: The default is for such groups to appear above any media files in the top-level object, but you can change it so that they appear below the media files in the top-level object. Hover over the screenshot below to see the difference:
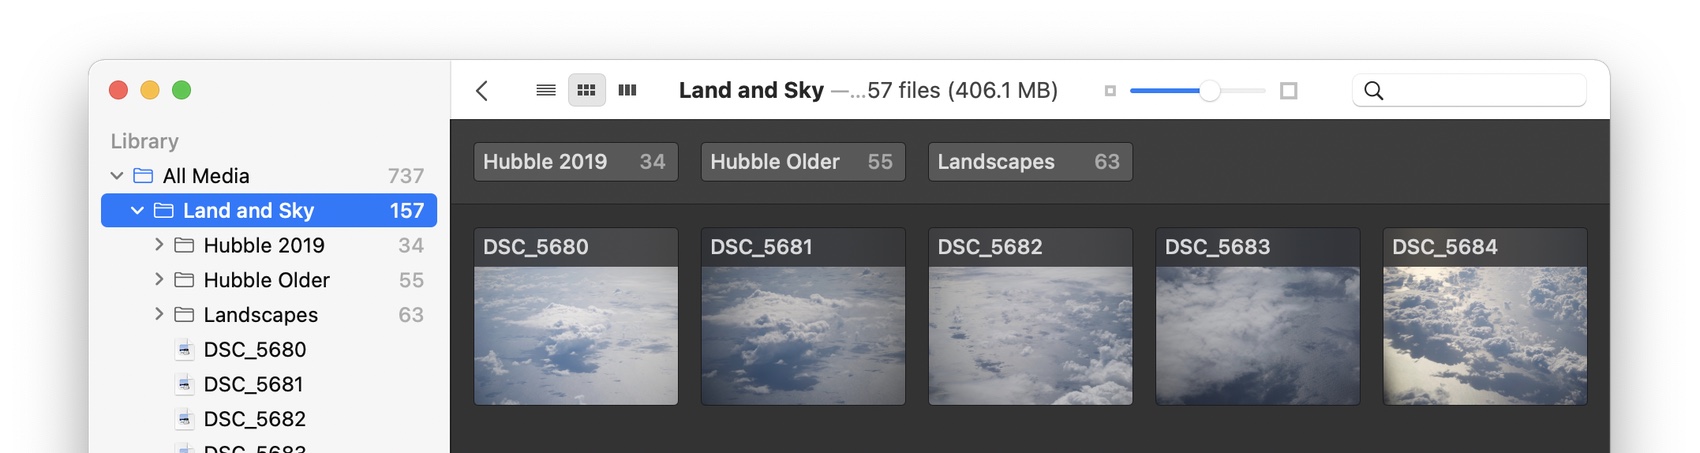
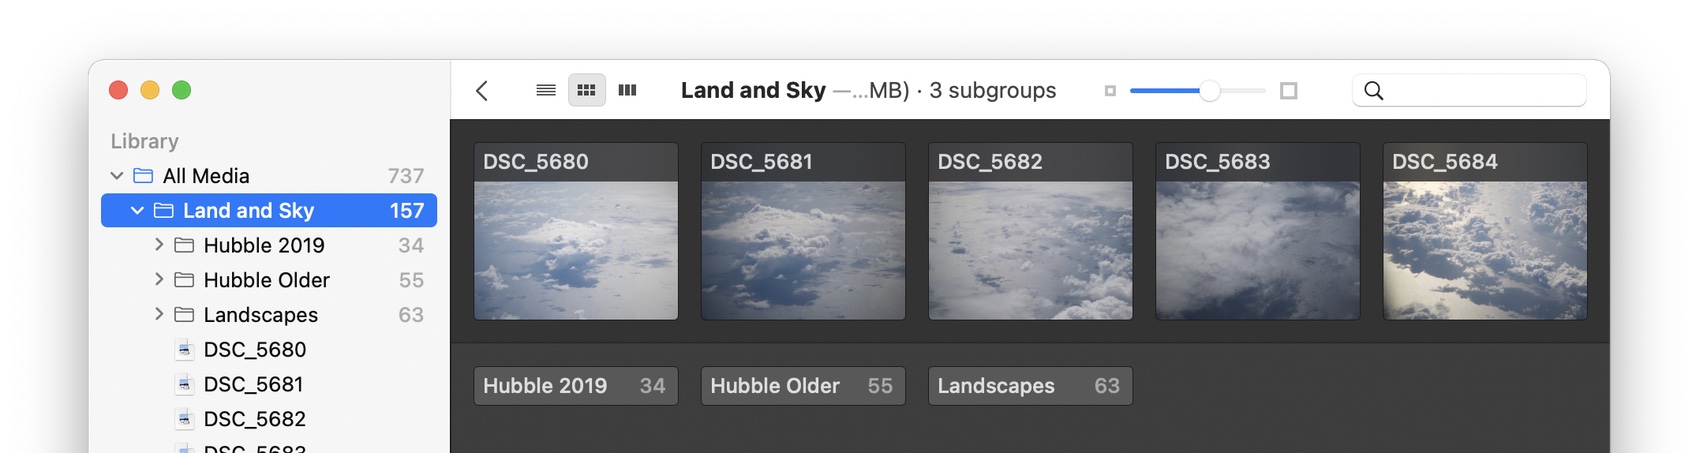
Notice, too, that the header changes based on whether you're showing groups above or below the media files.
If you have a collection of movies with cover art, you can control how (or if) you see those covers in preview mode with the Superimpose covers onto previews at position [slider] — [opacity]. Move the position slider to the far left side to put the cover on the left, and move the opacity slider to the left to reduce the opacity of the cover.
If you'd rather not see any superimposed covers, move the opacity slider all the way to the left.

The Generate movie previews via [frame] at relative time: [slider] setting controls how Usher generate preview images for movie files. The default is to use a frame from the movie, taken at the 5% point—far enough in that opening credits should be gone. You can change the slider to whatever value you prefer.
If you see a solid black (or white or other solid color) preview image for a movie, it means that at that point in that particular movie, that's what the frame contained. In those cases, you'll need to manually replace those problematic frames.
To do so, open the movie file, slide across the timeline until you find an image you want to use, and then select → → (or just press Shift-Command-P). This will replace the automatically-generated preview with the one you've selected.
If you change the first pop-up to Quick Look, then Usher will use the preview created by macOS' Quick Look feature, and the relative time slider will go away, like this:

The main disadvantage is that you have no control over what Quick Look uses to create the preview images—the exact mechanism is known only to macOS. As with the other method, though, if you get a bad preview image, you'll have to manually replace it.

This pref, as you'd guess, controls the size of the remote control interface, which you can access via → . As you move the slider, you'll see a real-time preview of the remote control interface's size.
The Animate box smooths the panels' appearance as you navigate the hierarchy; disable this setting to have the panels appear without any animation.
Controls
The Controls tab contains some basic options for how Usher behaves while viewing your media files.

Unless you've got an older Mac that contains an infrared receiver and an older Apple remote, the Use remote control option will be of no use to you—because those are the only setups that will be able to use this setting.
However, the Activate full screen mode when opening a file via remote control setting is effective even if you're using the remote control interface via the menu ( → ).
You can switch between modes during playback with mouse clicks: Double-click co switch between scaled and cropped full-screen modes, and triple-click to exit full screen mode.

Not much to say about these settings, as they're fairly self-explanatory. However, here's a tip: If you enable hovering controls, they will reappear whenever you move the mouse if Usher is in the foreground. However, if you switch to another app—maybe to do some email reading while half-watching a music video—then the hovering controls won't reappear until you move Usher back to the foreground.

Use this setting to control what happens when you press Command-R to rotate a movie during playback—by default, movies will rotate clockwise, unless you switch it to counterclockwise here.

Set your desired jump distance for the and entries in the menu. If you check Increase consecutive steps, then when you rapidly use the jump controls in succession (most easily done via the Command-Forward Arrow and Command-Backward Arrow keyboard shortcuts), the jump increments will increase each time, making it easy to quickly skip large chunks of the movie.
Library
The Library tab is probably the most important of them all. This section is where you tell Usher about how you'd like to set up your library and manage your files.

The Library location setting controls the location and operation of all of your Usher libraries. Usher can use one or more libraries, but only one library can be in use at any time. The default location for the library location is in your user's Movies folder.
We strongly recommend you leave your default library location on your internal hard drive. This does not mean you need to store your movies on the same drive, but Usher needs to read that file when it launches. If it's on your internal drive, it will always be present, unlike if it were on a sometimes-disconnected external drive.
Usher has the ability to extend your library in two ways: Multiple libraries and satellites.
A real-world analogy for multiple libraries would be corporations: Although two different companies may be in the same line of business, they don't share information with each other—they're completely distinct. Multiple libraries are the same way, and are a good thing to use if you want to keep your media separated. For example, if you have a collection of media files you need for work, and you have a personal collection of classic cartoons and movies, and you don't want to ever see both at the same time.
Satellites, on the other hand, are more like multiple locations of the same company—they share everything with the company headquarters. Satellites can be used in much the same way: If your hard drive fills and you don't have room for more media files, instead of laboriously copying everything to a new drive and setting up Usher again, you can just buy a new drive and use it as a satellite for your main library. You can then easily move files between the main and satellite library, and you'll see everything in both places within Usher.
Here are some additional details on each of these library options…
To set up additional libraries, click the Change… button, then click Other…, which will open a standard macOS file navigation window.
Navigate to the folder you'd like to use for Usher's library—we recommend an empty folder—then click the Choose button. Usher will then load that library—which will be empty, so you'll see an empty Usher library window.
Here's an example as to how this looks after a setting up a number of additional libraries:
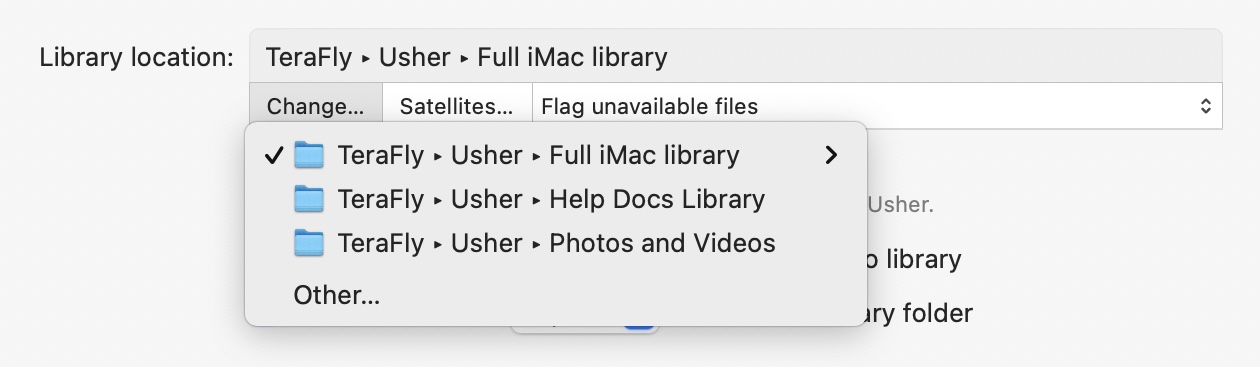
You can switch easily between the two libraries using the → menu item, or here in Settings.
You can add as many additional libraries as you like, but if you're going to remove the default library, you should do that before adding more than one additional library.
We strongly recommend you keep the main Usher library file on your boot drive. You do not have to store any movies on the boot drive (see info on Satellites below), but having the main library on the boot drive will insure it's always available when Usher launches.
Remove the default library
If you'd like to remove the default library, the right time to do so is now, before you've added anything to it, or set up more than one additional library.
After setting up a new library, click the Change button to see both libraries, as above. Make sure the new library has the check mark next to its name (indicating it's the active library), then hold down the Option key. With the Option key down, select the newly-revealed Clear menu item.
Click Clear, and the default library will be gone, leaving only the currently-active library.
Removed libraries are not deleted from your disk; if you click the Other… button, you can navigate to them and add them back to Usher.
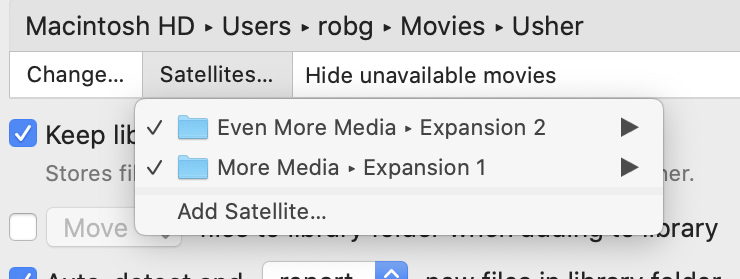
The Satellites… pop-up menu houses a very powerful Usher feature: The ability to infinitely expand a library. In the past, if your media file collection outgrew your hard drive, this meant a labor-intensive move of all your stuff to a a new larger drive, and then setting up your management app to use that new drive. But no more…
 When you start running out of storage space, purchase a new drive, connect it to your system, and create a folder on that drive to store your expanding collection.
Next, click the Satellites… button, then click the Add Satellite… entry in the drop-down menu that appears. In the resulting navigation dialog, find and select the folder you created on the new drive, then click Open.
Once you've added a folder, assuming you've left Usher's auto-detect setting enabled (see below), any movies you add to these folders will be immediately seen by Usher. Once you can see the newly-added movies in Usher, you can file them in your existing folder structure, and they'll appear with all your other movies in those folders, regardless of their physical location. (Usher does this by duplicating your folder structure on the satellites.)
Using satellites, you can keep growing your collection without ever having to relocate your existing files. You can add as many satellites as you want or need—while there is a limit, it's so high as to not even be worth mentioning.
You can easily move media between libraries and satellites by right clicking on any media file(s) and using the contextual menu item.
There's one last option here that's nearly hiding—next to the Satellites… you'll find a pop-up menu labeled Hide unavailable movies. By default, if any of your libraries or satellites are offline, Usher will hide the media files located on those drives. (You can also change this setting via the → menu item.)
Change the option to Flag unavailable movies, and Usher will display a placeholder for missing movies—their labels have been inverted:
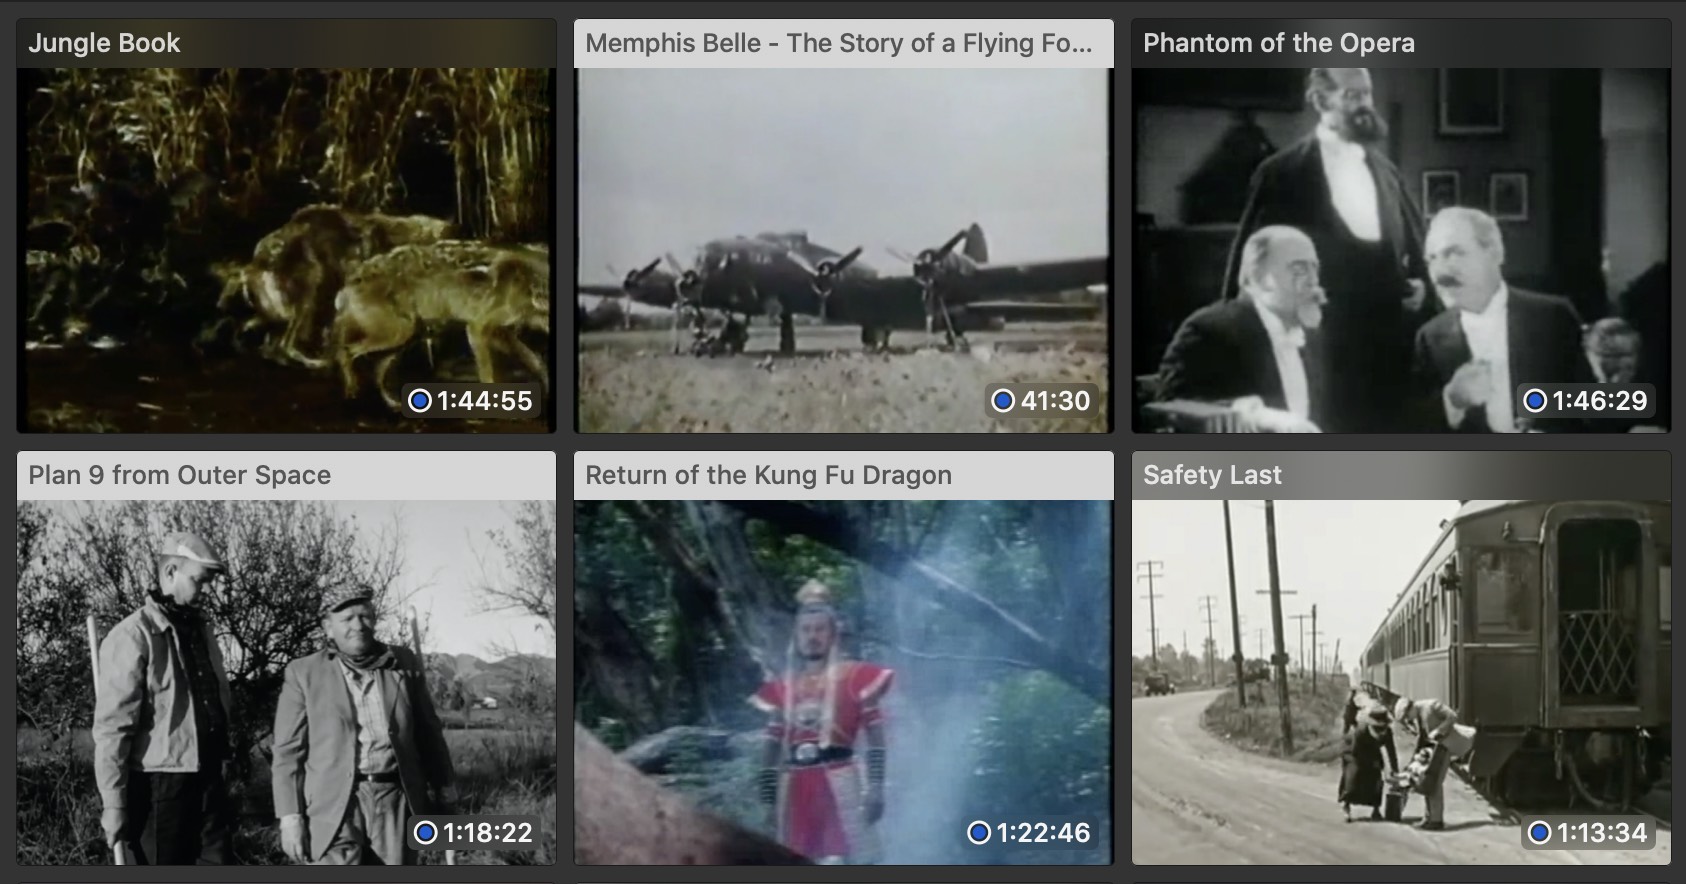
You can still hover over a missing movie to see the saved movie frames, but to play the file back, you'll need to mount the missing drive.

This setting will only affect media files stored directly within the Usher library folder—so if you don't also have the [Move|Copy] files to library folder when adding to library option enabled, then this would only affect files you manually added to the Usher library folder.
Here's an example of how this setting changes how Usher handles files. Generally, when you remove a media file or folder from Usher, you'll see this warning dialog:
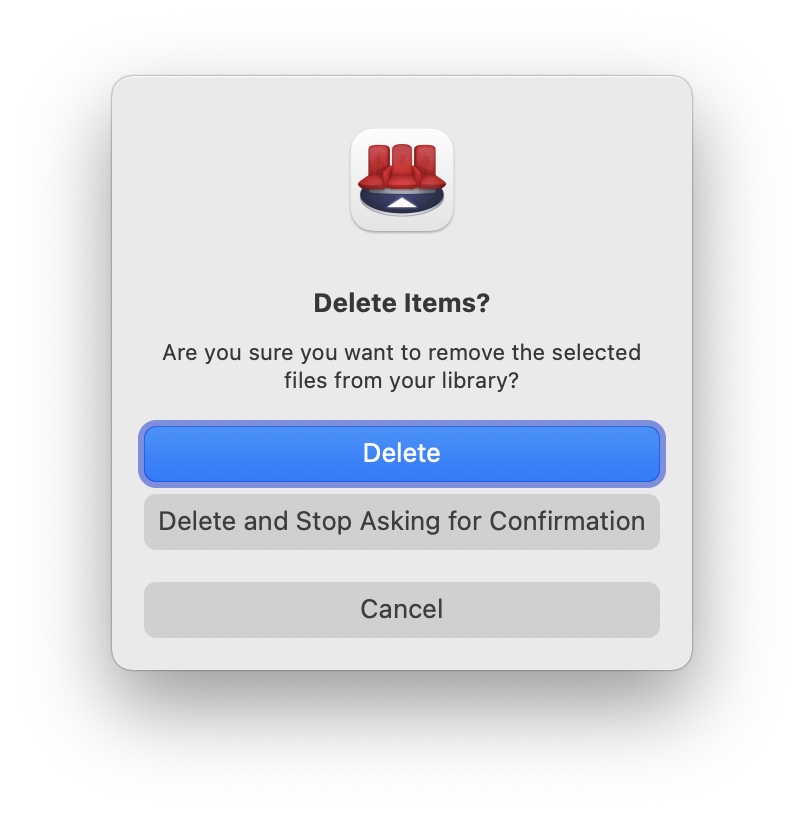
You can remove the file (and never be asked again), cancel, or just remove the file (but keep the warning for the next time). However, both removal options leave the media file as it is on you drive. But with Keep library folder organized enabled, after you click Remove, you'll see another dialog:
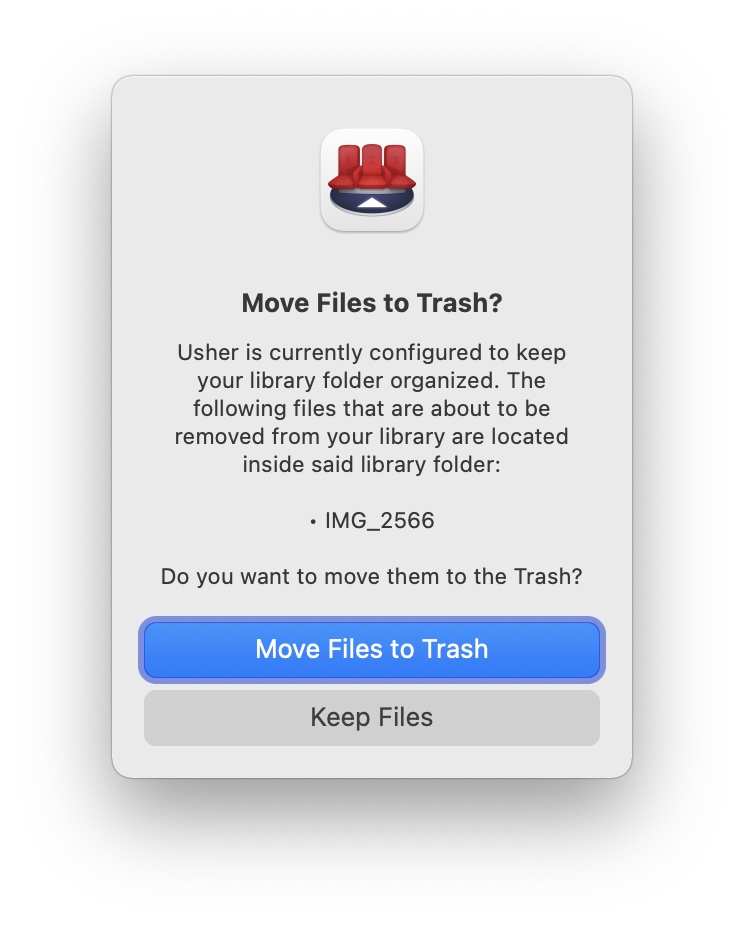
Click Cancel to, well, cancel the operation and leave everything untouched. Click Keep Files to keep the original files while removing their entries from Usher, or click Move Files to Trash to delete the removed files.
If you choose Keep Files, Usher will add those files to its exceptions list (more details about the exceptions list are provided in the Advanced section of this help). This has to be done, otherwise Usher would re-add the deleted file the next time it scanned the library and satellite folders.
The [Move|Copy] files to library folder when adding to library option controls how Usher handles your media files. Left disabled, your media files remain where they are; change this to Move and Usher will physically move your files into its library folder, or set it to Copy and Usher will store a copy of the files in its library folder.
There's more detail on this setting in the Media Management Decision section of the main page, which you hopefully read before arriving here.
When you add new files to library folders in Finder, the Auto-detect and [report|add] new files in library folder setting controls what Usher does when it notices those files. By default, you'll be alerted to new files, like this:
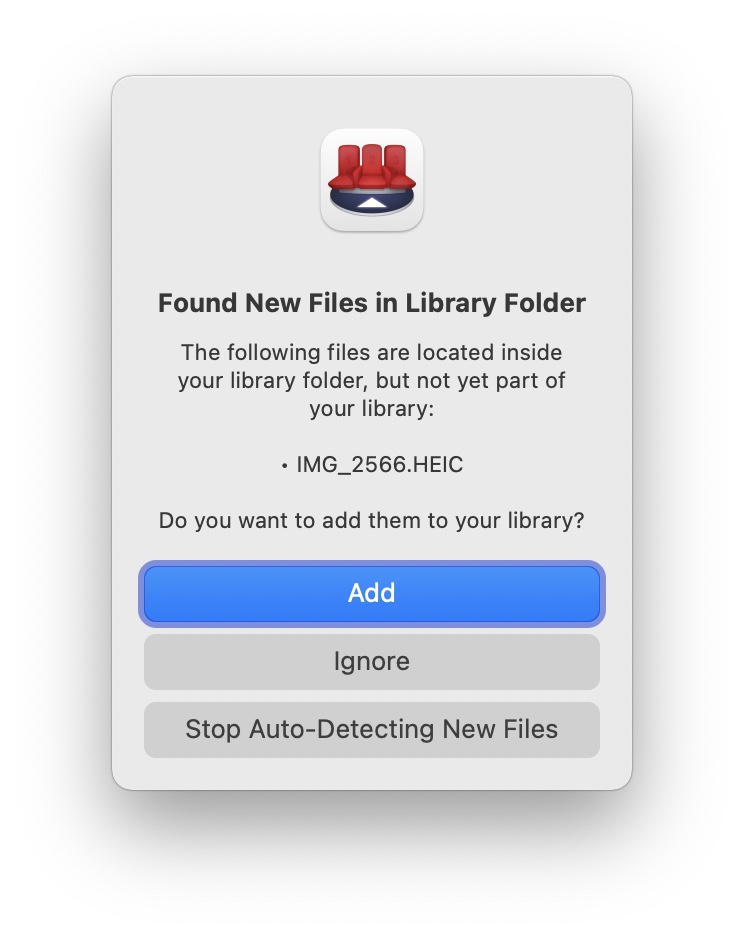
As you can see, you can choose to never check for such files again (disabling this preference), add the files to the exceptions list (so they're ignored, but can stay in the library folder), or add the files.
Usher will only watch for new files directly in its library folders. If you're using Usher in reference mode, where your movies remain where they are, then you won't be notified of additions to those folders.
You can disable this preference, or set it to add to automatically add any new media files to your library.
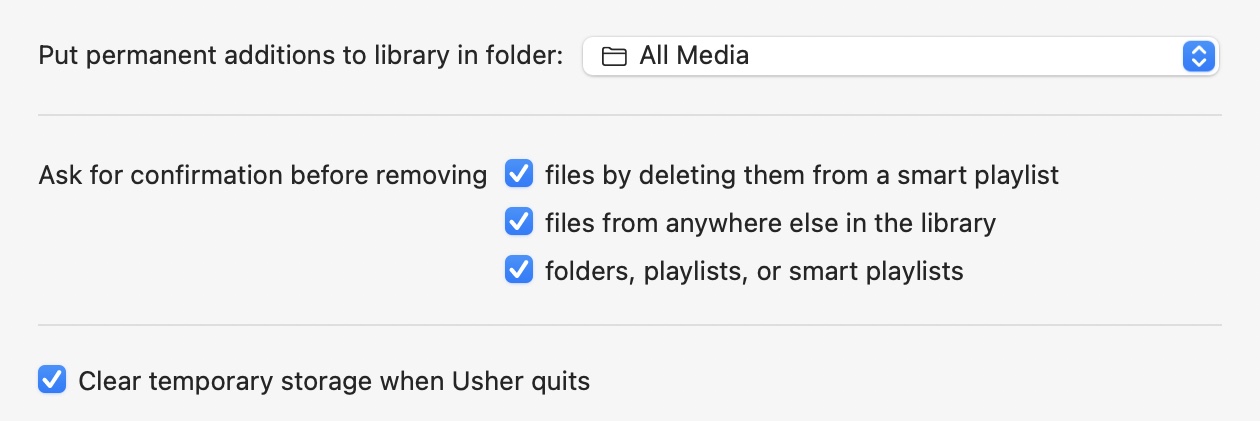
Most of the settings in this last section are self-explanatory, with the exception of the first one. Use the drop-down menu next to the Put permanent additions to library in folder [All Media] to control where Usher puts files that you drag into Usher's interface.
By default, new additions go into the top level library, but you can change this to any of the folders you've set up within Usher—you might use a "New Additions" folder, for example, as a sorting bin for newly-added media files.
You can also set it to Temporary, which would prevent anything you add to Usher from being retained when you quit, unless you manually drag those items into Usher's Library itself.
External Media
The External Media tab controls how Usher handles movies from outside its library—from places like Music, TV, Photos, and even the discontinued Aperture. (If you're on earlier versions of macOS, Usher also supports iTunes, which was the previous home for music, TV, and movies.)

With one or more of these options active, the "All Media" label in Usher's sidebar will change to read Usher, indicating those files are within Usher itself. You'll then see the other sources listed separately in the sidebar.
As of now, Usher does not display photos and images from external media, only movie files.
Advanced
The Advanced tab controls some more-subtle aspects of Usher's behavior. Many users may never need to visit this panel, but if you decide to check it out, here's what you'll find.

The Supported file formats setting controls what types of files Usher can see. By default, Usher sees all file types, as shown by the asterisk (a wildcard meaning "look for all extensions"). This means Usher will find any file type in its library, which includes not just media files but all files.
None of this should be a problem if you have Usher working in a folder that contains only media files. But if, for some reason, you have a mix of media in your Usher folder, you might wish to customize this list of formats. For example, this list would capture the most common video formats and nothing else: .3G2 .3GP .AVI .FLV .M4V .MOV .MP4 .MPG .SWF .WMV
Alternatively, if you wanted Usher to only manage still images, you could use .PNG .JPG .JPEG .GIF
The Exceptions button drops down a dialog where you can list media files that should never be seen by Usher—even if they'd normally be included, based on their type.
To add a media file to the exceptions list, you can drag and drop it from Finder, or paste (or type) its path. You can also use wildcards, so that /Users/your_user/Movies/Secret/* would exclude everything in the Secret folder within your Movies folder. (Put each entry on its own line, don't use commas or spaces to separate entries.)
This list is also populated when you delete movies from Usher and you have the original media in your Usher folder and have Usher set to keep your library folder organized. This is done to prevent Usher from continuously trying to re-add the movie to your library.
Finally, the Auto-convert animated images to movies for playback checkbox does exactly what it says it will do: When you play an animated image (in any of a number of formats), Usher will convert it to an actual movie file, for easier control over playback.
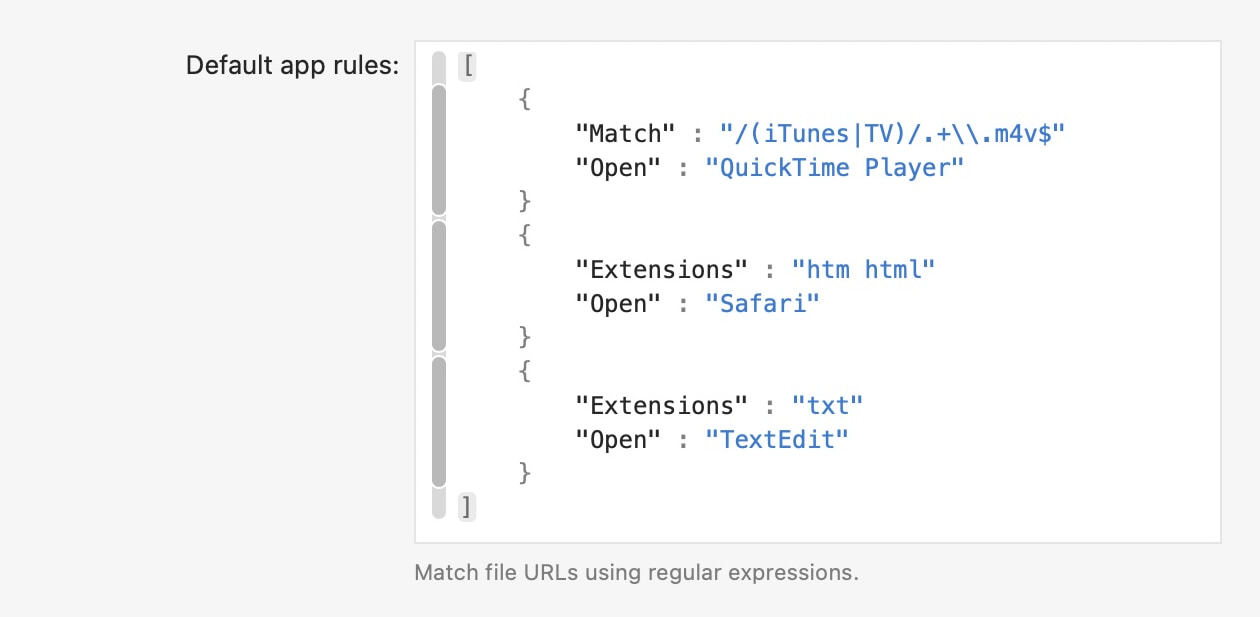
The rules in this section control what files are used to open what types of media files. However, Usher uses the macOS-provided default apps for media files it can't play, so you really shouldn't have to use this section. About the only reason you'd use it is if you have a type of media file that you want to open in a different app when you open it in Usher than you do when you open it from Finder.
If you did want to create a new rule, here's a simple (now redundant) example. The following rule would set a variety of movie types to open in VLC:
{
"Match" : "\\.(avi|flv|mpg|mpeg|mkv|wmv)$"
"Open" : "VLC"
}
You can create both "Match" (to match parts of your media files' URLs) or "Extensions" (match based on extensions) rules as seen in the above screenshot.
The "Match" rules use regular expressions, which you'll need for more complex rules, like the one above.
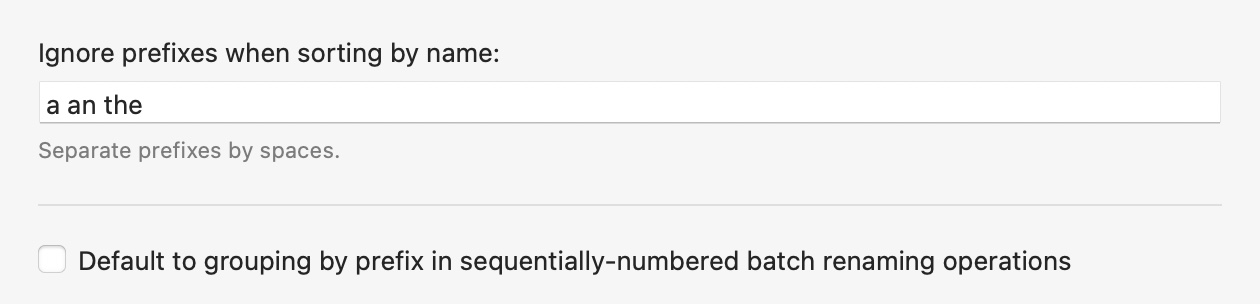
The Ignore prefixes when sorting option is fairly self explanatory: Anything listed here will be ignored when sorting your collection. If you'd rather that Usher paid attention to all of the prefixes, just remove the existing entries in the input box.
Even if you have Usher ignoring prefixes, you may want to use those prefixes when renaming media files using Usher's built-in batch renamer. (See the File section of the Menus chapter for more on the batch renamer.) If you enable Default to grouping by prefix in sequentially-numbered batch renaming operations, that's exactly what will happen—for that specific type of renaming.