

Name Mangler can be used for many file renaming purposes; many people use it to change the generic IMG_ (or whatever) prefix their camera applies to all photos. Another good use, though, is to clean up filenames—either to remove odd characters (which can happen with web-downloaded files), or to remove characters not allowed in other filesystems, such as NTFS. In today’s how-to, I’ll show you how to do both of those things with some not-too-complicated Name Mangler queries.
Name Mangler 3 includes two entries in its Presets menu—Dumb Down for Windows and Trim Whitespace—that can fix many filename issues. This blog post explains some methods to use when those menu items aren’t enough.
Removing odd characters
Let’s say you’ve downloaded some images from a picture sharing site, but they come down with badly-mangled names, like this:
Ocean%20at%Morning%20%2D%20Hawaii.jpg
Sunset%20over%20City%20%2D%20Denver.jpg
Snow%20on%Mount%20Hood%20%2D%20Oregon.jpg
The %20 is a space, and %2D is a hyphen; these values are URL encoded on certain web servers, to make sure they’re properly transmitted. But on your Mac, you’d rather have actual spaces and hyphens, obviously. You could convert these by using Name Mangler’s Find & Replace mode twice, once for each character, but that’s a pain. Instead, you can do repeated substitutions using Name Mangler’s Advanced mode. Here’s how.
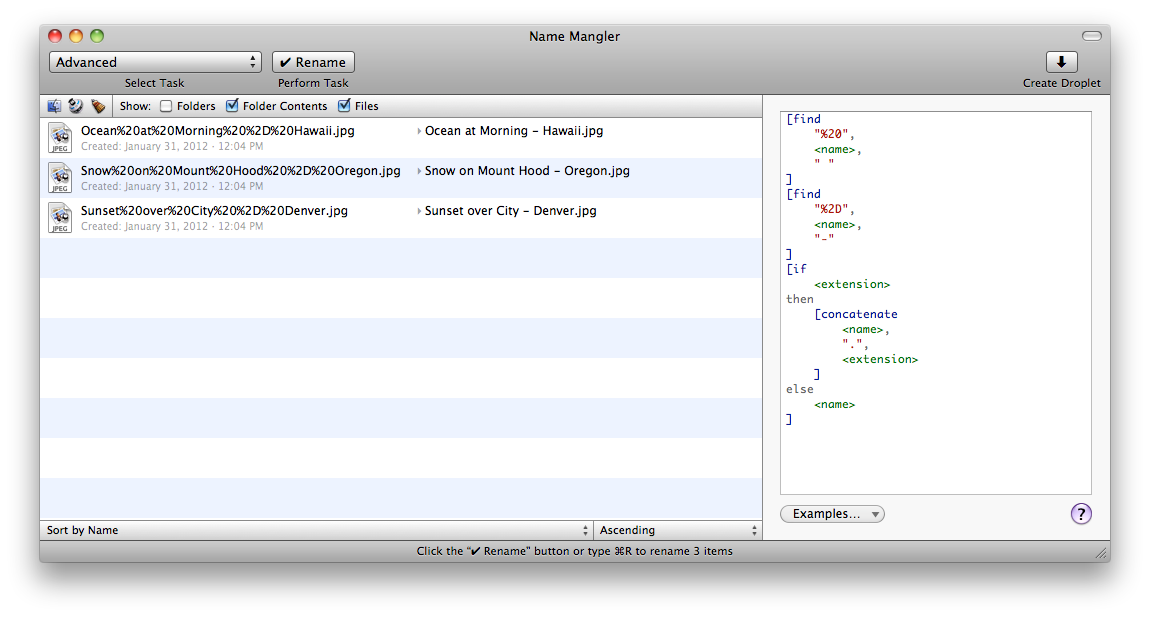
In Name Mangler, set the Select Task pop-up to Advanced, and drag in your (already backed up, just in case, right?) files from Finder. In the code box to the right of the file list, enter this code:
[find
    "%20",
    <name>,
    " "
]
[find
    "%2D",
    <name>,
    "-"
]
[if
    <extension>
then
    [concatenate
        <name>,
        ".",
        <extension>
    ]
else
    <name>
]
The code consists of two separate find statements, and one if statement. The find searches for the first term (%20, for instance) in the second term (<name> contains the filename), and replaces it with the third term (a space, in this case). You can add as many distinct find commands as you need; just make sure you enclose each in opening and closing square brackets. The if block is standard to most Advanced mode queries; all it does is append the file’s extension, if it has one.
Here’s how it looks in action (click on the image for the full-sized version):
If you do this often, consider saving your query as a droplet (Create Droplet in the toolbar), to give you simple access to the query again in the future.
Removing non-allowed characters
Sometimes you’ll need to move files between your Mac and other computers that may not be as lenient about what characters are allowed in filenames. The NTFS (used in Windows), for instance, doesn’t allow a number of characters that you can use on the Mac. Although there are many things one needs to look at when moving files across systems, Name Mangler can help remove the obvious problem characters.
For NTFS, the non-allowed characters are /\:*?"<>|, and you can get rid of all of these in one command, using Name Mangler’s ability to process regular expressions. As an example, consider these demo files:
|/slashes/\are/\beauty\|.jpg
another<weird>file.jpg
Some/weird\file*?"really<>weird.jpg
While you could build an advanced mode query to replace each character, one by one, regular expressions provide a much faster way. Launch Name Mangler, and (again, already backed up, right?) drag in your files to be renamed. Set the Select Task pop-up to Find and Replace, and check the “Query is a regular expression” box. In the Find box, enter this code:
[/\\:*?"<>|]
This looks vaguely like the list of characters to be found, with a couple of exceptions:
- The characters are grouped in square brackets, which tells the regular expression engine to find any occurrences of any of the listed characters within the filename. Put another way, it searches for slash or backslash or colon or asterisk, or etc. within the filename.
- There are two backslashes because the backslash has special significance in the regular expression engine. The backslash is normally used to force certain characters that the regular expression engine uses for certain operations to instead be interpreted as normal characters (see the Syntax section of the Wikipedia entry for more details). Because the backslash is also a special character, we need to use another backslash to tell the regular expression engine that it should read this as a normal backslash character.
In the Replace box, you can put whatever you like; if you leave it blank, the special characters will be removed completely. I prefer to use an underscore, which tends to provide a more-legible final filename. Here’s how it looks in action:
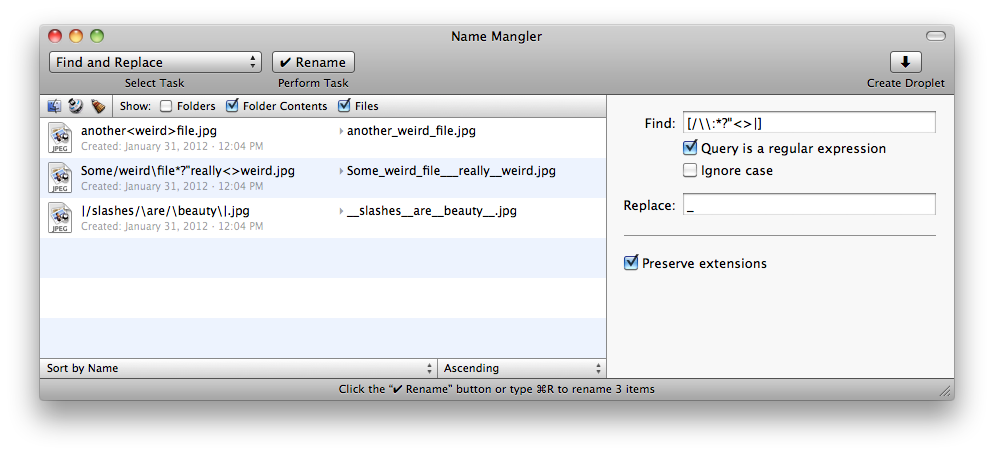
While this is nearly perfect, notice that two filenames wound up with multiple underscores—that’s because they had multiple non-allowed characters in a row, and each was removed and replaced with an underscore. If you’d prefer only a single underscore ever appearing, you can use a modified version of the regular expression in the Find box:
[/\\:*?"<>|_]+
The changes are the inclusion of an underscore within the square brackets, as well as a plus sign at the end. The plus sign tells the regular expression engine “find one or more occurrences of the preceding characters,” which gets rid of duplicate underscores (as groups of non-allowed characters will be treated as a single match, instead of multiple distinct matches).
The underscore within the brackets makes sure that if there are any underscores directly next to non-allowed characters in the original filename, they won’t result in two underscores (because the existing underscore will now be treated as part of the group of non-allowed characters, and replaced with an underscore).
Here’s how this version looks in action:
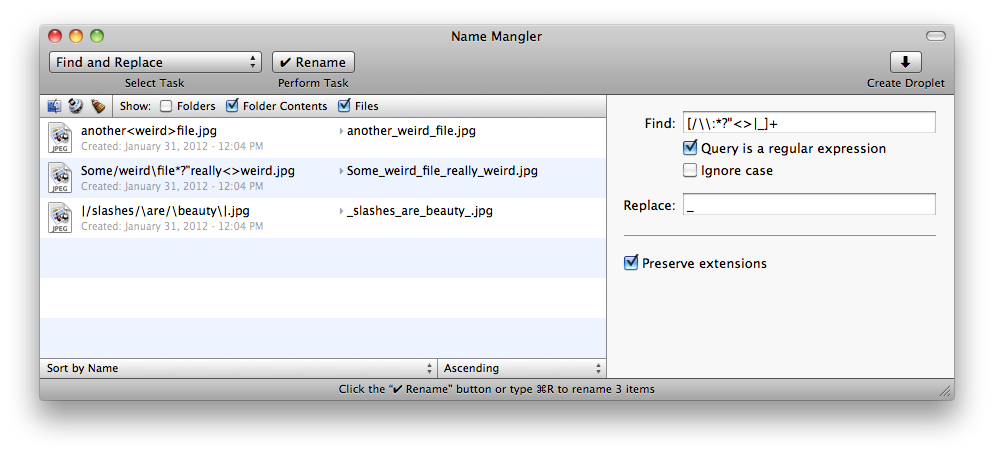
You can modify the characters in the square brackets to find other characters you’d like to remove, and of course, replace the underscore with any other character you like. If you change the replacement character to something other than an underscore, you’ll need to replace it in the Find box, too.
As with the removing odd characters example, if you do this type of renaming often, use the Create Droplet button to greatly simplify the process.
Terrific product and a great post. I’ve been using this post as an example to rename about 700 files and was wondering how to leverage the if then else functionality to convert a file like this:
[email protected]
into something like this:
2X_iconHouse.png
I’m soooo close but can’t quite get the if this then prepend that logic working. What am I missing?
Steven:
It is possible, but a bit involved. I’ve sent you an email with the solution; please reply via email if you need further assistance.
regards,
-rob.