

The Basics
Name Mangler is a tool to rename large numbers of files at a time—hundreds, thousands, even tens of thousands. It does this through a simple single window that provides access to powerful tools without resorting to a cluttered and complicated user interface.
Before beginning any renaming operation, there are two things you must do:
- Back up the files and folders you're renaming! Name Mangler is a powerful tool, but with that power comes the ability to make large-scale mistakes. One typo in your renaming commands could result in thousands of misnamed files. So please, make sure you've got a current backup before you attempt any mass renaming operation.
-
Populate Name Mangler's file list. In order to rename files, Name Mangler has to know which files to rename. You can get your list of files into Name Mangler in two ways:
- Use the File → Populate or File → Populate With Finder Selection (if you have the files selected in Finder) menu items.
- Select the files in Finder, and then drag and drop them onto Name Mangler's window.
You should not try to rename files and/or folders that reside on mirrored cloud drives, i.e. Dropbox, Copy, etc. Why not? Because these services are mirrors, when you rename a file, you may find that the original isn't deleted (because it's been mirrored back from the cloud). To rename files on a shared cloud drive, first copy the folder to your local Mac, rename, then copy back to the cloud drive. Name Mangler will warn you if you attempt to rename files on a cloud drive.
Once you've backed up your files, and populated Name Mangler's window, you're ready to start the renaming operation. Before you do so, however, there are a couple of things you need to be aware of: filename extension and slashes in filenames.
After reading those sections, continue on to two examples, one quite simple and the other a bit more complex.
Filename Extensions
Extensions are the strings of letters (typically three) that follow a file's name, and appear after a dot separator: Grand Canyon Vista.jpg or Letter to Mary.txt, for example. In macOS, these filename extensions are very important, as they control which programs will open which files. Remove the extension from an image file, for instance, and suddenly Finder may think it's a Unix executable file.
If you ever see that a number of your files have turned into 'Unix executable files' after using Name Mangler, don't panic: they've simply lost their extensions. Use Name Mangler again to add the extensions back, and the files will be fine.
Because of the importance of extensions, Name Mangler tries to protect you from accidentally removing them during renaming operations. It does this via this checkbox, which you'll find on actions that can affect an extension, such as Find and Replace or Compose:

Make sure that box is checked whenever you see it—it is checked by default—and you'll never lose your filename extensions during a rename operation. If you ever try to do a rename operation without this box checked, though, you'll see this dialog:
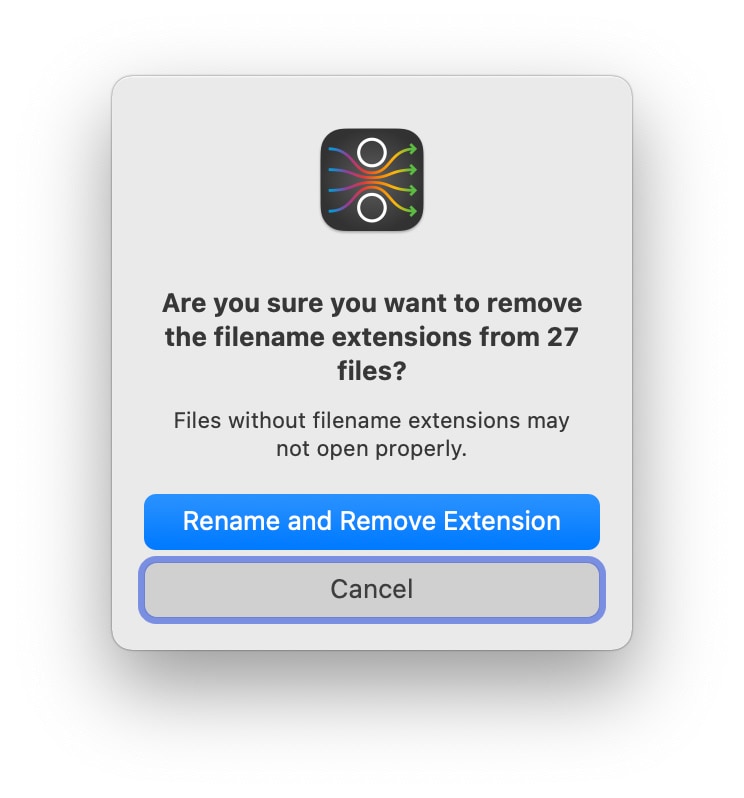
If you click Cancel, then your renaming action will be canceled, and you'll return to the Name Mangler interface. If you select Rename and Remove Extension, then the renaming action will occur, and the extensions will be removed. Please be certain this is what you want to do before proceeding.
Slashes in Filenames
The forward slash character has a special role in macOS—it's used as a path separator (i.e. /Users/your_user/Library) on the Unix side of the operating system. In the Finder and AppleScript, macOS uses the colon as a path separator.
Generally speaking, you should avoid using slashes or colons in filenames, due to their roles as path separators in different parts of macOS.
If you do need to rename files to either add or remove a forward slash character, however, it's generally possible in Name Mangler: simply type the slash as you would any other character. (The colon character is more restricted than the forward slash; as with Finder, Name Mangler will convert a typed colon to a forward slash.)
Example 1: A simple renaming operation
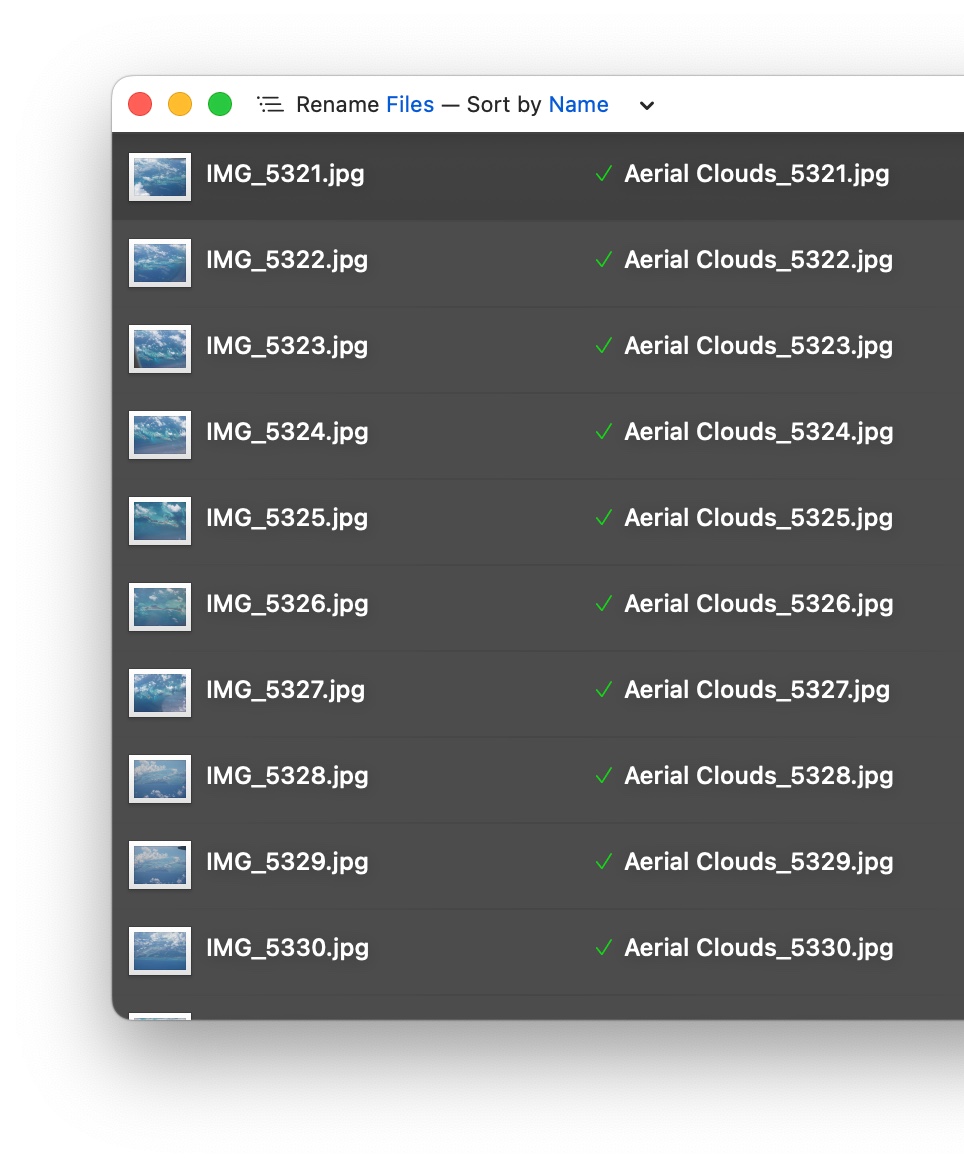
Let's say you've got a folder of 10 files you'd like to rename. The current filename structure looks like this:
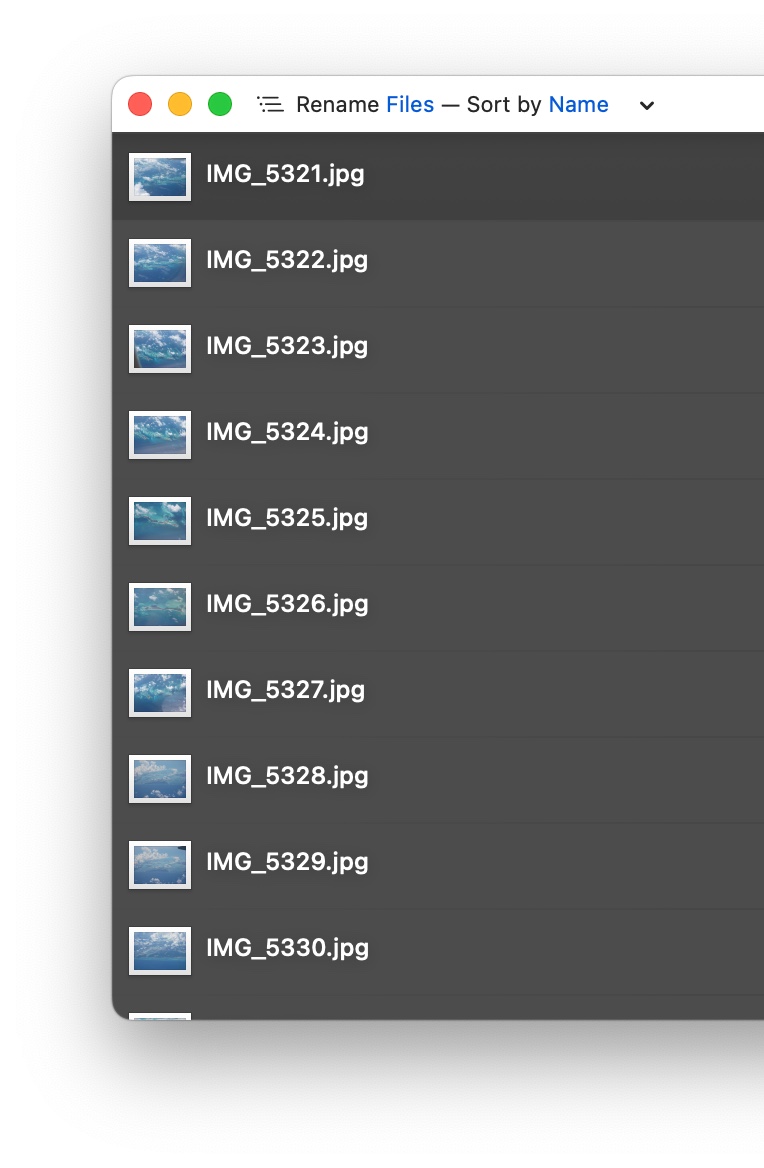
All you want to do to these files is change the IMG_ to Aerial Clouds_.
After backing up your files (you remembered that step, right?) and populating Name Mangler's file list, it's time to choose a renaming action to use for this task. Click the pop-up menu at the right-hand side of Name Mangler's window to see the choices:
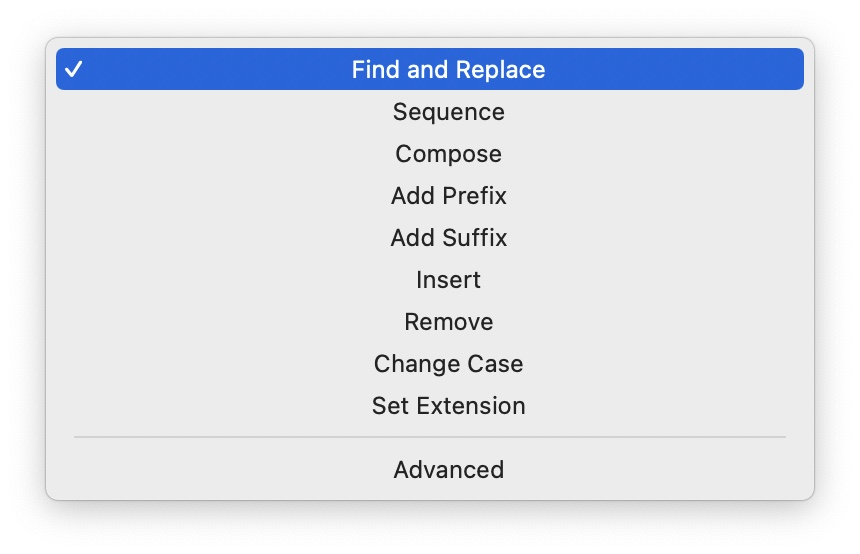
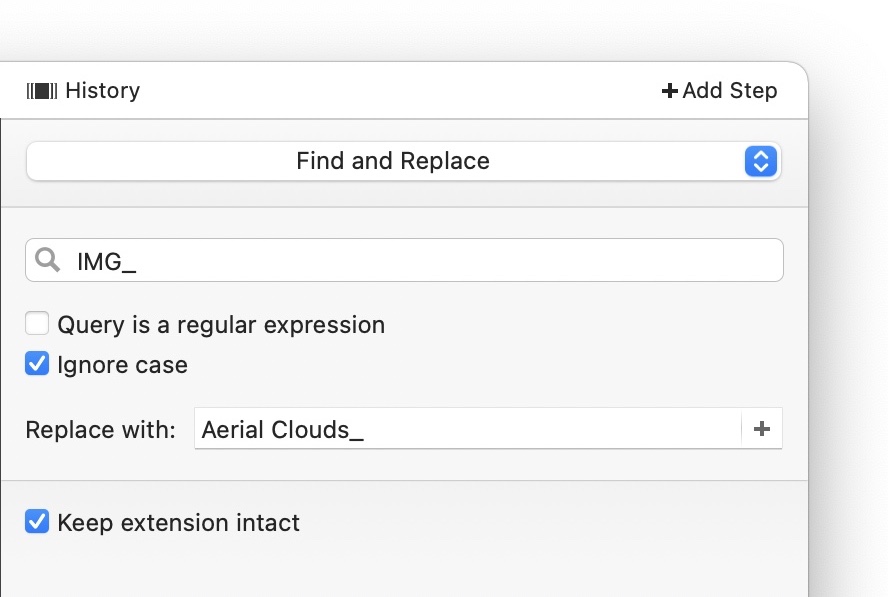
You can read more about each of these choices in the Renaming Actions section of help. For this simple example, select Find and Replace, because that's exactly what needs to be done. With Find and Replace selected, you'll see the options for that action immediately below the menu:
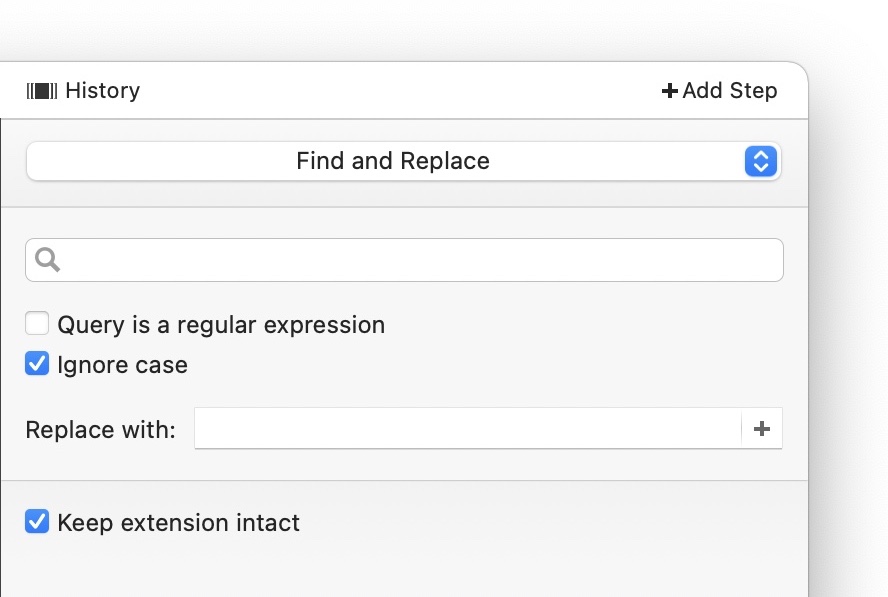
Click or tab into the Find field (the one with the magnifying glass) and type IMG_. Leave the two checkboxes that follow as is, and then type Aerial Clouds_; leave the 'Keep extension intact' checkbox checked. When you're done, the right portion of the screen should look like this:
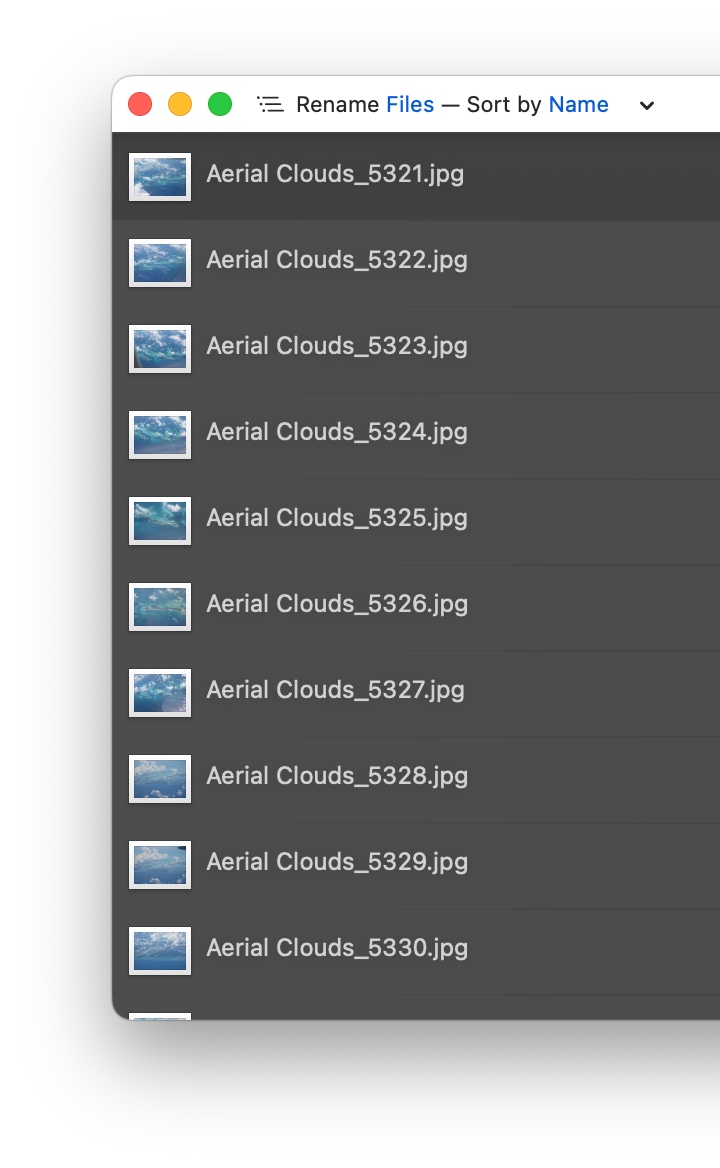
The left side of the window will show you the before-and-after view of your filenames; use this view to ensure that the renaming operation is going to do exactly what you want it to do:
The original filename is on the left, and the proposed new name is on the right. A green checkmark means "all is good" and the file will be renamed. (For much more about the information presented in Name Mangler's file list area, read the View File Information section of help.)
Once you're sure that the after names match what you want, click the Rename 10 Files… button, and you're done:
Example 2: A more complex renaming operation
For this example, let's start with the same set of files as in the simple example, as seen here:
As with the simple example, we'd like to replace IMG_> with Aerial Clouds_. But we'd also like to clean up the weird image numbering, and add the year the photos were taken. To pull this off, we'll create a four-step renaming task.
Step One
The first step is the same as in the simple example, so start by setting the renaming type to Find and Replace, then enter IMG_ in the search box, and Aerial Clouds_ in the Replace box:
Instead of clicking the Rename button at this point, though, click the + Add Step button at the top right of the Name Mangler window. This will add a second rename action to the window, below the existing Find and Rename.
Step Two
Click the newly-added action's pop-up menu, and change the action to Remove. In the Remove box's settings, change Remove to 4, set Start at index to 1 (for the first character), and change Count from the pop-up to end:
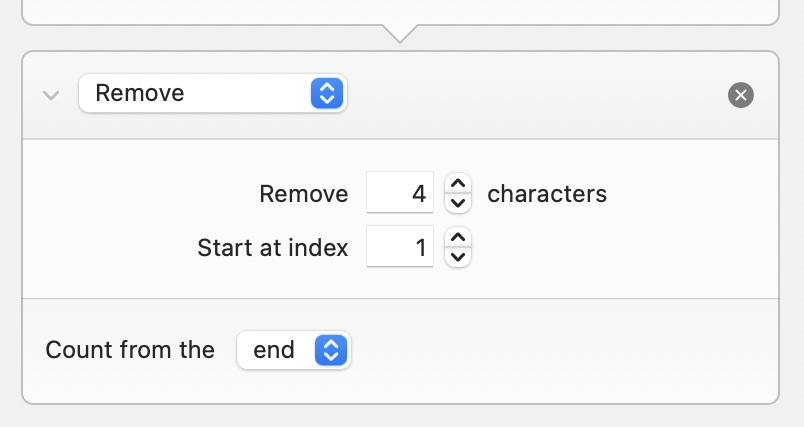
This removes the last four characters—the image numbers—from the filename. The problem with doing this is that all the filenames are now identical—and you can tell there's a problem by looking at the file list area, where it should be very obvious what the problem is:
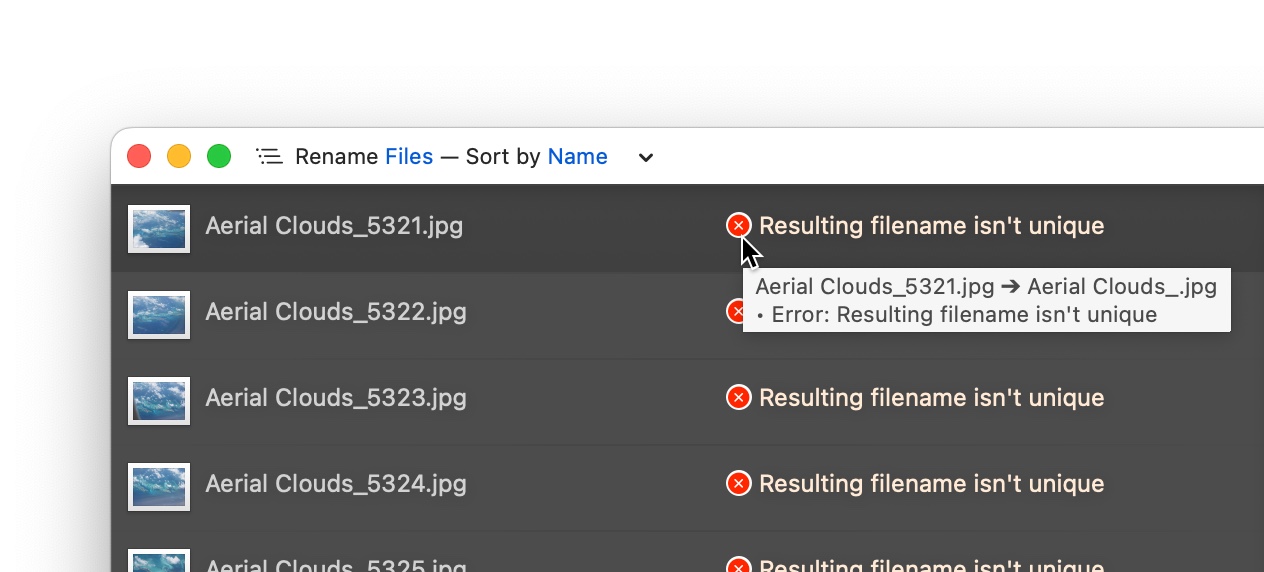
As seen with the first file, you can hover over the red 'x' for additional information; in this case, that's the new filename that wouldn't have been unique.
We'll solve this problem by adding a new sequence number at the end of the filename. But before that step, we're going to add the year these photos were taken to their filenames.
Step Three
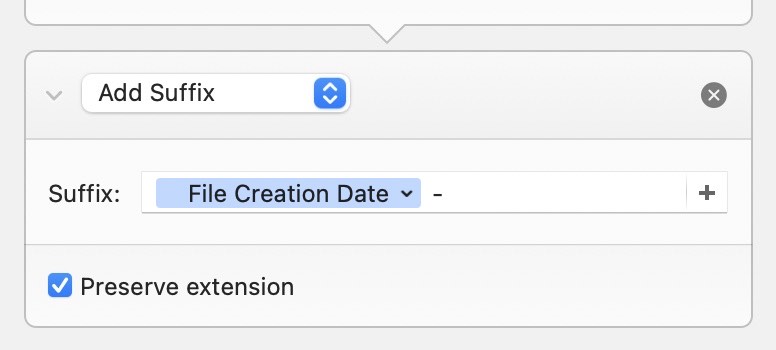
Click the + Add Step button again, and set the newly-added step's pop-up menu to Add Suffix.
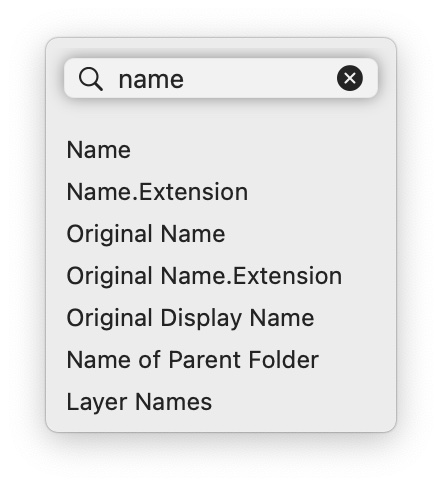
In the Add Suffix action's settings, click on the plus sign at the far right of the Suffix box. This will open Name Mangler's metadata browser, which is where you'll find things like file creation date, image dimensions, and much more. For a full explanation of Name Mangler's metadata support, please read the Using Metadata section of help.)
The metadata browser appears as a drop-down window, with a small text entry box. As you type in the box, Name Mangler will show matching metadata fields (or you can browse them by clicking into any of the sections below the input box). Type creat into the entry box, and you'll see a number of matches:
`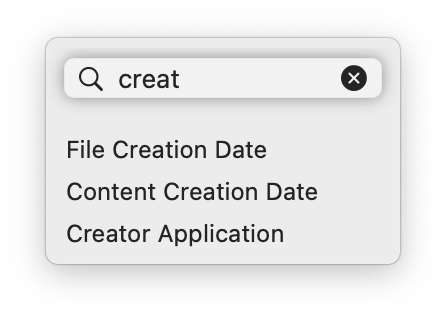
Press the down arrow once to select the File and press Enter (or just click it with the mouse). When you do, you'll see your selected metadata field appear in the Suffix box, highlighted to make it clear it's not normal text. (You can also add text to the Suffix field; I've added "space hyphen space," to help separate the year from what comes next.)
And at the right edge of that highlighted area is a small downwards facing arrow. When you see one of these, it's Name Mangler's way of letting you know there are some options available for the chosen metadata. Click the arrow, and you'll see these choices for formatting the creation date:
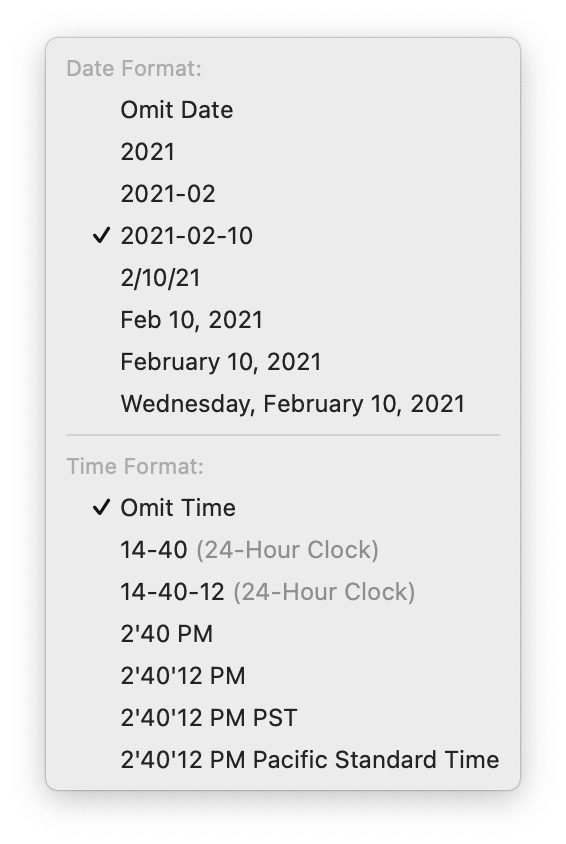
We just want the year, so select the current year-only ("2021" in this case) in the Date Format section of the window, and Omit Time (the default) in the Time Format section. (The file list area will still show duplicate file text, because all of these photos were taken in 2008. So our final step will be to make the filenames unique).
Step Four
Click the + Add Step button once more, and this time, select Sequence from the pop-up menu. The Sequence action has a lot of options, but we're going to use the default for all but one: The Prefix box. By default, Sequence doesn't use the existing filename in any way; it replaces the entire filename with a sequence number.
But that's easily changed: Click the plus sign in the Prefix box (because we want to add information before the sequence number) to bring up the metadata browser again, and this time, type Nam, and you'll see these matches:
Select Name, and as before, it'll appear with a highlight (though it doesn't have a down arrow, as there are no formatting options for Name):

As the last step, type "space hyphen space" after the Name tag (as seen in the above screenshot); this will separate the sequence number from the rest of the filename.
All done!
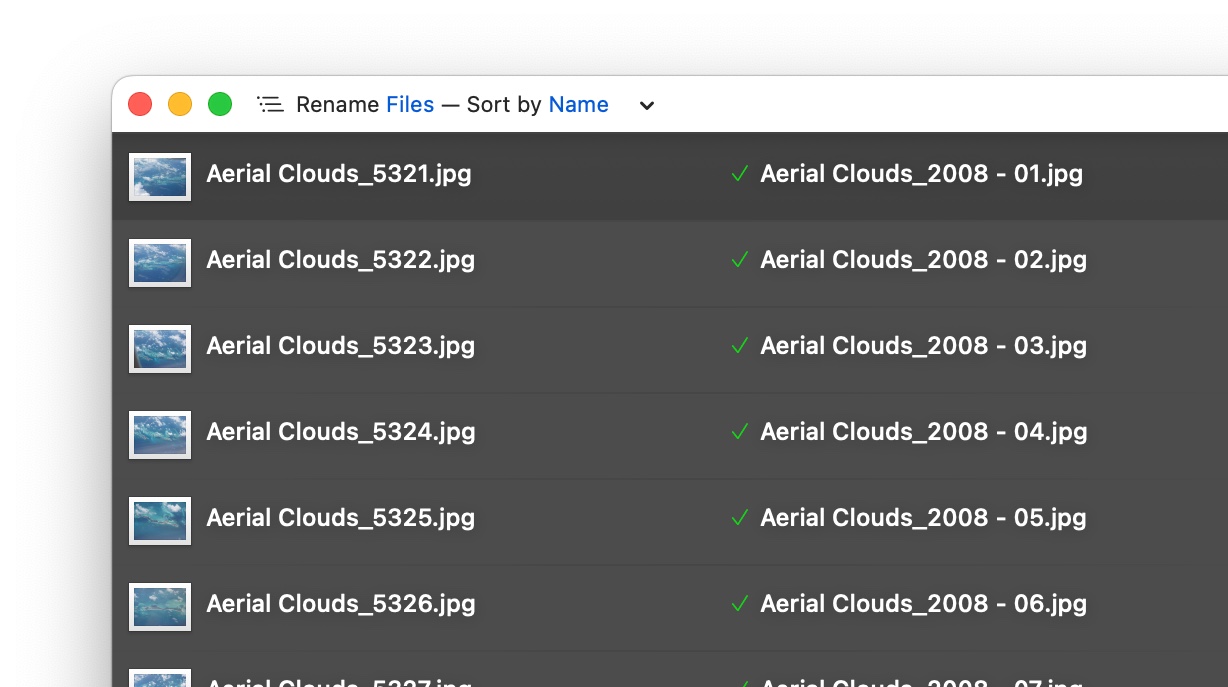
As soon as you complete the Prefix box, you're done—you'll notice that your filenames are all unique (thanks to the sequence number) and reflect all your other changes:
Informational Messages
Name Mangler 3 is really fast. It's so fast that, unless you're renaming thousands of files, you may not even notice that it's renamed your files (this is especially true if you've disabled the "are you sure?" alert that appears before renaming). Because it's doubtful you'd ever need or want to rename the same files twice in a row using the exact same renaming scheme, if you try you'll see this warning:
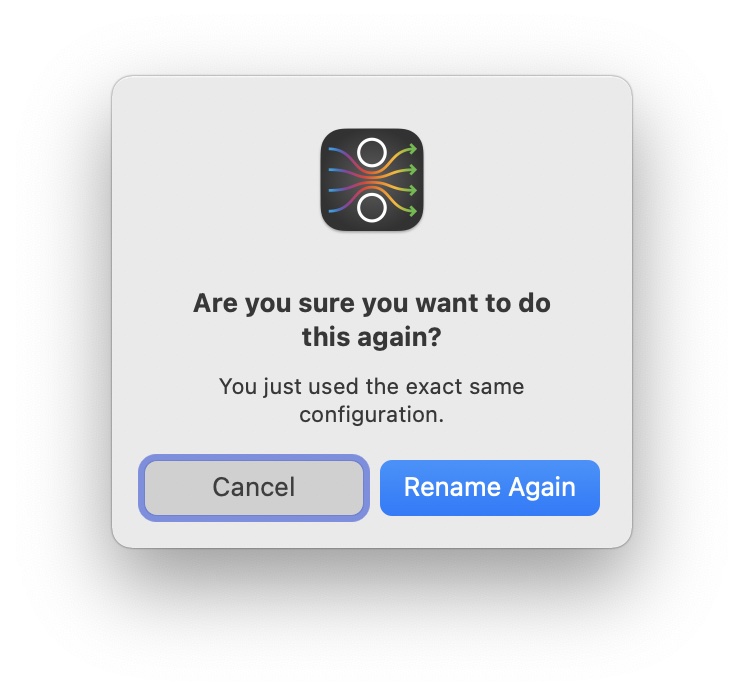
If, for some reason, you do want to use the same renaming again, just click Rename Again. Otherwise, click Cancel to return to the Name Mangler interface.
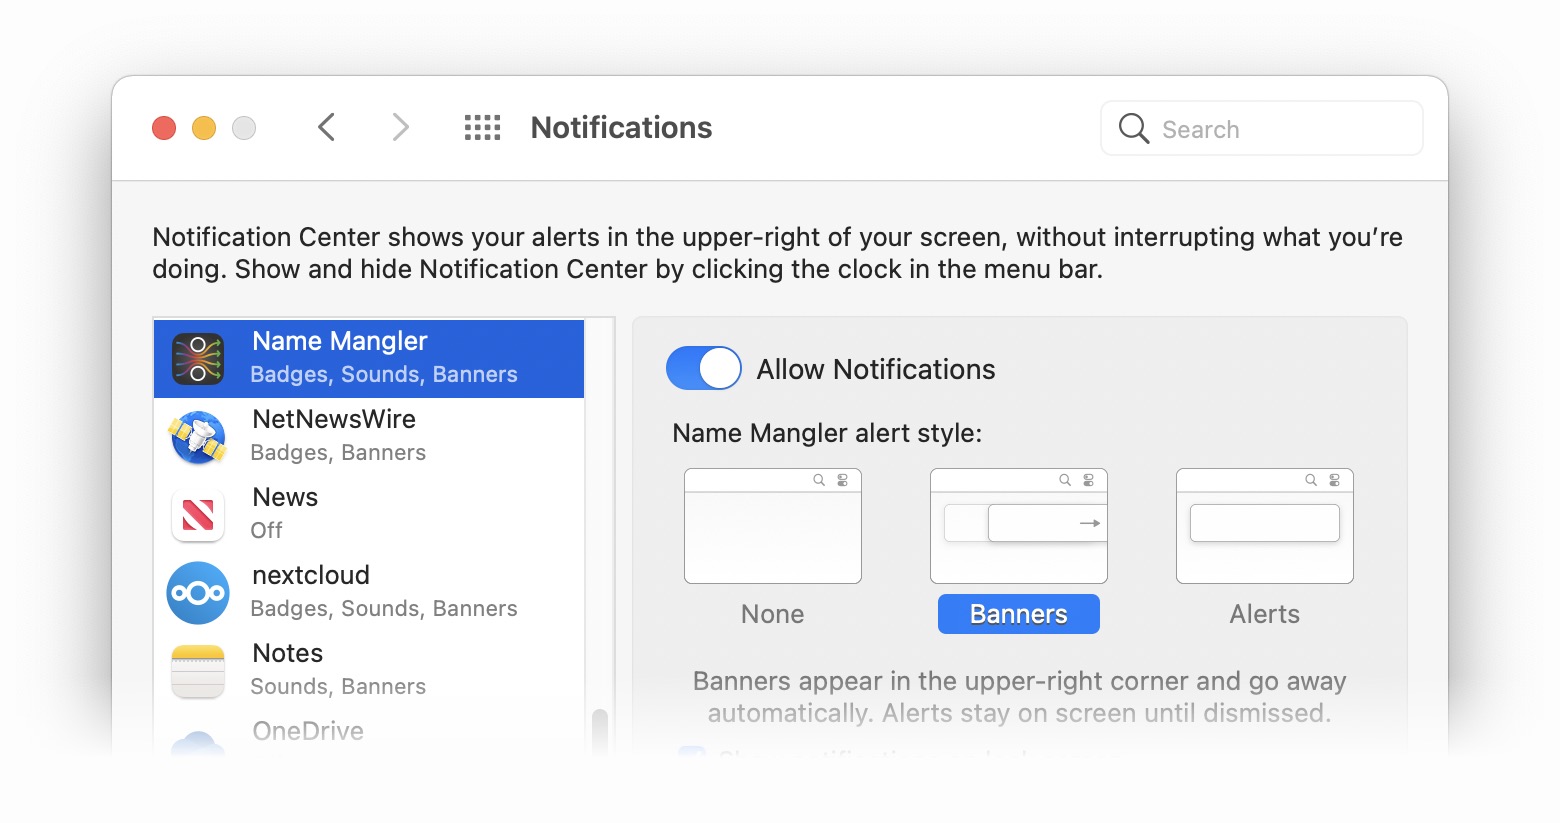
For those times when you are renaming thousands (or tens or hundreds of thousands) of files, Name Mangler includes support for Notification Center. Go ahead an switch to another app while renaming, and Name Mangler will let you know when your renaming task is done:
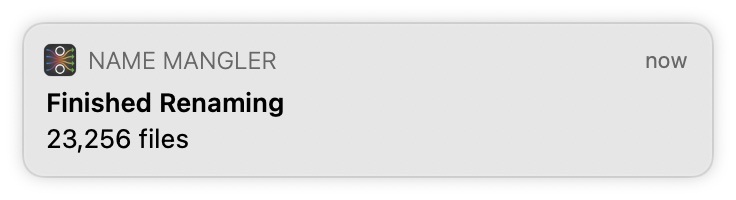
(You will only receive this alert if Name Mangler is in the background; if it's in the foreground, alerts are suppressed by macOS.)
To control how Name Mangler uses Notifications, open System Settings, and switch to the Notifications panel. There you'll find an entry for Name Mangler (assuming you've performed at least one renaming task) that lets you control how (or even if) Name Mangler will notify you:
If you don't see an entry for Name Mangler in the Notifications panel, the fix is simple: use Name Mangler to rename something, and then it should appear. (Applications appear here only after generating at least one notification.)