

Note: We have found a much simpler way to implement Quick Actions, via Apple’s Shortcuts app. See the linked post to download the template, make a few simple edits, and you’ll be up and running with Quick Actions.
You are welcome to use the following Automator solution, which still works fine, but the Shortcuts solution is easier, and offers more ways to invoke the Quick Action.
As of today’s Name Mangler update, sharp-eyed users will notice that the File → Create Context Menu Service menu item has vanished. Unfortunately, due to recent changes in what kinds of things Apple allows apps that create Services to do, we had to remove the feature. (Basically, the only thing we’d be able to include would be a set of standard pre-defined Services, and that’s not very useful for an app that renames files.) So that’s the bad news.
The good news is that there’s a relatively easy workaround that will let you create Quick Actions using Automator. These will function as Services did before, though via the Quick Actions menu instead of the Services menu.
The process of creating Quick Actions for Name Mangler isn’t overly complicated, and we have several different ways for you to learn how to complete the task.
We have a video for those who learn best by observing, and a step-by-step write-up for those who learn best by reading. Also, at the end, you’ll find a “just make it work for me!” section that provides a nearly ready-to-go Quick Action that you can duplicate and edit as needed. (However, knowing how to create Name Mangler Quick Actions is important, so we recommend watching the video and/or reading the instructions as well).
If you have any questions on any of the following instructions, you can find us on Discord, or you can file a support ticket; we can definitely help you get your Quick Actions working.
The video
If you prefer video instructions, you can watch the video right here, or head on over to YouTube for larger-format viewing options.
The video demonstrates the entire process from start to finish. The video does reference a required AppleScript, which you’ll find—along with full text instructions for those who prefer reading to viewing—just down below.
The required AppleScript
Here’s the AppleScript. This is the piece of code you’ll need to insert—with one simple edit—in each Quick Action you create in Automator.
Click anywhere in the box to copy the code
try
-- In the next code line, replace [Droplet Name]
-- with the name of your droplet (but leave the quotes!).
-- Please launch the droplet manually once before creating a service.
set theDropletName to "[Droplet Name]"
-- Do not edit anything below this line
set theQuotedPaths to ""
repeat with aFile in theFiles
set theQuotedPaths to theQuotedPaths & " " & quoted form of POSIX path of aFile
end repeat
do shell script "open -a" & quoted form of theDropletName & theQuotedPaths
on error theError
display dialog theError
end try
end run
For now, click the box to copy the code to your clipboard, as you’ll be using it in your first Quick Action. (Once you have one in place, creating additional Quick Actions is much easier.)
The written how-to
How exactly do you create a new Quick Action for Name Mangler? The basic process is:
- Set up your renaming action in Name Mangler
- Save it as a Droplet to an Applications folder, and launch it once
- Create a new Quick Action using Automator
- Insert a Run AppleScript action, paste the above script, and make one edit
- Save the Quick Action and quit Automator
- Test your Quick Action
- Make more Quick Actions…more quickly!
Here’s a more detailed look at each of those steps, with some call-outs for a couple of things uses of the App Store version of Name Mangler will need to do.
1: Set up your renaming action in Name Mangler
This one’s pretty self-explanatory; in Name Mangler, set up the renaming action you’d like to use as a Quick Action. You can use one or more actions; here’s a simple example with two actions:

Just remember that Quick Actions aren’t interactive, so whatever settings you choose for your action(s) are the ones that will be applied.
2: Save it as a Droplet to an Applications folder, and launch it once
Important: Before saving your droplet, you may want to create an Applications folder at the top-level of your user’s folder—the same level where you see the Documents, Downloads, Movies, etc. folders. You don’t have to do this, but it will help keep your Mac more organized. That’s because the Quick Services you’re going to create must be saved into a folder that the OS recognizes as an official Applications folder.
You could save your Quick Services to the general Applications folder, but saving them to an Applications folder in your home folder will make them easier to find and manage.

To create this folder, open a Finder window, and navigate to your home folder, so you can see the above-named folders. Select File → New Folder, and name the new folder Applications. The OS will automatically apply the “this is an applications folder” icon overlay, as seen at right.
After creating the folder, switch back to Name Mangler, and save your droplet with the File → Create Droplet menu item. The name you give it is mostly irrelevant, as you won’t be running this droplet (your Quick Service will). But descriptive names are always useful for figuring out what something might do when you see it on your disk in the future.
You must save your droplets to either the top-level Applications folder, or to the Applications folder in your user’s folder.
After saving, navigate to the Applications folder where you stored the droplet, and launch it once, without any files selected. Name Mangler will open; just quit it after it opens.
App Store users: When you try to launch your just-saved droplet, you’ll see the alert on the left side of the below image. Despite Apple’s dire-sounding language, there is nothing to worry about. We store your configuration right within the droplet, so droplets can be shared among users and Macs, but doing so breaks the droplet’s code signature, which makes macOS distrust the droplet. And since the App Store build is sandboxed, we can’t suppress the dialog.
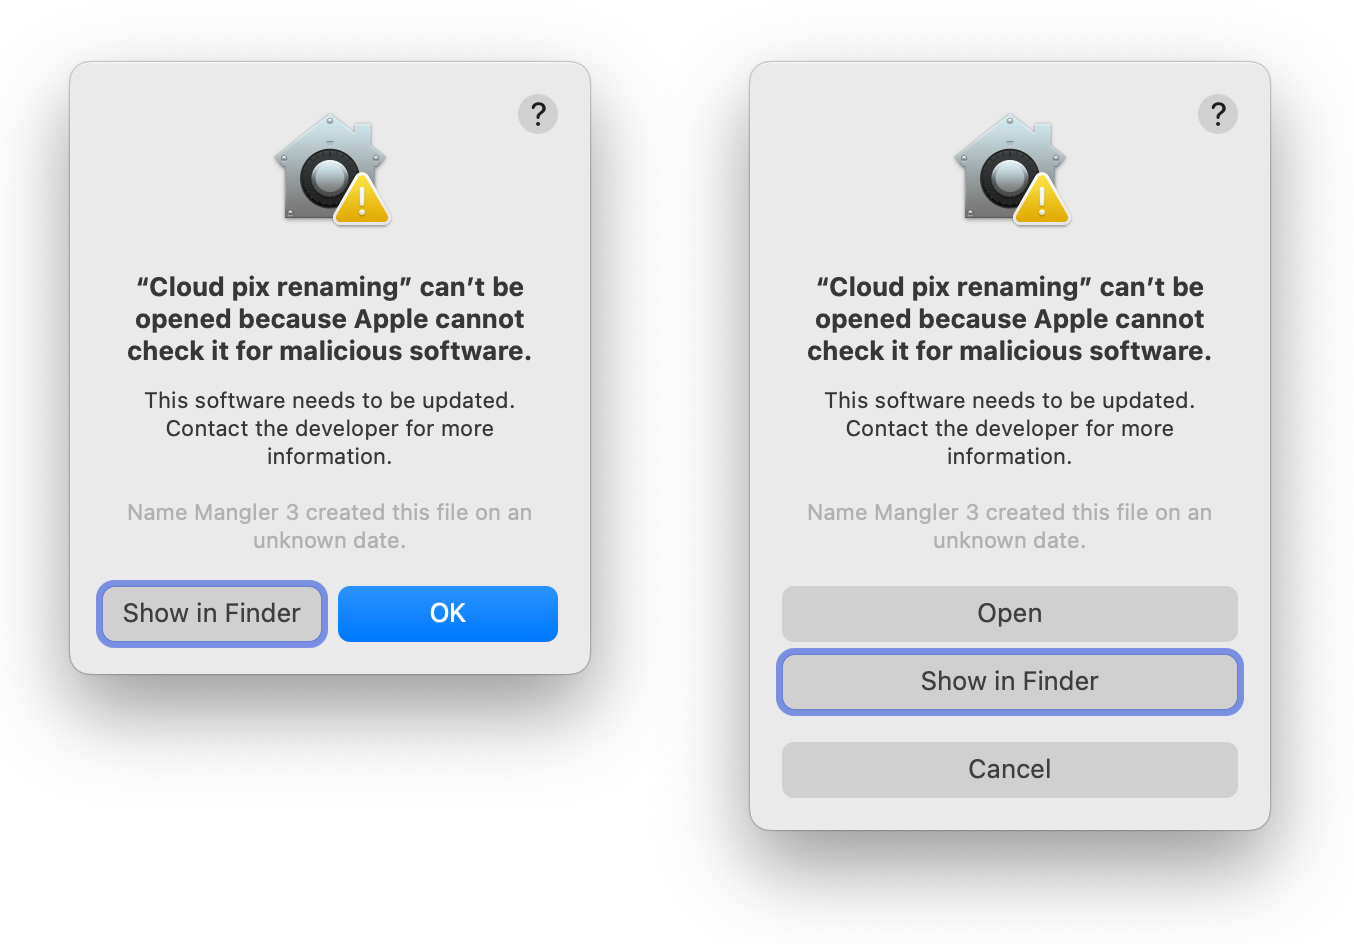
Thankfully, the fix is simple if a bit annoying: Right- or Control-click on the droplet and select Open. While this won’t actually fix things, it will get you a second dire-sounding alert, as seen on the right of the above image.
Click the Open button on that dialog, and Name Mangler will finally open and show you your droplet; you can then quit Name Mangler.
This “launch once” step is required as it registers the droplet as an application with macOS, which enables it to be used in a Quick Service.
3: Create a new Quick Action in Automator
Launch Automator, and select Quick Action from the document chooser:
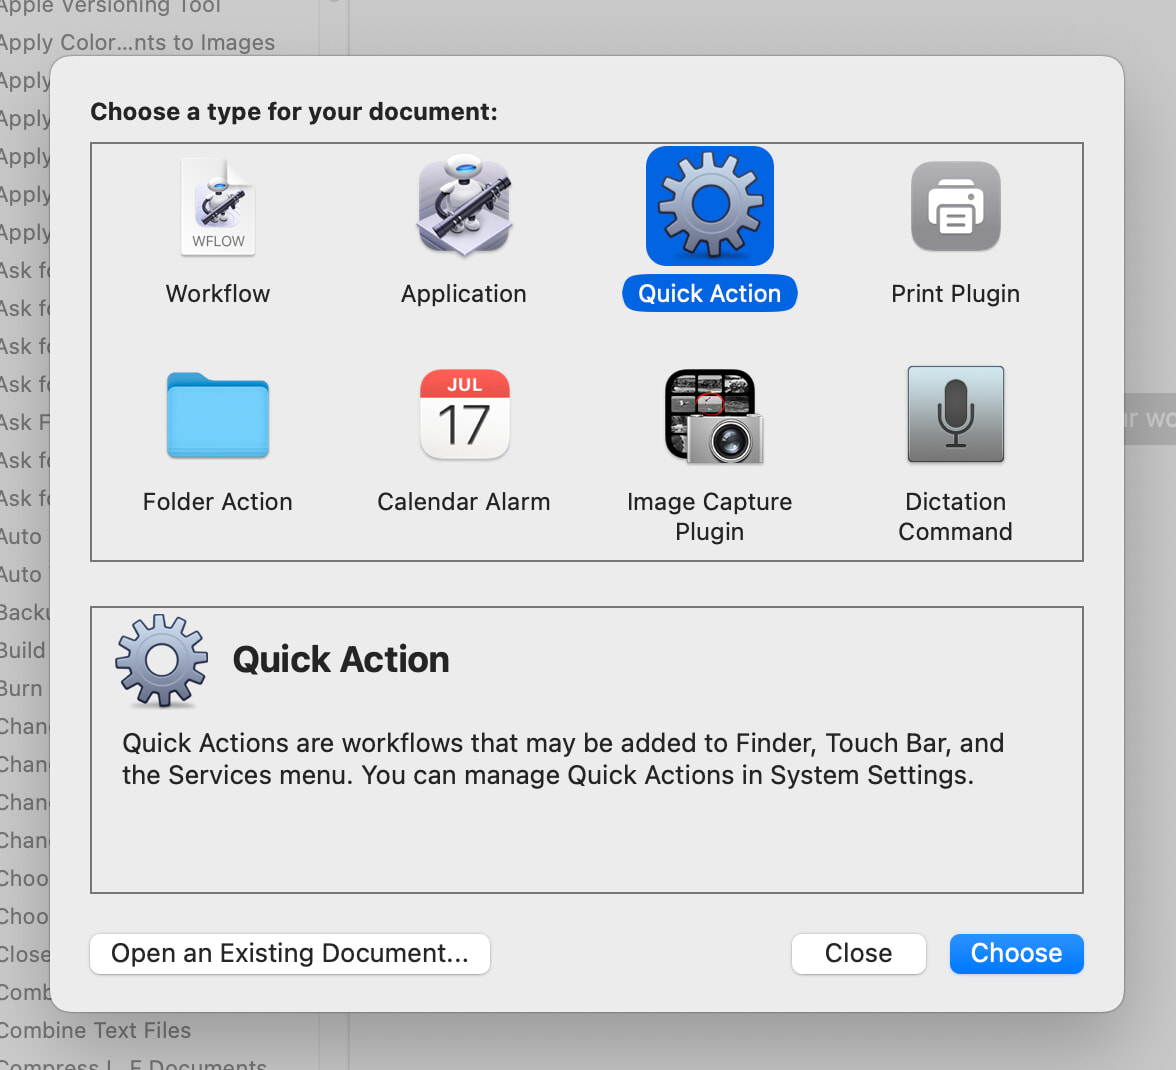
If the document chooser doesn’t appear, select File → New to make it show up. Click Choose to create a new Quick Action.
When the Automator window opens for your new Quick Action, you’ll see that it’s got some information prefilled at the top of the right-hand column. Change the “Workflow receives current” pop-up to “files or folders,” and the “in” pop-up next to it to “Finder.” When done, it should look like this:
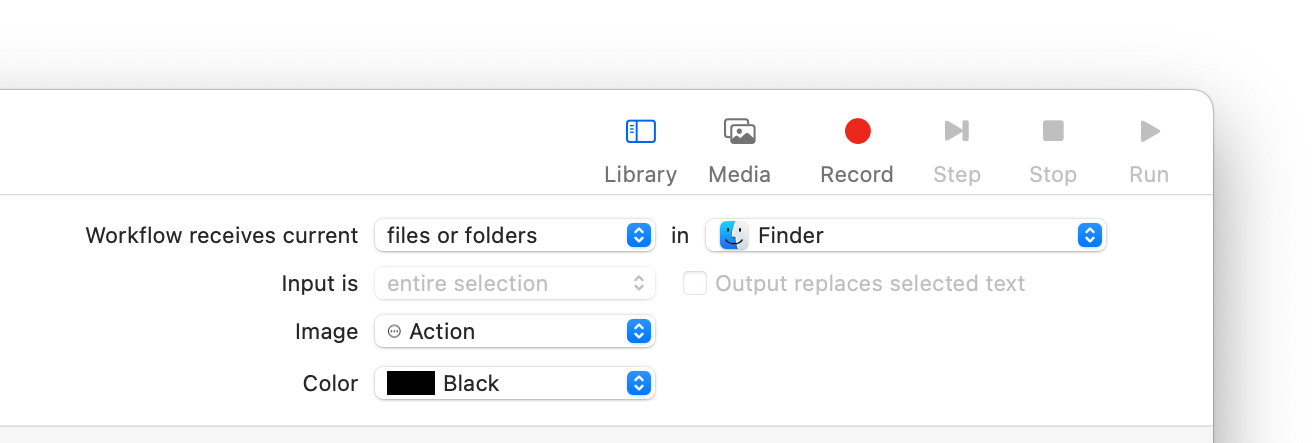
You can also change the Image and Color pop-ups if you wish.
4: Insert a Run AppleScript action, paste the above script, and make one edit
In the search box at the top of the left-hand column, type AppleScript, and then drag the Run AppleScript action from the left-hand column into the right-hand column. The AppleScript will have some default text; select it all and delete it, then copy-and-paste the AppleScript from above, and click the hammer icon to make sure it compiles without errors.
Important: Before doing anything else, edit this line of the script:
set theDropletName to "[Droplet Name]"
Replace [Droplet Name] (just that, leave the quotes in place) with the name you gave to the droplet you created in step two. If you forget this step, your Quick Action won’t do anything useful.
5: Save the Quick Action and quit Automator
Once that’s done, select File > Save, and save your quick action. The name you choose here is one you’ll see—every time you look at the Quick Actions contextual menu—so choose wisely! You may want to use a common prefix (NM or whatever) on all your Name Mangler quick actions, so that they sort together in the menu.
You can now quit Automator.
6: Test your Quick Action
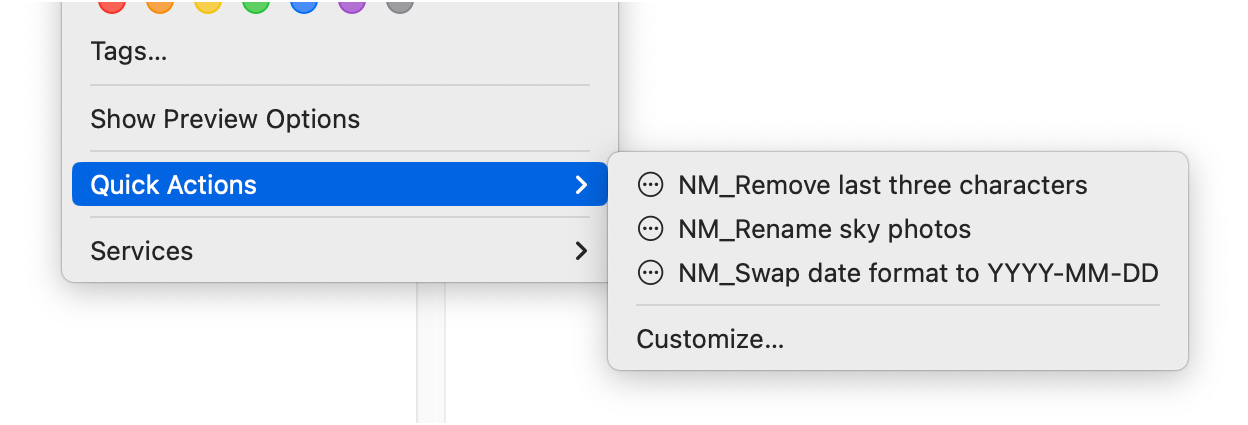
In Finder, duplicate a few files that will be affected by your Quick Action, so you can test in safety. Select those files, right- or Control-click, and select Quick Action → Name of your Quick Action to test it out.
App Store users: As the App Store version of Name Mangler is a sandboxed app, you may have to unlock the folder the files are located in, if it hasn’t been previously unlocked. You should only need to do this once per folder. (This is the same unlocking you may occasionally have to do while doing normal renaming in Name Mangler.)
Assuming you’ve set everything up properly, you should find your files renamed in short order. Pretty slick, isn’t it? The good news is that if you like how well Name Mangler’s Quick Actions work, it’s incredibly easy to set up more…
Note: If you’d ever like to verify that a saved Quick Action is going to do what you think it should do, launch Name Mangler first, then run the Quick Action. Name Mangler will populate with the list of files to be renamed, and with the Quick Action’s renaming steps loaded in. If everything looks good, just click the Rename button.
7: Make more Quick Actions…more quickly!
Once you’ve got a functional Quick Action, the process of creating more is much simpler. Just do the following:
- Create a new droplet in Name Mangler, set up with the actions for the new Quick Action.
- Save the new droplet to an Applications folder. Remember to launch it once!
- In Finder, navigate to your user’s Library → Services folder. This is where all your Quick Actions will be found.
- Select an existing Quick Action and duplicate it (⌘-D). Change its name to match your new droplet’s functionality.
- Right- or Control-click on the duplicated file and select Open With → Automator (not Automator Installer!).
- Edit the droplet name to match the name you gave to your new droplet, then save the Quick Action.
That’s all there is to it—your new Quick Action is ready to go.
Just get it done for me!
Because each Quick Action needs to be customized for your particular renaming needs, we can’t do the entire process for you. But we can give you a great head start, with this downloadable general Name Mangler Quick Action. Here’s how to use it to easily create new Quick Actions:
- Create a droplet in Name Mangler set up as you need it to be for your renaming task. See the video or written instructions above if you need more help with that task.
- Make sure you save the droplet to an established Applications folder, and then launch it one time. Again, see the video or written instructions for more help with that if needed.
- Download the linked file above and expand the .zip archive.
- Right- or Control-click—do not double-click—the resulting “Name Mangler Quick Action – EDIT FIRST!.workflow” (you may not see the extension depending on your macOS settings) file, and select Open With → Automator (not Automator Installer!).
- When Automator opens, find and edit the line that reads set theDropletName to "[Droplet Name]". Replace [Droplet Name] (remove the brackets, but leave the quotes in place!) with the name of the droplet you created earlier.
- Hold down the Option key, then select File → Save As… from Automator’s menu. You’ll see a rename box; the name you enter here is the one you’ll see in the Quick Action menu, so choose wisely.
- Click Save and you’re done.
For future Quick Actions, repeat the above steps (leaving out the download and expand bits, obviously).
Utterly lost me – I used to use services all the time but I’m not a programmer. I’ve tried to use scripts and other options on Mac OS and they have never worked. I’m not even going to try to create droplet or quick action using automater, based on so many failed attempts over the years.
Appreciate it’s out of your hands, but NM is now much hobbled compared to previous usefulness…
Thanks for making it work for others, like I said, it’s just not going to work for me.
I’m not a programmer either (Peter, our founder, does all that work :)). This process really isn’t overly complicated, and you can make it even simpler by just downloading the finished Quick Action at the end (the “Just get it done for me” section). Then you just have to follow those instructions; duplicate the download each time to make new Quick Actions.
If that’s still too complicated, unfortunately the changes that Apple has put in place make it impossible for us to make it any easier :(.
-rob.
Worked flawlessly – 10 minutes invested now, and non-interrupted workflow in the future for efficient renaming. Thanks!
Sorry – didn’t see the responses. Tried to follow the instructions and got nowhere in a hurry. Whatever “script” I produced did nothing. I found a copy of 3.8 on a backup drive and have reverted to that. At some point in time I suspect I will have no choice in “updating” at which point I’ll look around for another app.
Appreciate this is a situation forced upon you by Apple but there has to be an easier way to maintain functionality, surely.
Presume (haven’t looked) the Droplet option is also gone? It’s all a shame, been a long time user of NM but I can see the writing on the wall
thanks anyways!
“Appreciate this is a situation forced upon you by Apple but there has to be an easier way to maintain functionality, surely.”
Do you honestly believe that if there were a simpler, better solution available we wouldn’t have implemented it? We looked at all the solutions available, and this was the *only one* that met our requirements of producing a solution that worked as well as our previous version did.
“Presume (haven’t looked) the Droplet option is also gone?”
The above statement seems to say you didn’t read this article at all. Why? Because the word droplet appears 41 times, and is the FIRST STEP in creating a new quick action. Nothing has changed with droplets in any way. And you didn’t watch the video, because creating a droplet is one of the very first things that happens.
If you would like some one on one assistance with this, please open a support ticket, and I’m 100% positive I can get it working for you. And once it’s working, creating new ones is a maybe 30 second job (after you create your drople and run it once).
But it seems you’ve made up your mind after not reading the article, and not watching the video, and I can’t help with that decision.
-rob.
I read it multiple times and tried to follow the instructions. My query re ‘droplets’ was in previous versions, there were 2 options: a droplet or a service. Perhaps I was unclear – I was hoping the option of a droplet standalone remained. As I said, I tried to follow the coding/scripting but got nowhere ina hurry.
It’s not that my mind is made up – it’s a case of not being a programmer, and being unable to achieve the desired outcome. Over the years, I have tried to create scipts and using Automator (or whatever it’s called these days) and none have worked – perfect track record. So yes, when I saw the instructions, I had no expectation of success, based on years of failure. I’m not a programmer/coder. Simple as that.
My apologies for wasting your time
E
Droplets are still there and work fine, and aren’t going away (unless Apple breaks them). And I have good news coming on the Services front: We did find a simpler way, so thank you for making me go back and dig.
We’ll have a new blog post up about it next week—and you did *not* waste my time! Sorry for the snappy attitude in the prior comment, but we put a lot of work into solving an issue that was none of our doing, and I was a bit defensive about the “must be a simpler approach” comment. My apologies for that.
-rob.
Hi Rob – all good, definitely no apologies needed – I was frustrated at the potential loss of a favourite and well-used app. I’m 66 and it seems Macs are getting harder to use (been using them since 1983). My apologies for upsetting you – wasn’t the intention.
Seriously appreciate your efforts, most sincerely, thank you.
E
Eric:
Please see the new Shortcuts-based method we just posted; it should be much simpler to follow along.
https://manytricks.com/blog/?p=6105
-rob.
thanks – tried. no joy. I d/l the NM Shortcut and it appears in my list of shortcuts, but there is no option to dupe/copy/paste the Shortcut, and I can’t find the parent folder in Finder. OS claims it’s in my iCloud but can’t see it there (Shortcuts folder on icloud is empty) and the shortcuts folder in my library just has a bunch of SQL files but no NM shortcut.
Various file searches (Tembo, Find Any File) can not locate a NM shortcut. I truly have no idea what’s going on, but apologies, but I am giving up. Greatly appreciate your efforts and kind words re me “spurring you’ .
Eric:
Please either open a ticket or email me directly, and I’m sure we can get you up and going.
-rob.