With the basics of custom actions out of the way, it's time to dive into the available custom actions, starting with a few of the most useful and powerful actions: Folder, Chain, and Layout. After those three, the remaining actions appear in the same order they do in Moom's interface.
Remember, every single custom action that you're about to read about can be renamed, and almost every action can have its own keyboard shortcut. Take advantage of these features for better organization and accessing your most-used actions via the keyboard.
 Folder
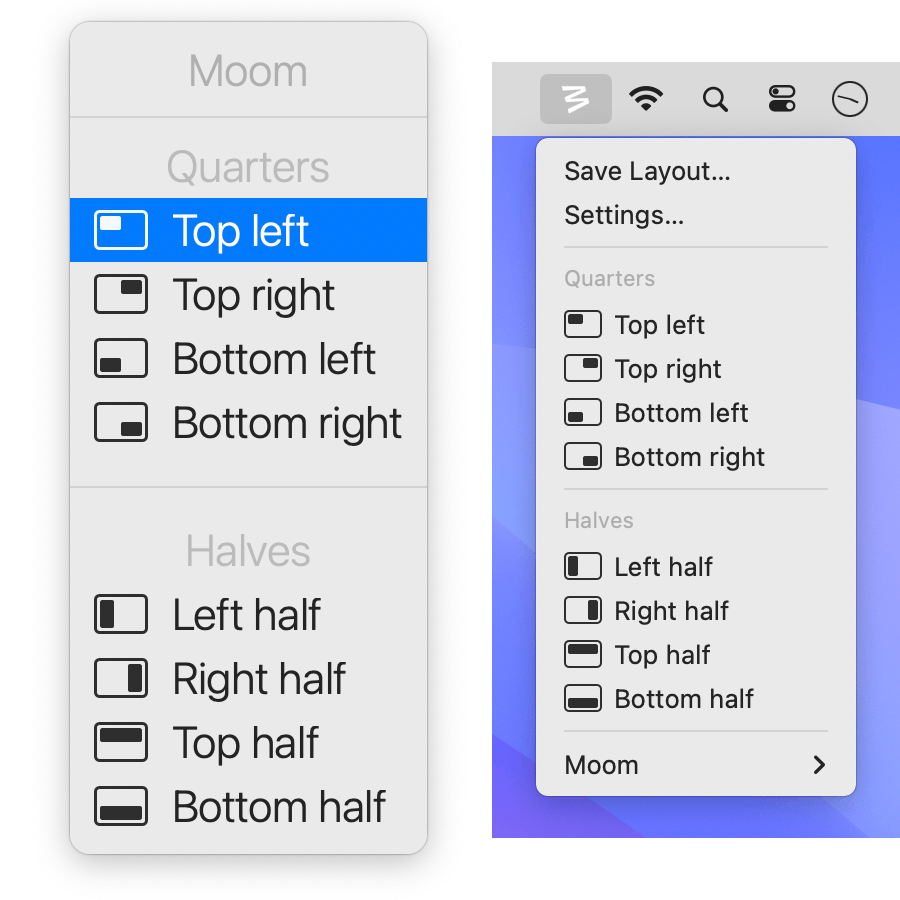
The Folder custom action lets you do what you think it would: Put other custom actions within it, to help organize your collection. Folders can work in one of three ways, depending on how you set their two available options:

If you don't assign a hot key and leave ▢ Chain descendants unchecked, then the folder is just a folder. You can see it in Moom's menu bar item, and you can add it to the Palette to navigate into it via the pop-up palette, but that's it.
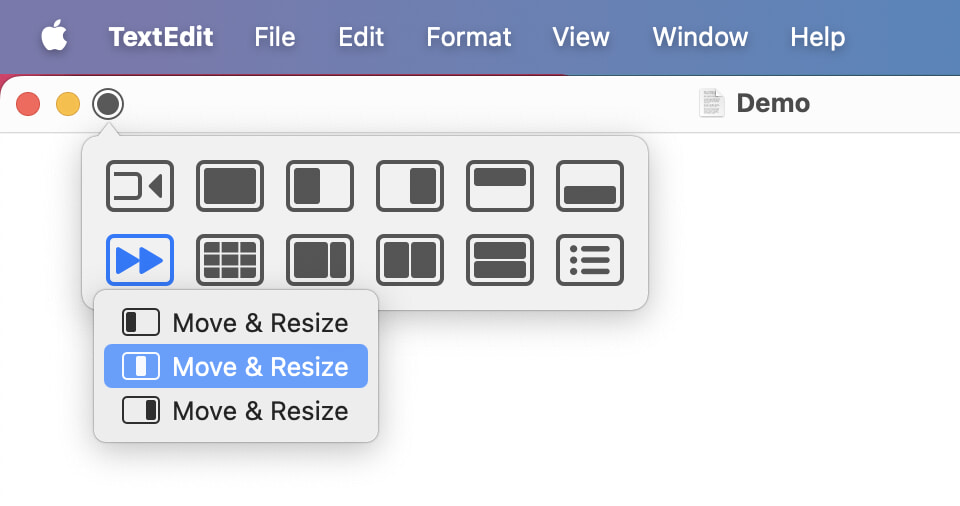
If you assign it a keyboard shortcut, however, it becomes a use-anywhere pop-up menu that lets you select any of the actions it contains. Just press the defined hot keys, and the pop-up menu will appear, as seen at right.
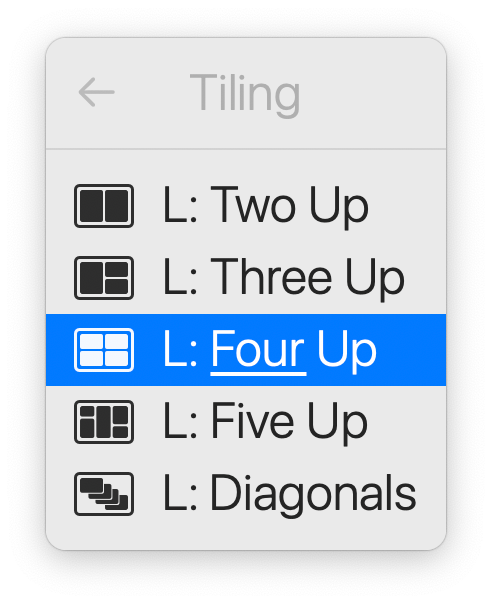
Navigate the list with the up and down arrow keys, and press Return to activate the selected items. The menu also supports search-as-you-type, so you can type your desired action. In the screenshot at right, four has been typed and Moom has selected the match based on the typing. If there are multiple matches, you'll see underlines on each match; further typing will narrow the selection.
Folders can contain any custom action. Want to separate and label the sections in your pop-up folder? Add Menu Header and Menu Separator actions. Want to use the overlay grid? Add the Use Grid action.
But the real power comes when you add a Folder action to an existing folder. When there are folders within folders, Moom will present them as items with sub-menus; use the left and right arrow keys to navigate into and out of the submenus. Folders can contain folders that contain folders that…you get the idea. This makes a folder an infinitely-expandable fast-access tool.
Consider creating a folder containing your most-used actions, and assigning it an easy-to-remember key combo. You'll have super-fast access to the actions you use the most, and all you have to remember is one key combo.
The other option in the Folder action, ▢ Chain descendants, converts the folder into a chain. Keep reading to learn all about chains.
 Chain
Chain
The Chain custom action lets you combine other custom actions into one new action. This new combined action can operate as a series of separate actions—where each use of the chain will run the next custom action in the chain—or as one action, where the chain is treated as though it were a single custom action.
When you first create a chain, it will just be an entry in the list of custom actions, much like a Folder custom action:
A chain is just a specialized Folder custom action, and you can switch between the two by checking or unchecking the ▢ Chain descendants checkbox.
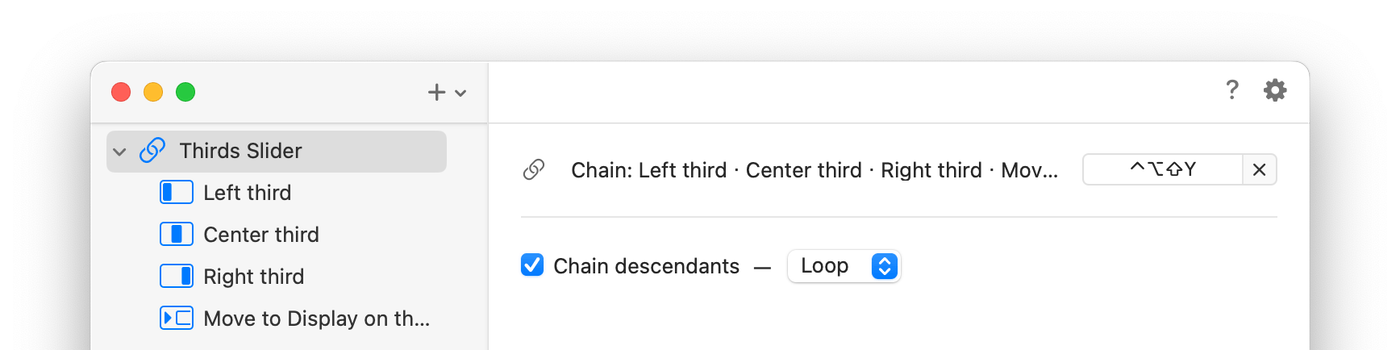
A newly-created chain is just an empty folder with special powers; to make it actually do something, you need to add custom actions within the chain folder. As an example, here's a chain that steps through "thirds positions" on a display; it also jumps to the next display after reaching a screen edge:
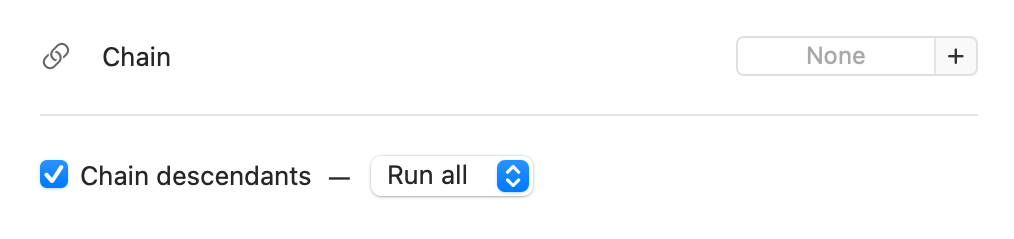
The ▢ Chain descendants checkbox controls how the chain works, and offers three options:
- Run all: In this mode, the actions in the chain are executed automatically, in sequence, as if they were one action. If you wanted to resize a window, then place it at screen center, a "run all" chain would let you do just that: A Resize custom action followed by a Center custom action.
- Loop: This is the first of two run-in-sequence options. The first time you trigger a chain in loop mode, the first action in the sequence executes; the second time you trigger it, the second action runs, etc. This first loop mode is global: It doesn't matter which app you're in when you trigger it; Moom simply keeps track of which action is due to be executed next.
- Loop separately for each window: As with Loop, this runs the actions sequentially, but Moom keeps track of both the window and the next action to be run. In this mode, your chain will keep track of which action is due next on a per-window basis.
And yes, you can put folders inside of chains. The folders will be flattened, treating everything in them as if they were at the top level of the chains folder. Any actions that aren't chainable (i.e. Menu Header, Menu Separator, etc.) will be ignored, but valid actions will be added to the chain.
Directly access chain steps in the palette:
If you have a chain in the palette, you can right-click (or control-click) on that chain and then directly select one of its individual actions. If you're using a laptop with a trackpad, you can also long-press the trackpad to access the same list of actions.
If you do this, Moom will remember that you've done so, and if you then invoke the chain, it will start with the action following the one you manually selected.
If you put a chain inside a chain, one of two things will happen: If it's a looping chain, it will be flattened as described above. But if it's a "run all" chain, then Moom will run that chain as one combined action, just like it would if that chain weren't inside another chain. Keep reading to see how this can be very useful for multi-display Moom users.
Use chains in chains for multi-display cycling
Moom's ability to execute a "run all" chain within another chain is the perfect way to march windows across displays in a sequence. For example, if you have two displays sitting side-by-side, you can set up a chain that will do the following:
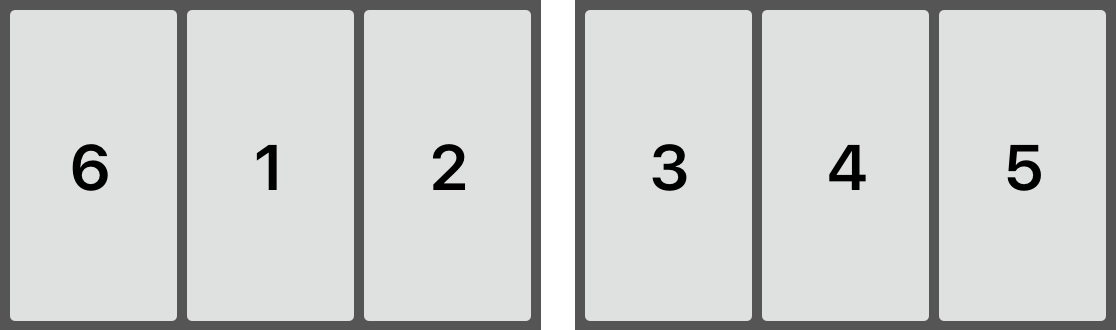
Move and size a window to the center-third of the first display (Position 1), then to the right-third of that same display (2). The next use of the chain will move the window to the left third of the second display (3), then center third (4), then right third (5). Finally, one more use of the chain will move the window to the left third of the first display (6), completing the cycle. In action, it would look like this:
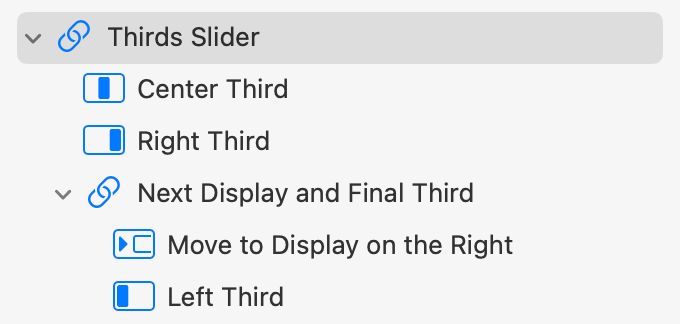
The chain to do the above is shown at right, and you can see that there's a chain within the chain. That second chain must be set to "run all," and the Move to Other Display action (here, it's the display on the right) needs to have ▢ Loop through displays enabled—otherwise, you won't be able to get back to the original display.
If you'd like to test this chain yourself, Moom's ability to import (and export) actions makes it simple to do: Download the Thirds Slider chain, expand the archive if your browser didn't do so already, then double-click the expanded file. Moom's settings will open with the newly-added action selected and ready to edit. Note that there is no keyboard shortcut assigned, so you'll have to do that step yourself. Look through the chain to see how it works, and duplicate and edit it to create other similar chains.
You might think you could just set this up as a four-action chain: left third, center third, right third, then move to other display. That would work, but what would happen is that the window would move from the right third of the first display to the right third of the second display, then cycle through all three locations on display two before jumping back to the right edge of display one.
You need the "run all" chain within the chain to both move the window to the other display and then put it in the right spot for the sequence to continue. This may seem a bit weird to set up at first, but once you've built a few such actions, it will become second nature.
 Layout
This powerful custom action allows you to save and restore the positions of windows—either as a collection of windows in various applications, or as a generic target for any open windows in order of most recent use. (In prior versions of Moom, the Layout custom action was called Arrange Windows, and the menu item that invoked it was Save Window Layout Snapshot; it's now named Save Layout.)
It can also—with some limitations—launch the apps in the saved layout and apply the saved layout to those apps' windows.
Before you can do anything with a layout in Moom's settings, you have to have a saved layout. You can create one directly from the settings by adding the Layout custom action, but that's not generally the best way to do it: Moom will save all windows in all apps that are currently visible (even if obscured by other windows). Most likely, you want to save a layout after getting everything set up just how you like it.
How to save a layout
Here's a good general process to follow to set things up to create a saved layout:
- Open all the windows, in all the apps, that you want to have in your saved layout.
- Using Moom or manual actions, size and arrange the windows exactly as you'd like them.
- Before saving the layout, hide any apps whose windows you don't want in the saved layout. (See below for more on this.)
- Save the layout using the Save Layout command in Moom's menu bar menu.
So what windows will Moom save with a layout? It will save all windows that are visible on displays that you can see, even if those windows are partially or totally covered by other windows. An easy way to see what windows will be saved is to activate Mission Control using ⌃↑, or a four-finger upward swipe on a trackpad. Here's a look at a desktop as you might see it (left), and as Mission Control sees it (right):
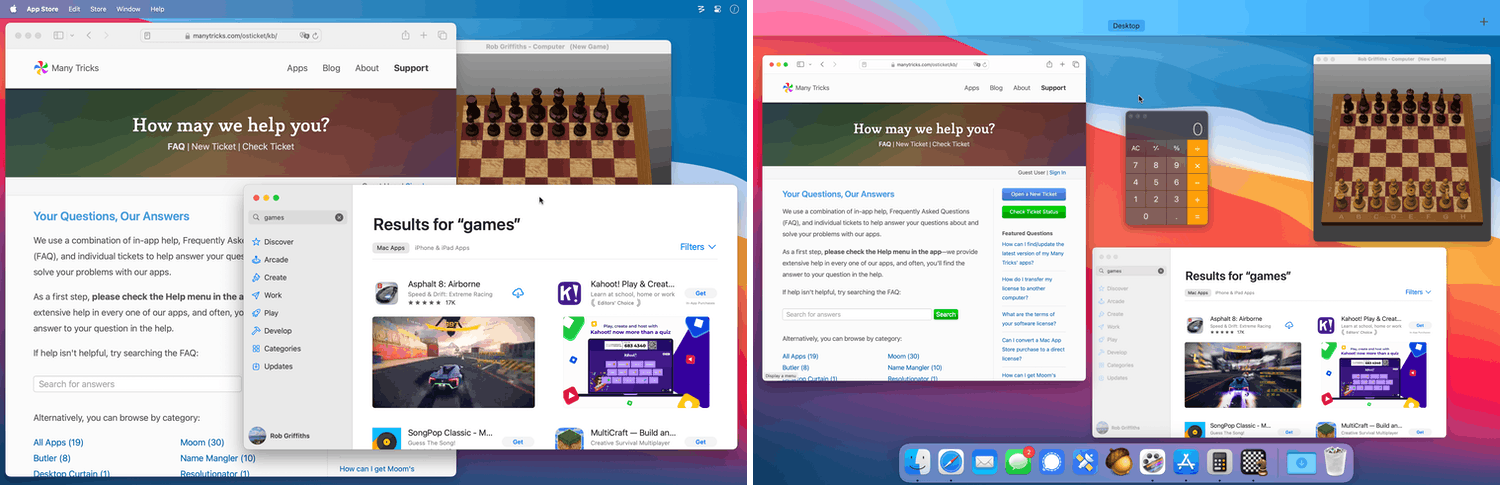
The desktop view seems to show three windows, but if you save those windows as a layout, there will be four, because the Calculator window is visible, but completely covered by the others. You can account for this after the fact, using the Narrow saved layout down to unobstructed windows checkbox (covered later in this chapter), but you may prefer not to have any extraneous windows saved with your layout.
The easiest way to hide the apps you don't want in the layout is to first select an app you do want in the layout, then use the Hide Others menu command to hide all the other apps—this menu command lives in the app (leftmost) menu in each app.
After hiding all the other apps, use the Dock or ⌘⇥ to switch to each other app whose windows you want in the layout. After doing that to reveal each app you want in the layout, save the layout.
Although not overly complicated looking on the surface, the Layout custom action hides a ton of very useful features within its settings.
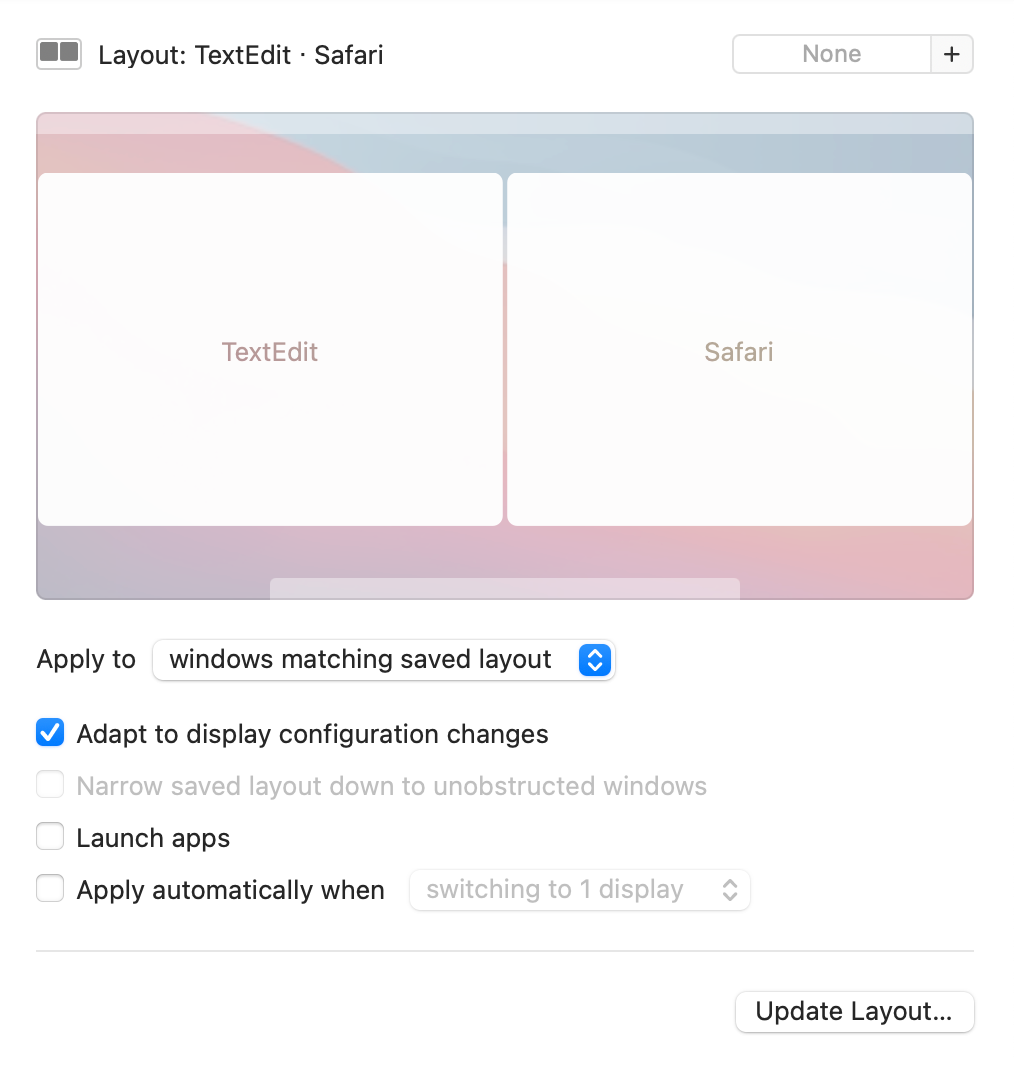
The first setting, Apply to [windows matching saved layout | any windows — active window first | any windows on active display – active window first] hides a lot of power behind those three options: This pop-up menu controls how saved layouts behave when activated.
App-specific saved layouts
In the first mode, as shown above, the saved window locations are associated with particular applications—TextEdit and Safari in this case. App-specific saved layouts let you quickly restore the size and location of a set of windows across any number of apps.
If you have Safari and TextEdit each open with at least one window, and use the above saved layout, one window from each app will be restored to the positions shown in the saved layout. This is the traditional method of using saved layouts that has existed in Moom for many years.
To save a new layout, set up the windows in the applications you want to save. For apps that you don't want in the layout, either hide the app, or minimize or close their windows. Once you have everything set up as you want it, select Save Layout from Moom's menu bar menu. Moom's settings will then open, with thew newly-saved layout selected and ready to edit.
Note that Moom cannot save layouts across Spaces, as Apple doesn't provide any methods for developers to work with windows across Spaces. You will have to save a layout on each Space where you want to restore layouts.
When saving a layout, Moom will save any windows that you can see, even if those windows are currently obscured. In other words, if you have a three-monitor setup, Moom will save the locations of the windows on all three displays, whether those windows are fully visible, partially obscured, or completely covered by another window.
Before saving your layout, use the Hide menu item in the apps you don't want included to hide those windows. (Or you could minimize the windows, close them, or quit the apps.) This way, you won't save unnecessary windows with your saved layout.
Any-app saved layouts
The other two modes for saved layouts offer a powerful way to arrange your windows: Free form tiling. When set to either of the "any windows" options, Moom no longer associates window arrangements with particular applications. Instead, Moom saves a set of window locations and sizes, to be filled with the open windows, with the most recently used window going into the first location, the second most recently used window into the second location, etc., until all the spaces are filled.
This mode lets you create layouts you can use to quickly organize your open windows—save layouts with the alignments you want to use, and then fill your open windows into them with one Moom action.
Consider the Safari-TextEdit saved layout from above; here's how that same saved layout looks when set to any window mode:
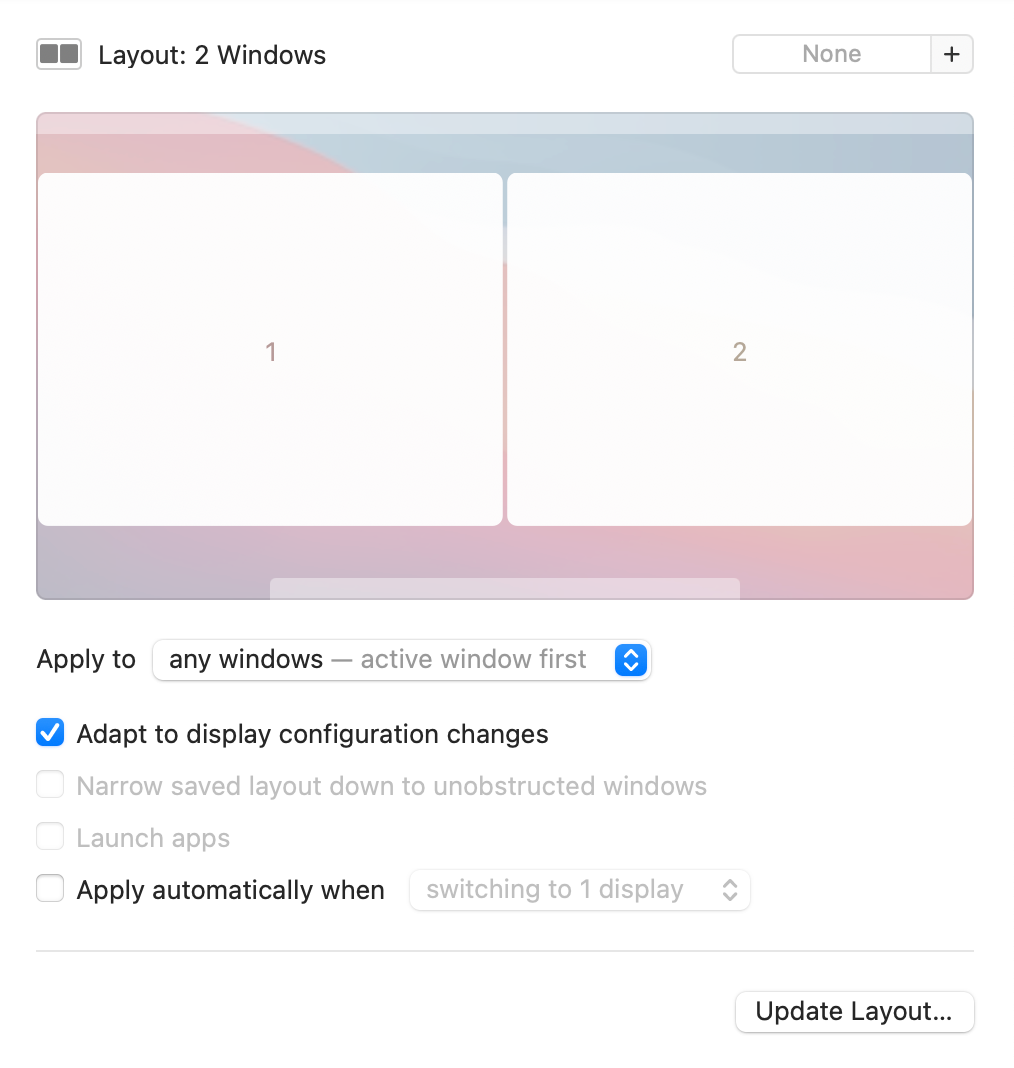
Note that Safari and TextEdit have been replaced with numbers. When you restore this saved layout, the frontmost window will go to position number one; the second most-recently-used window will go to position number two. Any window layouts let you create free form layouts to fit all your open windows into, instead of being locked to a set of windows associated with particular applications. It's a tiling manager with infinite power to arrange the tiles exactly as you wish.
See the final topic in this chapter, Unbundling and bundling saved layouts, for details on a very easy method of creating "any window" saved layouts. You can also use that same method to reorder the windows within a saved layout, in case you want window three to be window one, for example.
And don't worry if you saved a layout using the wrong settings; you can switch between app-specific and any-windows modes just by switching the setting in the Apply to… pop-up menu.
Peek into layouts in the palette:
Ever wanted to apply just part of a saved layout? If you have a layout in the palette, you can do just that.
Just right-click (or control-click) on that layout and then directly select one of its individual window entries. If you're using a laptop with a trackpad, you can also long-press the trackpad to access the same list of windows.
Other Layout settings
Here are the other settings you can edit after saving a layout, excluding the already-discussed Apply to… checkbox.
▢ Adapt to display configuration changes This setting scales saved layouts up and down as needed for changes in your display layout. It does this while trying to maintain your desired spacing between windows. If the configuration of your displays changes, it also tries to match the layout to the new configuration.
▢ Narrow saved layout down to unobstructed windows As noted above, it's easiest to save a layout with only the windows you want in it visible when you save it. Sometimes, though, when you try to lay out your windows, you might have an overlap you don't even see. Moom helps you find such layouts by displaying them differently than layouts without overlapping windows.
Consider these two simple layout examples with Safari and TextEdit:
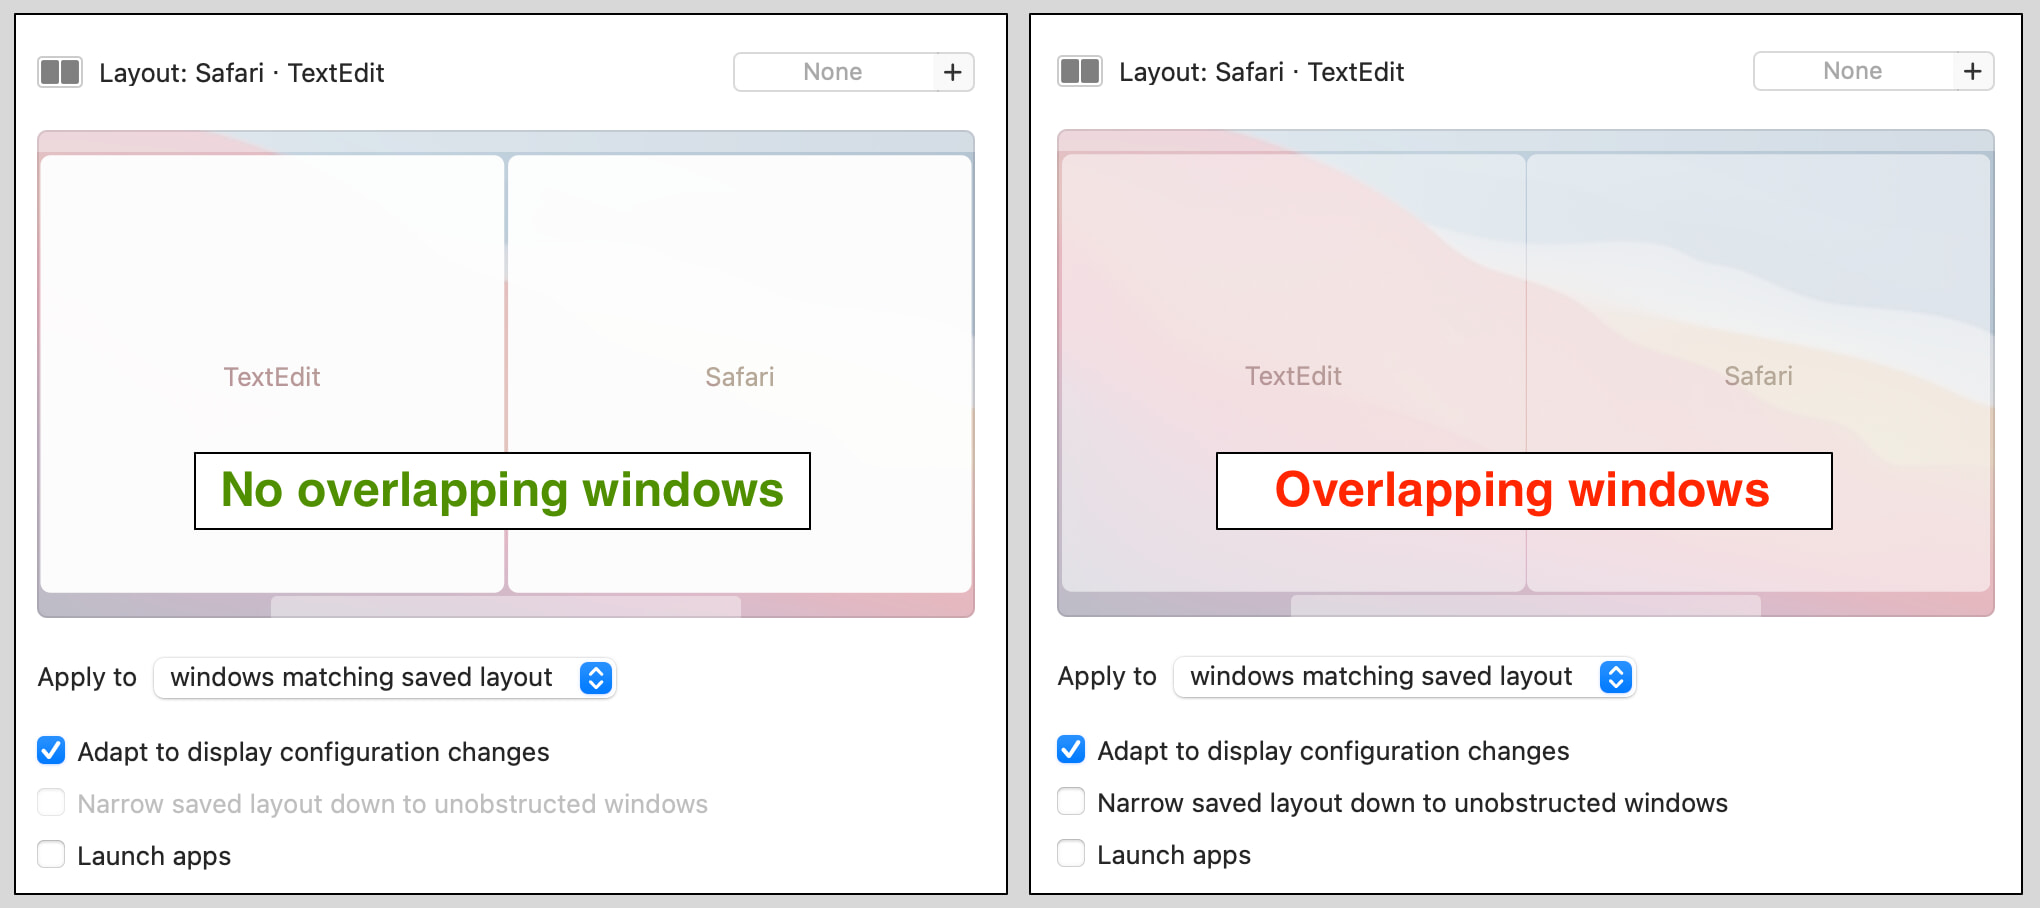
In the non-overlapped layout, the windows are shown with solid white backgrounds. In the overlapped layout, however, the windows are translucent, reflecting the overlap—a very slight overlap—between the two windows in that saved layout. If you see this translucency in a saved layout, that means your windows are overlapping, even if they didn't appear to be when you saved the layout.
The other visible change in layouts with overlapping windows is that the ▢ Narrow saved layout down to unobstructed windows checkbox is enabled (but not checked). If you want to see which windows are overlapping, just check that box, and the windows that are being overlapped will be hidden from view.
If you have overlapping windows, you can use your layout with this setting either checked or unchecked—the default is unchecked, so Moom will restore all windows, including partially visible windows. But this is also a good tool to use if you'd prefer not to have overlapping windows in your saved layouts.
The simple looking ▢ Launch apps checkbox does what it says: When checked, Moom will launch any of the apps in the saved layout, and then apply the saved layout to each app's open windows. So instead of launching an app, opening the right number of windows, then applying your saved layout, you can just apply the saved layout and let Moom do the work—subject to some caveats.
Get the most out of Launch Apps
Opening windows in apps is a tricky thing to do, and as such, Moom's native powers to do so are fairly limited: It can launch each app in a saved layout, but only one window in each of those apps. But many of you probably have layouts with multiple windows from one app—Safari side-by-side, for example—so you may think this feature isn't much help.
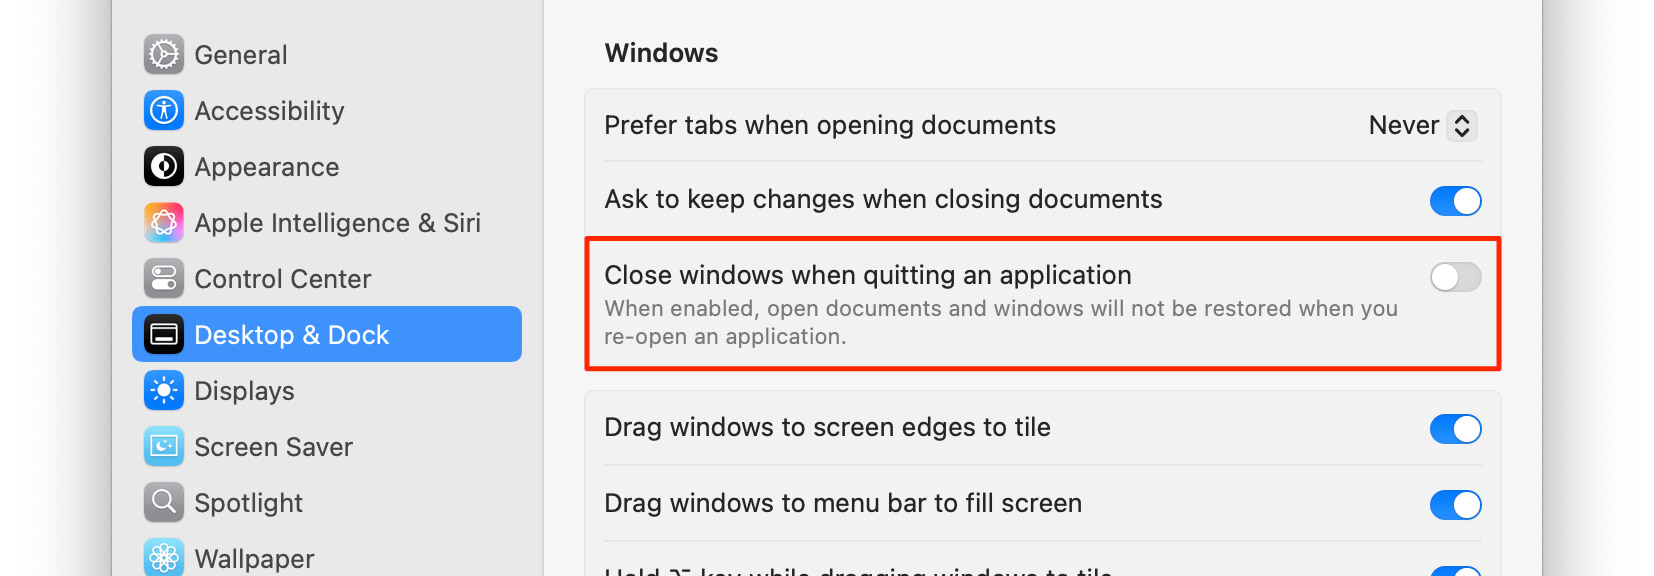
But thanks to an assist from macOS, that limitation is easily overcome: Set macOS to restore open windows and documents when you launch an application, and Moom's Launch Apps feature becomes oh so much more useful. This is the default setting for macOS, so unless you changed it, you're set. If you did change it, you can find and change it back in System Settings → Desktop & Dock → Windows:
Make sure the box is not checked, and now when you enable Launch Apps, restoring a layout will launch the associated apps, each of which will open all the windows and documents you had open when you quit, and then the saved layout will be automatically applied.
Hopefully obviously, if you're working with an "any apps" layout, the launch apps option won't be available, and will be grayed out.
There's a chance you may also see a grayed-out Launch Apps option even for app-specific saved layouts: If you've been a Moom user for a very long time (over a decade), and you're still using an unmodified saved layout from when you first got Moom, the Launch Apps button may be grayed out for such layouts.
Thankfully, the fix is easy: Just re-create the saved layout, and Moom will store the information it needs to enable the Launch Apps feature.
The next checkbox, ▢ Apply automatically when switching to [many options listed], turns a layout into an auto-triggering layout that's fired when you add or remove displays from your system.
For example, if you use two screens at work, and one at home, set the pop-up to , and your window arrangement will activate as soon as you disconnect your extra monitor at the office. Save another window layout when you have your second display connected, and set the trigger to , and your windows will arrange themselves again when you connect the second display.
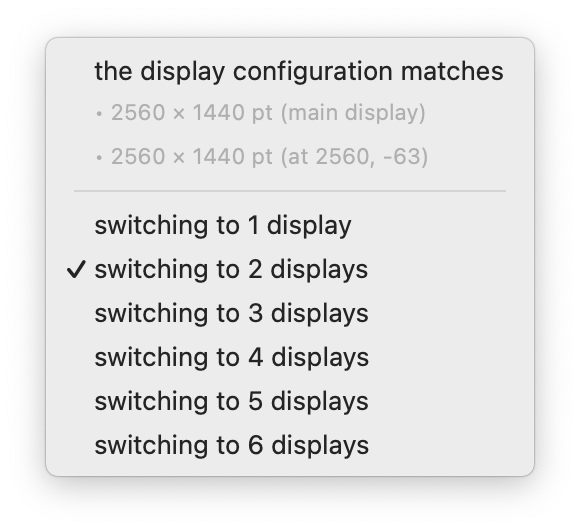
The other option in the pop-up menu is . You can use this option to trigger saved window layouts when the layout of your displays change—not just when you add or remove a display. For example, if you use a laptop closed with an external display, and then open it when disconnecting the external display. While you still have only one monitor, the resolution has changed.
When using this option, the drop-down menu will show you the resolution and position of the displays in use when the layout was saved, as seen in the screenshot to the right.
Note that this action will be triggered not just by changing resolutions (as when switching from an external to laptop-only display), but also if the configuration of currently-attached displays change: you move the menu bar to another display, or rearrange their layout.
Once you've enabled the automatic switching feature, you'll notice that the ▢ Also apply on system wake and unlock checkbox becomes active. This should be self-explanatory, but enable it to have your saved layouts reapplied when the system either wakes or unlocks; leave it unchecked, and those events will be ignored—unless waking also includes displays waking, in which case the usual rules apply.
The final setting is the Update Layout… button. Click it, and you'll see the dialog below, offering the choice to replace or merge layouts, or cancel:

By the time you see that dialog, Moom has already recorded a new layout to memory, consisting of all the visible windows. What happens next depends on which button you press:
- The Replace Layout button overwrites the existing layout with the layout that Moom created when you clicked the Update Layout button.
- The Merge Layouts button will merge the new in-memory layout with the previously-saved layout, adding any new windows to the saved layout. (Moom will not remove windows from the saved layout that aren't presently visible.)
- Cancel will leave the saved layout unchanged.
You can also update your saved layouts via Moom's menu item. Hold down the ⌥ key and select the menu, and you'll see all saved layouts prefaced by "Update." Select one, and you'll see the same dialog as above, and its buttons offer the same functionality.
If you have shortcuts that use the ⌥ key, you can hold down the ⇧ key to see the update option. If you have shortcuts that use both ⇧ and ⌥, you'll have to update from Moom's settings window.
Be very careful with this feature: It is not designed to be used to simply update an existing saved layout with new location and/or size information. That's because both the merge and replace options will add in any additional windows that are visible at the time.
One way around this is to hide any new windows that you don't want in the updated layout, move and size the existing windows as you want them, then update the layout using the "replace" option.
Another way to do it is to unbundle the layout (see details below), edit each Move & Resize action within the layout, then recompile the layout from the individual actions.
Unbundling and bundling saved layouts
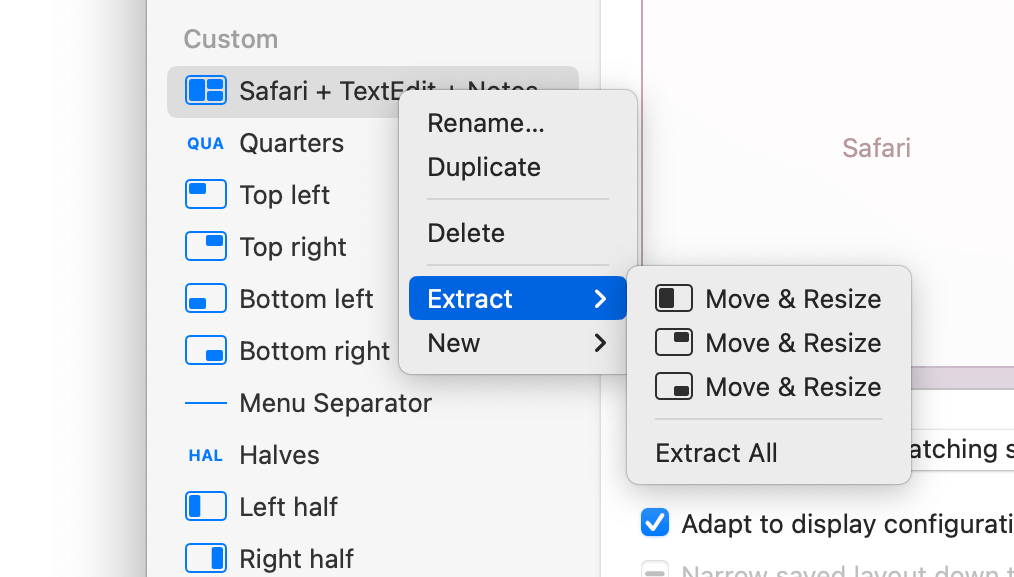
You can think of a saved layout as a collection of separate Move & Resize operations (behind the scenes, they're much more complex than that), saved as a collection that operate all at once on many windows. Moom lets you unbundle that collection via the contextual menu for a given saved layout. Right-click on any saved layout, and then select the menu item from the contextual menu. You can then choose to extract a particular action or all of the actions:
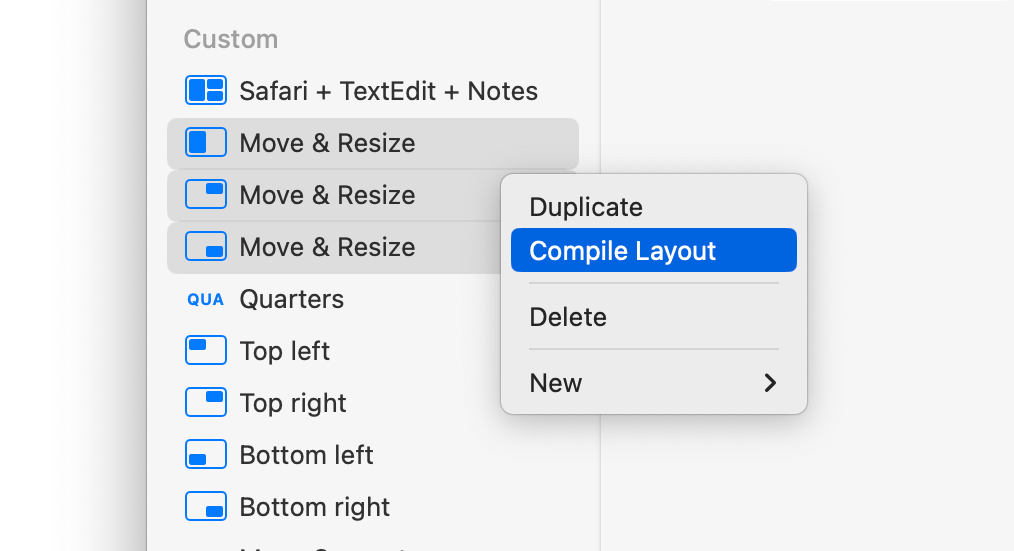
Since you can unbundle an existing layout, it only makes sense that you can do the reverse, too: Select more than one Move & Resize action in the custom actions list, right-click to bring up the contextual menu, then select :
As explained above, this is a good way to edit the size and location of windows within a saved layout.
Compiling a layout is probably also the best way to create ad-hoc layouts for use as Drop Zones in Snap mode, or any time you want to create an "any window" layout. Here's how:
- Add a new Move & Resize action, and draw out the window size and location you'd like to use. Rename the action if you wish.
- Duplicate the action and change the grid to mark window number two; change the name, too.
- Continue duplicating and editing until you have all your window locations defined.
- Select all of the new actions, right-click on them, and choose from the contextual menu.
Using this method, you can very quickly create any number of "any window" saved layouts.
 Move & Resize
This action moves and resizes a window, using a specified grid size.
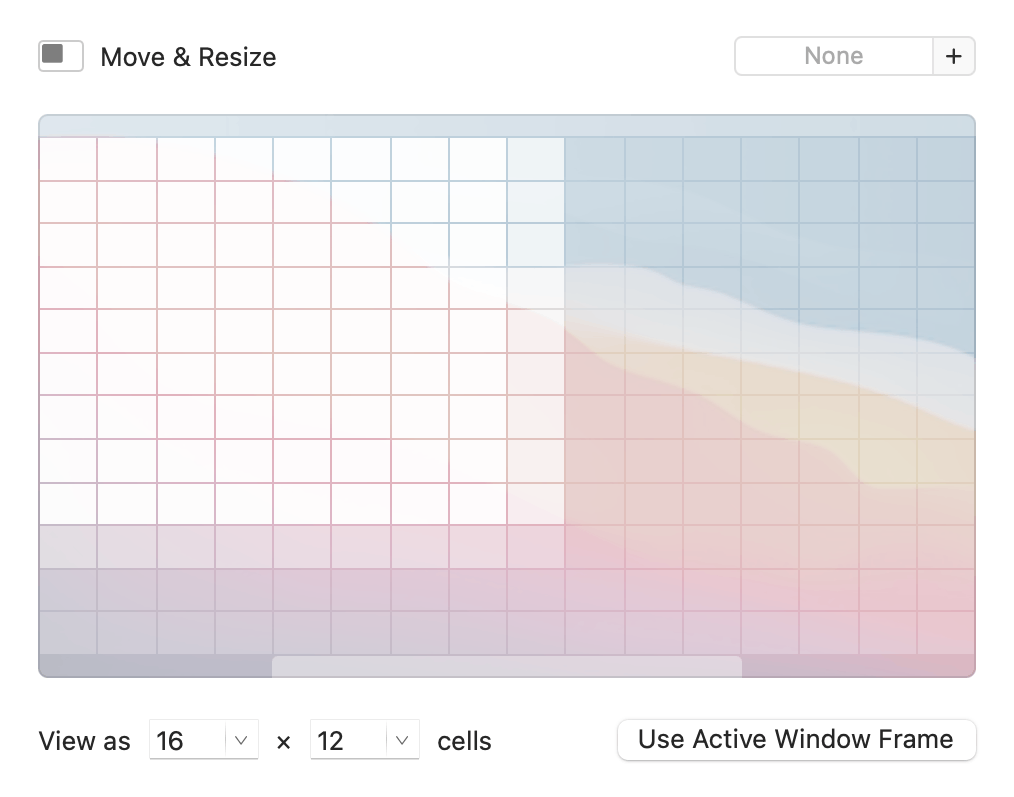
Use the View as [ ] × [ ] cells setting to change the size of the grid used to determine the position and size of the moved window. The grid's dimensions can be different for each custom action.
The Use Active Window Frame button will take the frontmost window's size and location and apply it to the grid, so you can easily use an existing window for your Move & Resize action.
 Move
Move
This action moves a window by a specified amount in a specified direction.
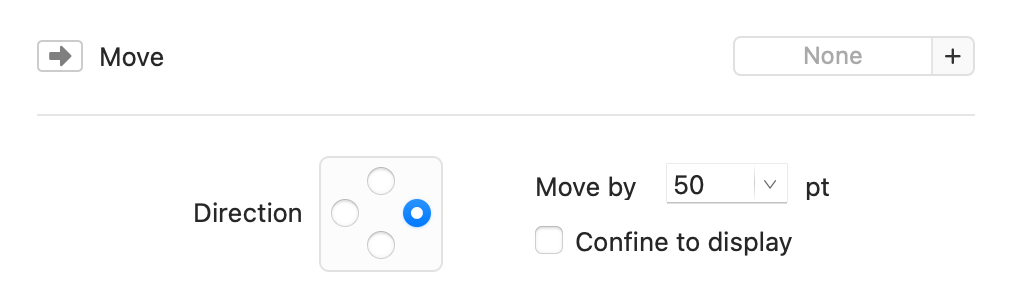
The controls are quite self-explanatory and shouldn't require any explanation, though you can use a somewhat hidden feature to add some flexibility to the Move action.
Although marked in points, the Move by box can also accept percentages. If you enter 25% as the move distance, then the window will move 25% of the display's width in your chosen direction.
 Move to Edge or Corner
This action moves a window to a specified edge or corner.
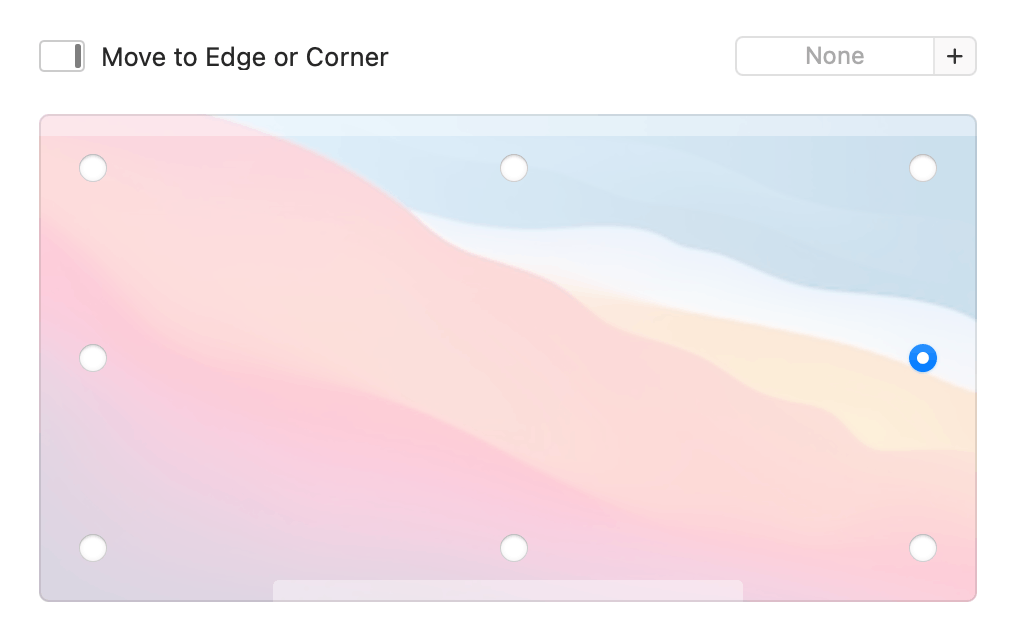
The four corner locations act as you'd expect—click one, and when you use this custom action, the window will move such that it's upper left (or right) corner is located in the corner you selected.
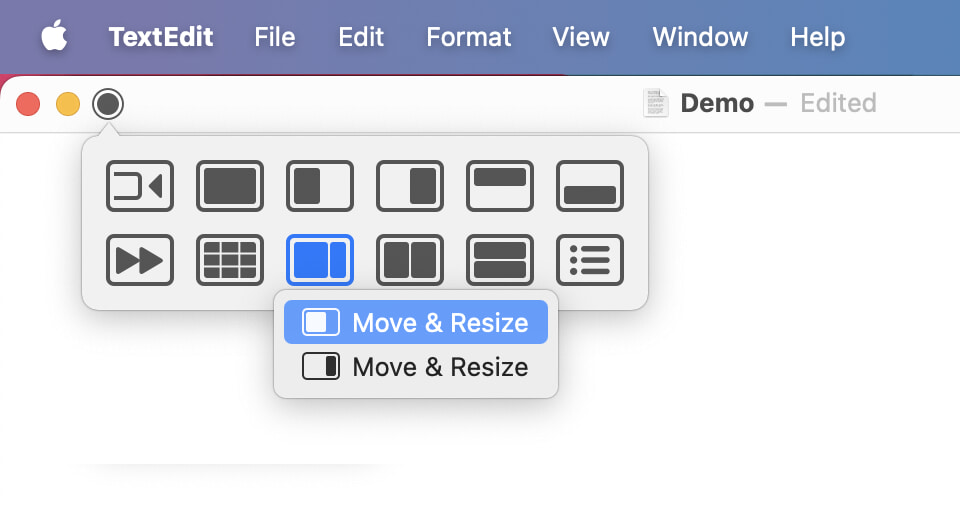
If you select one of the centered position buttons, however, there are actually two different modes available, as represented by two different icons when the button is clicked:
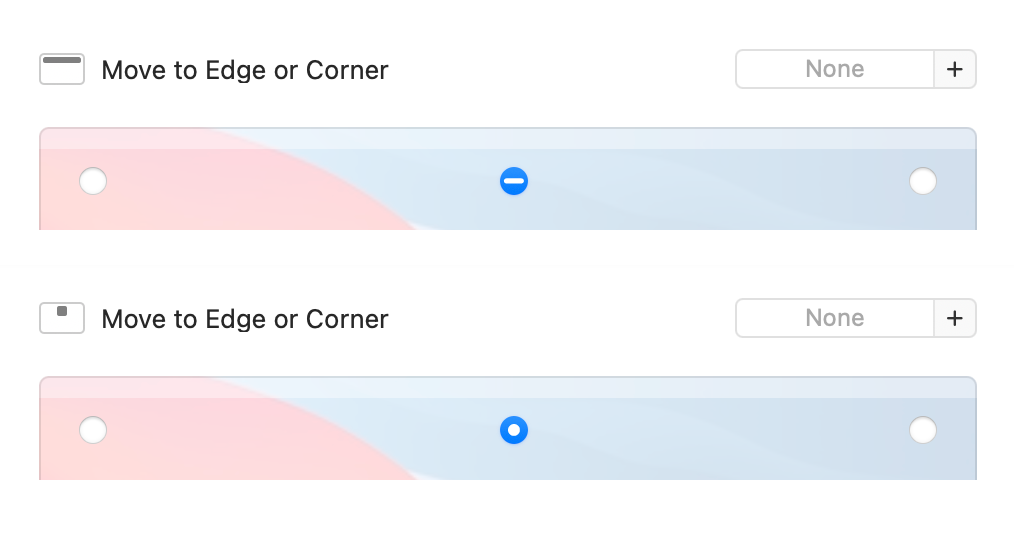
The first click of one of the center buttons will show the bar shape in the upper screenshot. In this mode, windows will move to the chosen edge, but at their current location along the other axis. In other words, if a window is currently 100 pixels in from the left edge, and you use the custom action to move it to the upper edge of the screen, it will do so, and remain 100 pixels from the left edge of the screen.
If you click the button a second time, the icon will change to the dot as seen in the lower screenshot. In this mode, the window will not only move to the edge of the display, but also to the center of that edge.
These two states are also reflected in the action's icon, as seen in the above screenshot.
 Move to Other Display
This action moves a window to another display.

The Direction buttons indicate the direction of the display to which you want to move the window. And if you check the ▢ Resize proportionally box, Moom will attempt to size the window to match the scale of the new display versus the current display—if the window took 25% of the current display's screen space, then it will be resized to take 25% of the new display's screen space.
Check the ▢ Loop through displays box, and Moom will move the window to each display in turn, each time you invoke the action.
 Center
This action centers a window at one of two different locations.
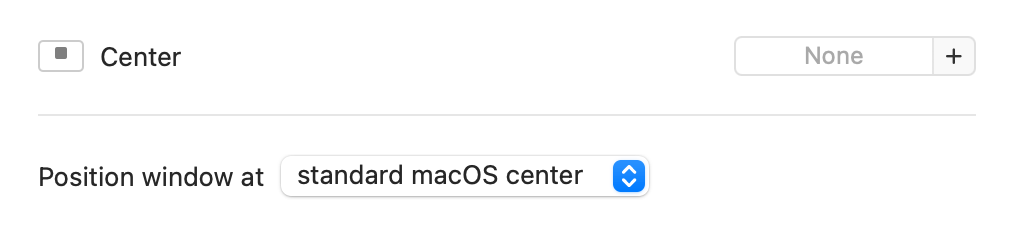
Yes, there really are two definitions of the word "center," at least in macOS land. You can access both through the Position window at [standard macOS center | actual display center] option.
Standard macOS center is a position somewhat above the actual middle of the screen, and it's where macOS centers windows. Actual screen center will center windows based on available screen space, which is the total screen space less the space taken up by the Dock and menu bar.
 Resize
This action resizes a window from a defined anchor point.
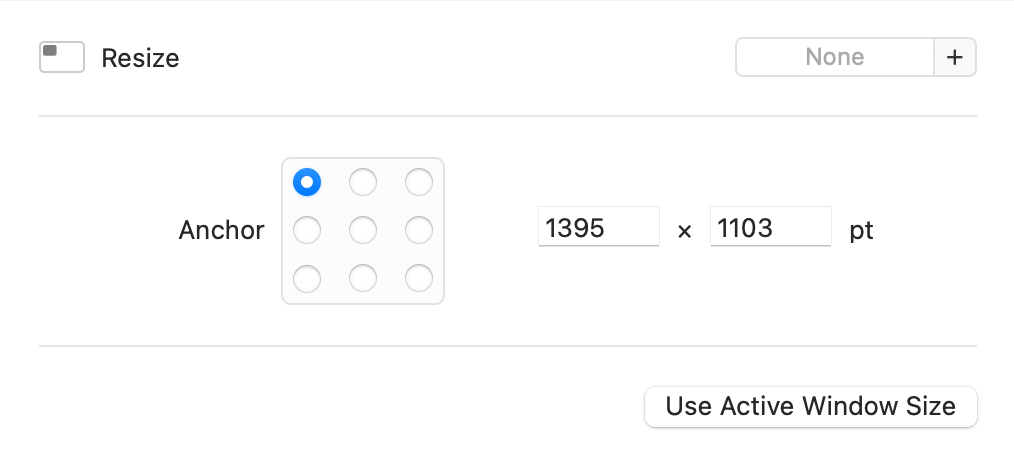
When you create a new Resize control, the size boxes will be prepopulated with the frontmost window's dimensions; enter your own dimensions to override the default values. You can also update the control with a different window's values by clicking the Use Active Window Size button after bringing that window to the front. (Moom's settings window is never considered frontmost.)
The Anchor buttons define the portion of the window that won't move when resizing the window.
While the Resize control looks very simple, there are some extra features hiding just below the surface. The first is the behavior of the center anchor button, which can be in one of two states:
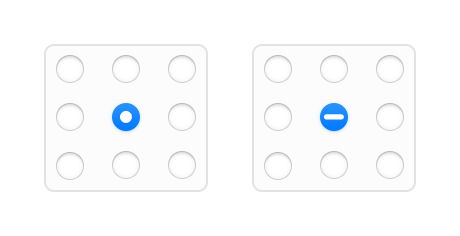
When you first click the center button, it will have the round shape as shown in the leftmost image above. If you pause a second or so, then click it again, it will turn into a minus sign, as seen in the rightmost image.
In the first mode (round button), the window will resize around the center, moving each edge equally to leave the center unchanged. In the second mode (minus sign), windows will first be resized to your specified size, then moved to the center (standard macOS center) of the screen—so you can center and resize in one operation.
The dimensions boxes in the Resize action have some special abilities as well. As in some other actions that accept dimensions, you can use a percentage sign to resize to percentage of available screen size—entering 50% × 25% would create a window that takes up half the width and one-quarter of the height of the display. And 100% will take up all of the available room in the chosen dimension.
You can also replace one dimension with a 0 or a = character to leave that dimension at its current size. For a window that's presently 1280 × 1024, for example, resizing it to = × 800 would leave the width at 1280 points while changing the height to 800 points.
If you combine these two features, you can create custom actions that resize-in-place either vertically or horizontally; this panel shows a normal "truly centered" window, and how it looks after resizing in place either horizontally or vertically:
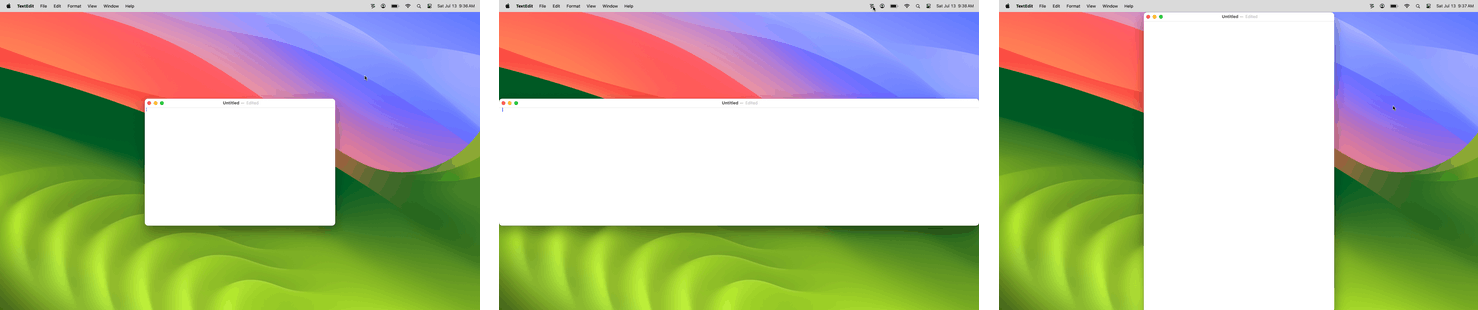
The following two Resize actions will create the window sizes seen in the second and third images above, respectively:
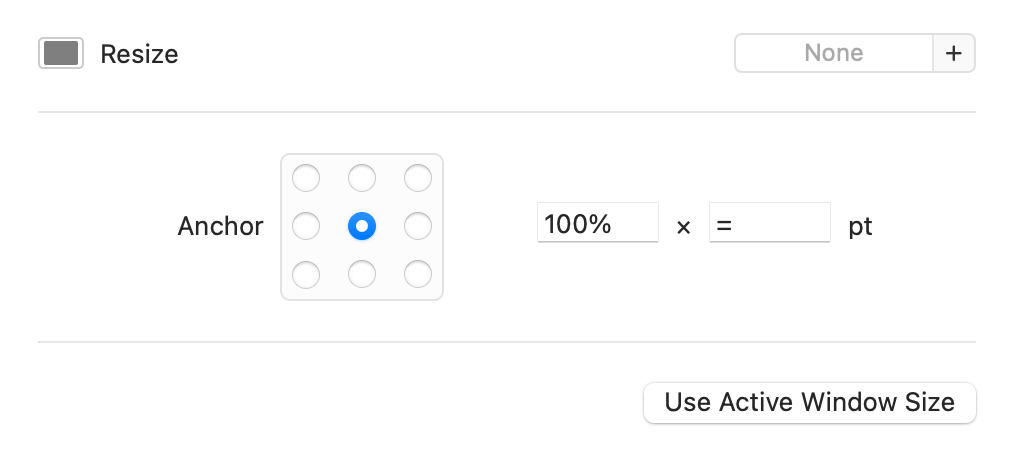
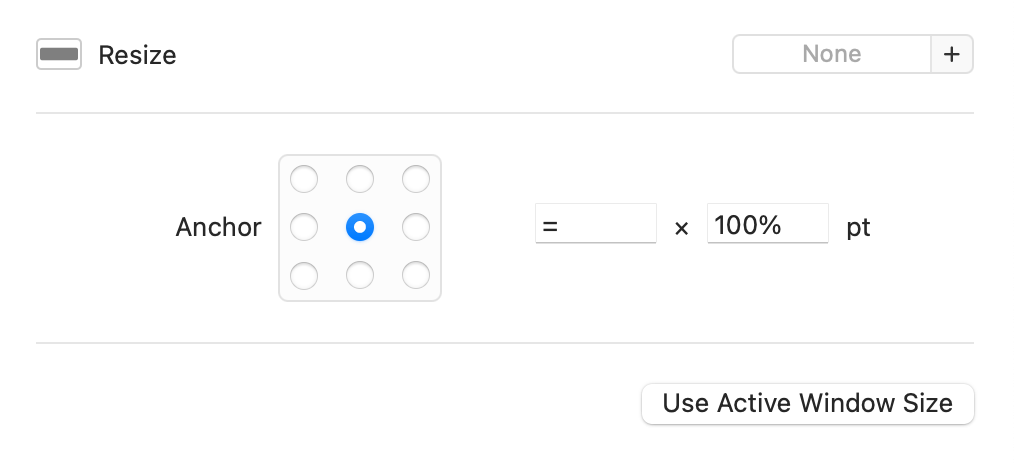
You don't have to use 100%, of course, but this is a good example of how to create resizing commands that maximize in only one direction.
 Grow
Grow
This action increases (grows) the size of a window, with the growth happening towards the specified edge.
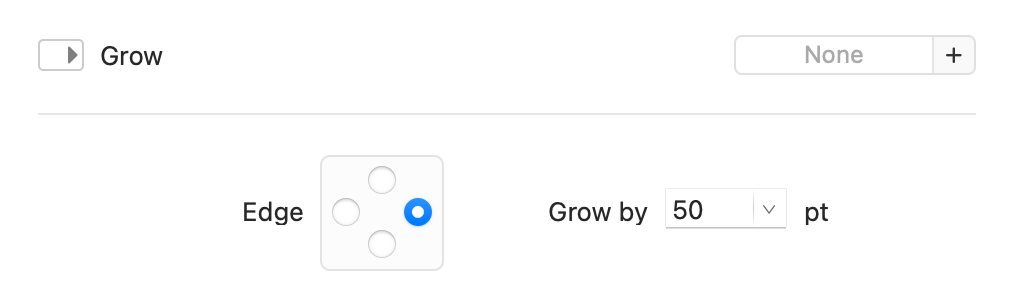
As with many other fields that accept dimensions, you can enter percentage values (75%) instead of point dimensions.
 Shrink
This action decreases (shrinks) the size of the window, with the reduction happening on the side indication by the specified edge.
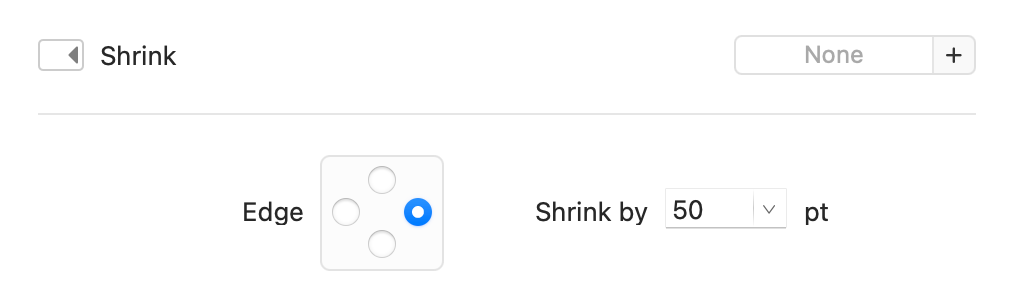
As with the Grow action (and many others), you can enter percentage values (75%) instead of point dimensions.
 Toggle Full Screen
A very simple action that just toggles full screen mode on or off.

Why would you need this action, given you can just click the green button to toggle full screen mode? Because Moom allows you to disable clicking the green button (see the General Settings help for more on that). With the button disabled, you may still want access to full screen mode; hence, this action.
 Use Grid
This action activates the overlay grid for window resizing. Regardless of how activated (keyboard or mouse), the grid can be controlled by both the keyboard and the mouse.
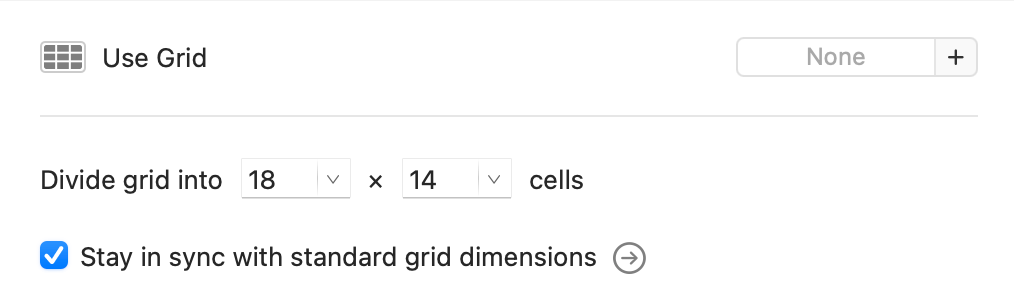
The grid defaults to the dimensions specified in Moom's general settings (accessed via the Gear icon), but entering new values will override the initial values. (The ▢ Stay in sync with standard grid dimensions checkbox will uncheck when you change the dimensions.)
When the checkbox is enabled, clicking the small circled arrow will open Moom's general settings so that you can change the default grid dimensions.
 Revert
This action reverts the window to the state it was in before any interaction with Moom.

 Menu Header
Inserts a text label in Moom's menu structure.

See the Menu Separator action below for an example of the menu header.
 Menu Separator

Here's how the menu header and menu separator look in both the custom action pop-up menu (left) and Moom's menu bar menu (right):