

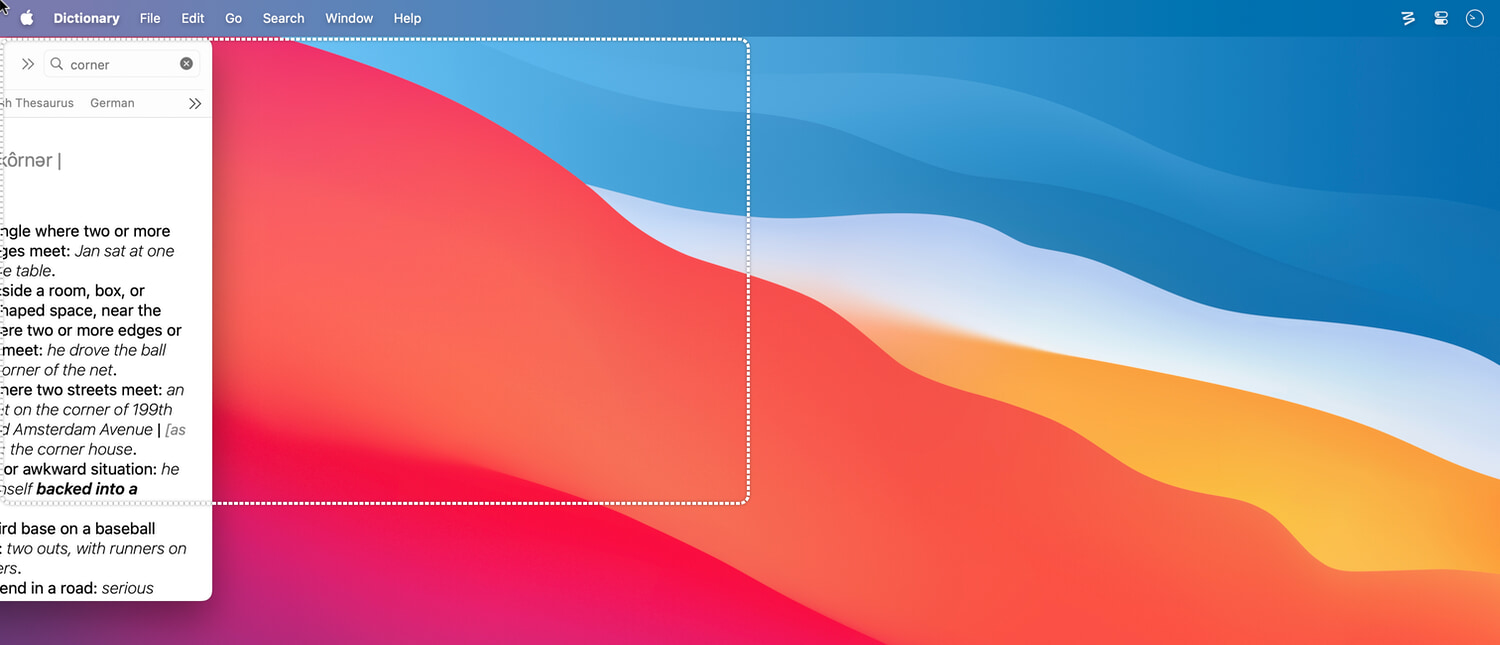
Moom's Snap mode lets you move and resize windows by dragging them to the a number of zones on the edges of your display(s):
Each zone can trigger either a Moom-provided action, or any of your own custom actions.
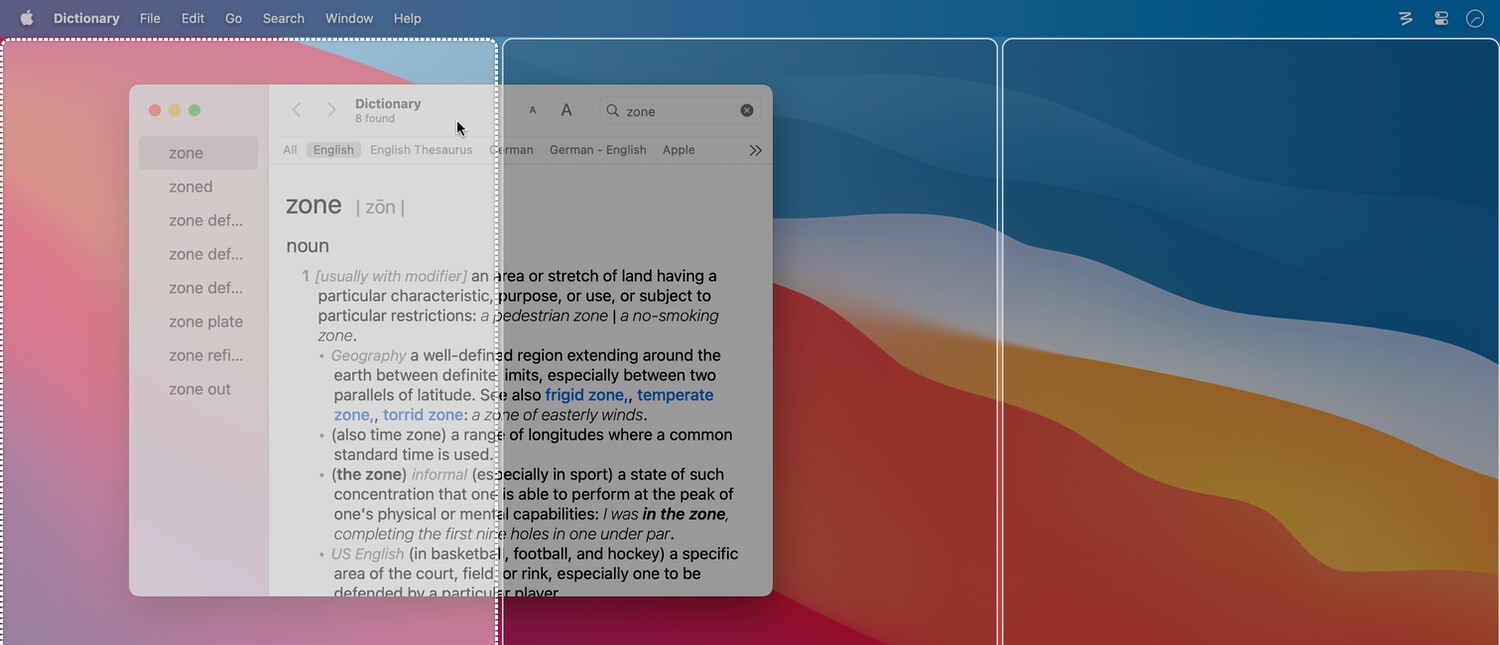
In addition, Snap's settings are where you'll find the controls for drop zones, which use a saved layout's window locations as onscreen targets for dropped windows:
Snap Overview
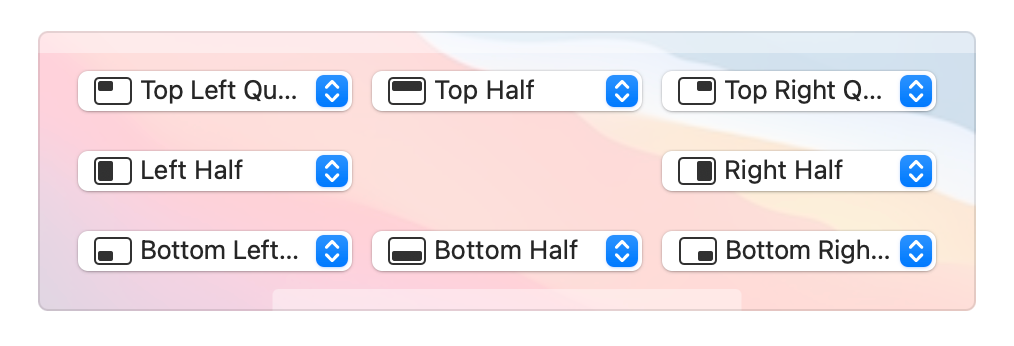
Moom has eight defined snap zones: Each corner of the display, and the mid point of each edge of the display; here are the default settings:
If you have more than one display, Moom can either ignore the edges between those displays, or treat them as snappable edges. To snap a window to an edge, drag the window towards the target zone, and keep dragging until your mouse reaches the edge of the screen.
Snap mode activates when the mouse reaches the edge of the display, not when some portion of the window reaches the edge. If you don't think Snap mode is working, make sure you're dragging the mouse all the way to the edge of the screen.
When the mouse reaches the target zone, you'll either see an outline of the window's new size and location, or a pop-up menu showing a number of options (more on that later), depending on what action you have defined for the targeted zone. Release the mouse, and the window will move and resize per the preview display (or menu option).
Snap Options
Moom's Snap mode doesn't have very many options; most of the area is devoted to customizing Snap mode's zones:
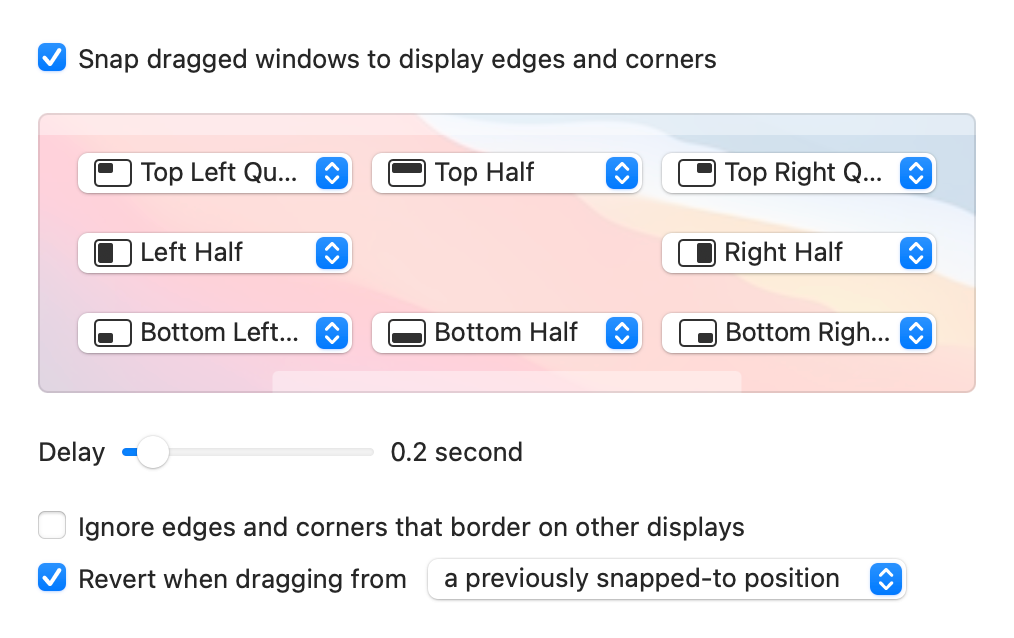
The first checkbox, ▢ Snap dragged windows to display edges and corners enables and disables Snap mode. When not enabled, the remainder of Snap's options are grayed out.
The Delay slider controls how quickly the snap zones appear when you drag your mouse to the screen edge. The default is 0.2 seconds, but feel free to experiment with the slider to find a delay that works for your workflow.
The ▢ Ignore edges and corners that border on other displays checkbox controls whether Moom treats each display as a full four-sided display (checkbox not checked), or just those edges and corners that don't touch other displays (checkbox checked).
Finally, the ▢ Revert when dragging from [a previously snapped-to position | any position set by Moom] checkbox controls what happens when you drag a window that's previously been positioned by Moom, either via dragging or via any Moom action—it will revert to its prior dimensions with the checkbox enabled.
If you don't want windows that Moom modified (either via snap or other Moom actions) to revert to their original shape when you drag them, make sure this box is not checked.
If you do want them to revert, you can choose between reverting only windows that were snapped into place ("a previously snapped-to position"), or any window that was modified by any of Moom's modes ("any position set by Moom"). Just select the appropriate option from the pop-up, and make sure the checkbox is checked.
Customizing Snap Zones
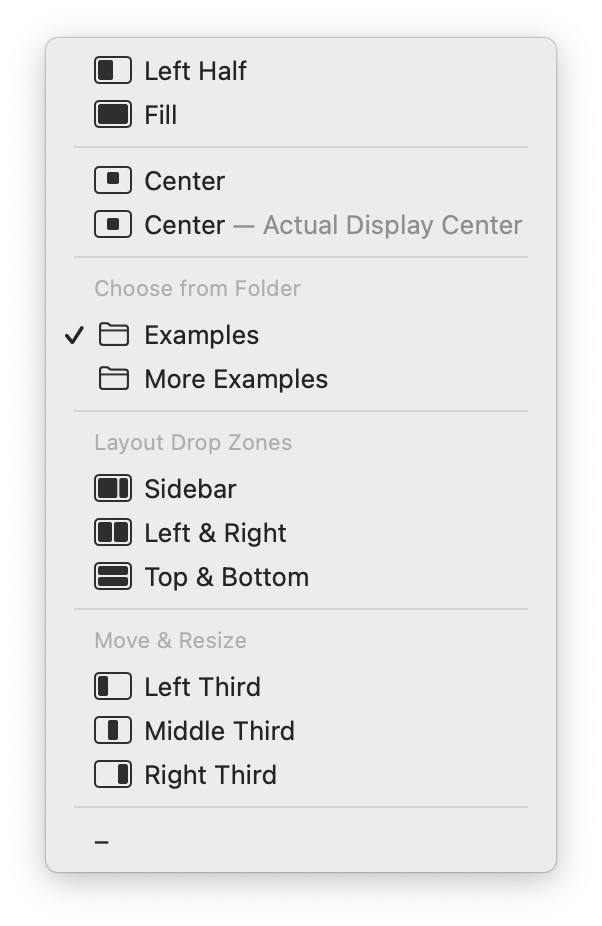
As noted earlier, there are eight separate snap zones within Moom. The pop-up menu for each of these zones can show choices in up to four separate categories—the screenshot at right is for the mid-screen left-edge zone in its default form, and shows the four categories:
- Moom-provided actions: The first four entries are Moom-provided actions, and they vary a bit by zone.
- Choose from Folder (or Chain): You can access some or all of a Folder or Chain's contents by adding it to a snap zone; what you can access varies a bit by zone.
- Layout Drop Zones: A layout in a snap zone opens that layout's window locations as drop zones, letting you drag a window into any of those zones.
- Move & Resize: Finally, all Move & Resize actions are listed as possible snap zone actions.
Each of these options will be explained in detail below. In addition to those options, there's a "do nothing" choice in each list (as indicated by a "-" symbol), so you can have zones that don't do anything.
You can use the keyboard to quickly navigate these pop-up menus; in particular, typing a minus sign will select the "no action" entry, regardless of where you are in the list.
1. Moom-provided actions
These actions mimic what's available in Moom's pop-up palette, depending on which zone's menu you're looking at. In the four corner zones, one of the Moom options will resize to a quarter-sized window located in that corner; in the four middle zones, it will resize to a half-height or half-width window.
In addition, two centering options are shown, one for the actual screen center, and one for the macOS screen center, which is a bit higher. Here are the Moom options for the top right middle and right edge zones, for example:
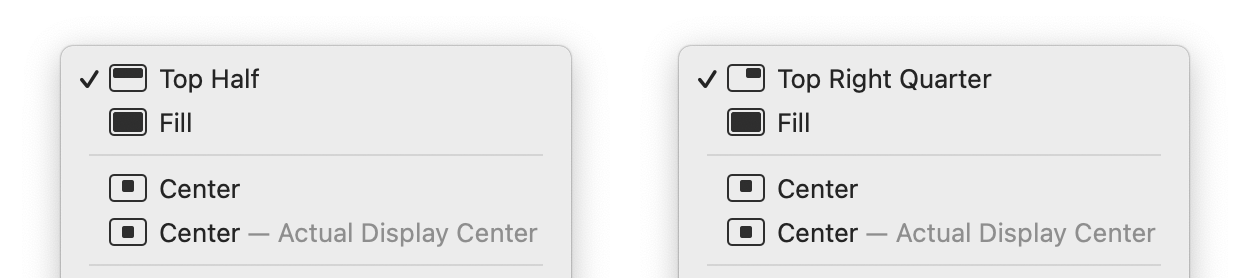
These four options are always available in any zone, unlike the remainder of the options.
2. Choose from Folder (or Chain)
You can choose Folder (or Chain) custom actions in a snap zone's pop-up menu. If you add the folder to a top corner zone, you'll be able to use the first action in that folder as the snap action. If you add the folder to a bottom corner zone, you can select the last item in that folder as the snap action.
However, if you select a middle zone for your folder, then you add even more power to Moom's Snap mode: You'll be able to choose from any of the custom actions in the folder when you drag the window to the screen edge via a pop-up menu:
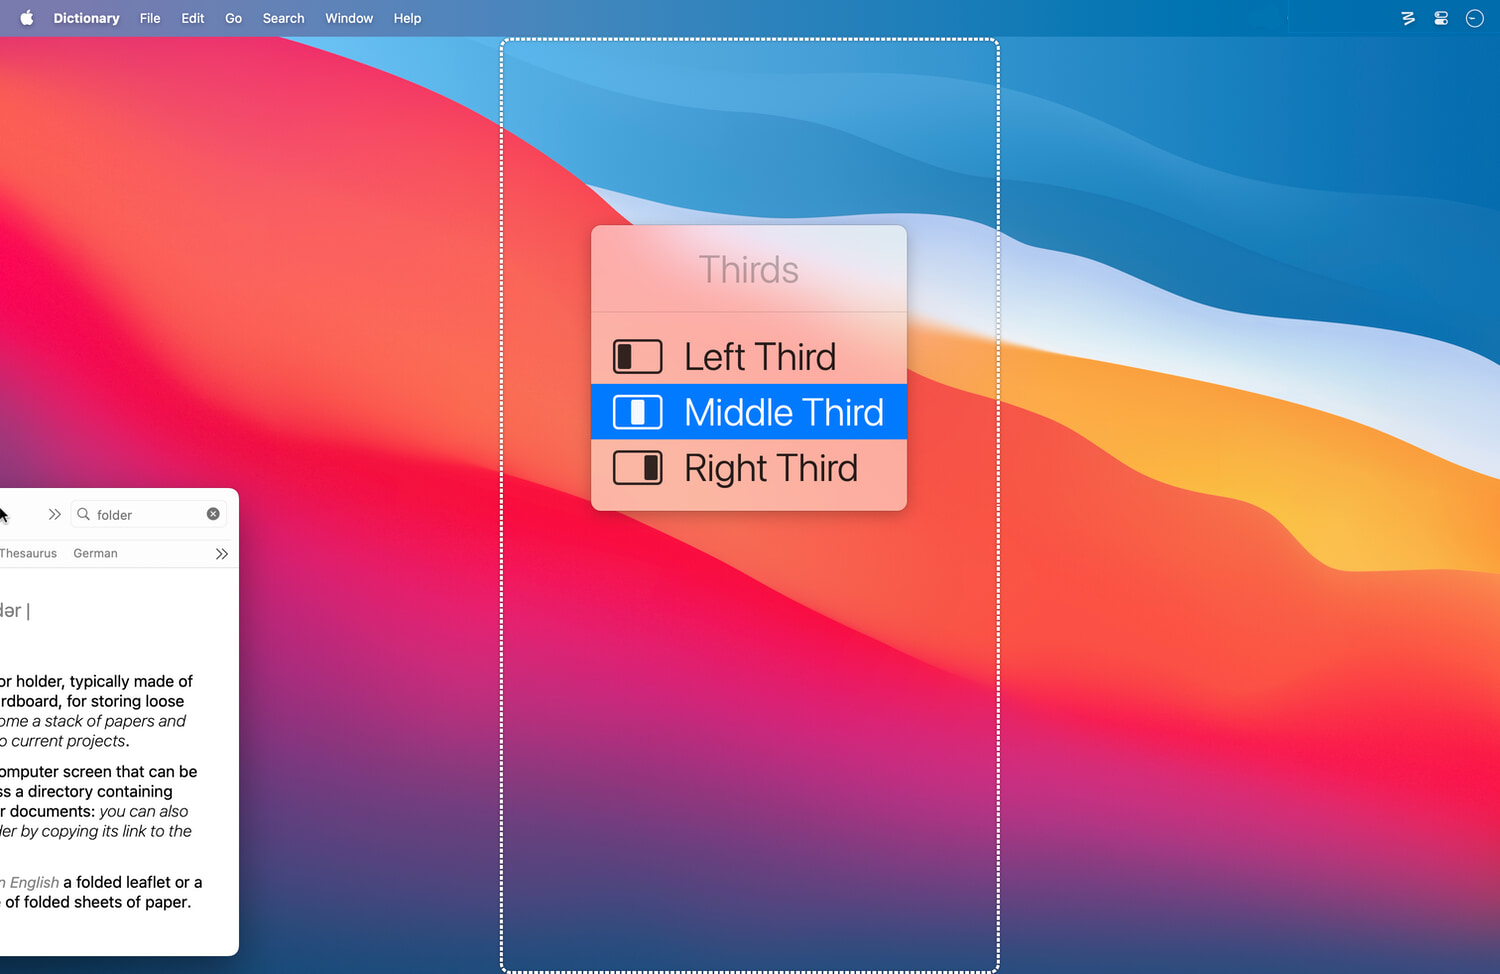
To select an item from the menu, drag the window up and down (if you used a vertical middle) or side to side (if you used a horizontal middle) to scroll through the items in the menu, and release your mouse to use the selected action on your window.
Chains behave just like folders in Snap mode: You'll be able to pick which of the actions in the chain you'd like to use, if you put the chain in a middle snap zone target; otherwise, you can pick the first (top corners) or last (bottom corners) action in the chain.
3. Layout Drop Zones
One of the most powerful uses of snap zones is to use them as drop zones—this will allow you to drag a window to a screen edge, then choose from any of a saved layout's window locations as the location for the dragged window.
See the linked section above on drop zones for more details, but you can use this feature to provide eight separate customizable layouts that do nothing but arrange dragged windows, perhaps something like this:
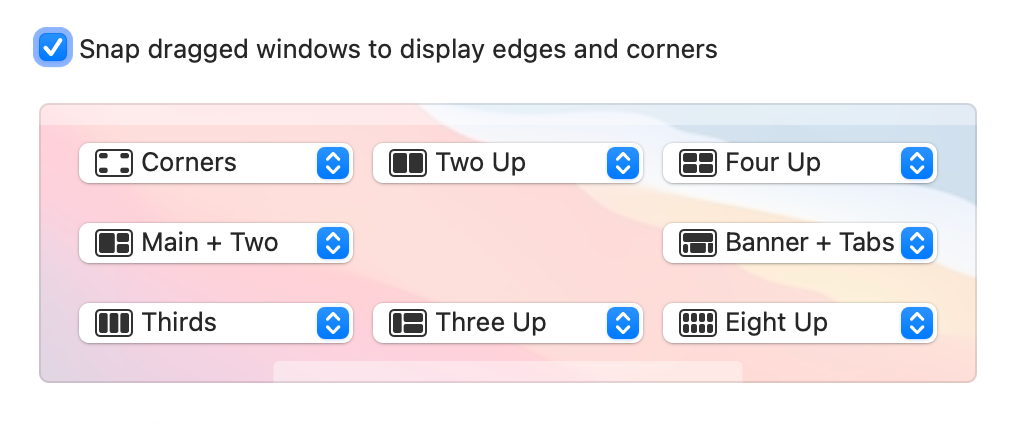
There are 31 separate window locations reflected in those eight saved Layout actions. Drag a window to the upper right corner of the screen, and you'd see the "Four Up" drop zones:
Drag the window to the desired zone and drop, and it'll move and resize into that zone.
Drop zones are one of Moom's most powerful features, and they're incredibly easy to set up and use. Read about Layout in the Custom Actions chapter, and pay particular attention to the last section in the chapter which discusses a really easy way to create saved layouts as seen in the above screenshot.
4. Move & Resize actions
Finally, any individual move and resize actions you have will be listed as available actions in each snap zone. This includes actions in both chains and folders, so you have access to all your move and resize actions.
The ability to add folders, chains, and layouts to snap zones means you can literally apply hundreds of Moom actions through the Snap interface. Add a folder that holds 10 saved window layouts, each with five window positions, and you'll have direct access to all 50 window positions (if you use a middle-edge snap zone). (Folder contents are flattened, so make sure you use identifiable names on your actions if you're going to do this!)
Drop Zone Overview
Moom's drop zones feature is a way to use any saved layout as a collection of visual drop targets, where a dragged window can be dropped into any of the saved layout's window locations via a visual drop zone. Drop zones are enabled by default, but need saved layouts to be usable.
If you're not familiar with saved layouts, please read about them first before trying to use drop zones.
Drop zones can be activated four different ways:
- By dragging a window to a snap zone with a saved layout assigned to that zone.
- By holding a defined modifier key while dragging a window.
- By pressing the modifier keys in a saved layout's keyboard shortcut while dragging a window.
- By pressing the keyboard shortcut for a saved layout while dragging a window.
The first method was covered in Customizing Snap Zones; the other three will be covered in the next section.
Overlapping windows and drop zones
A saved layout can have overlapping windows, like this:
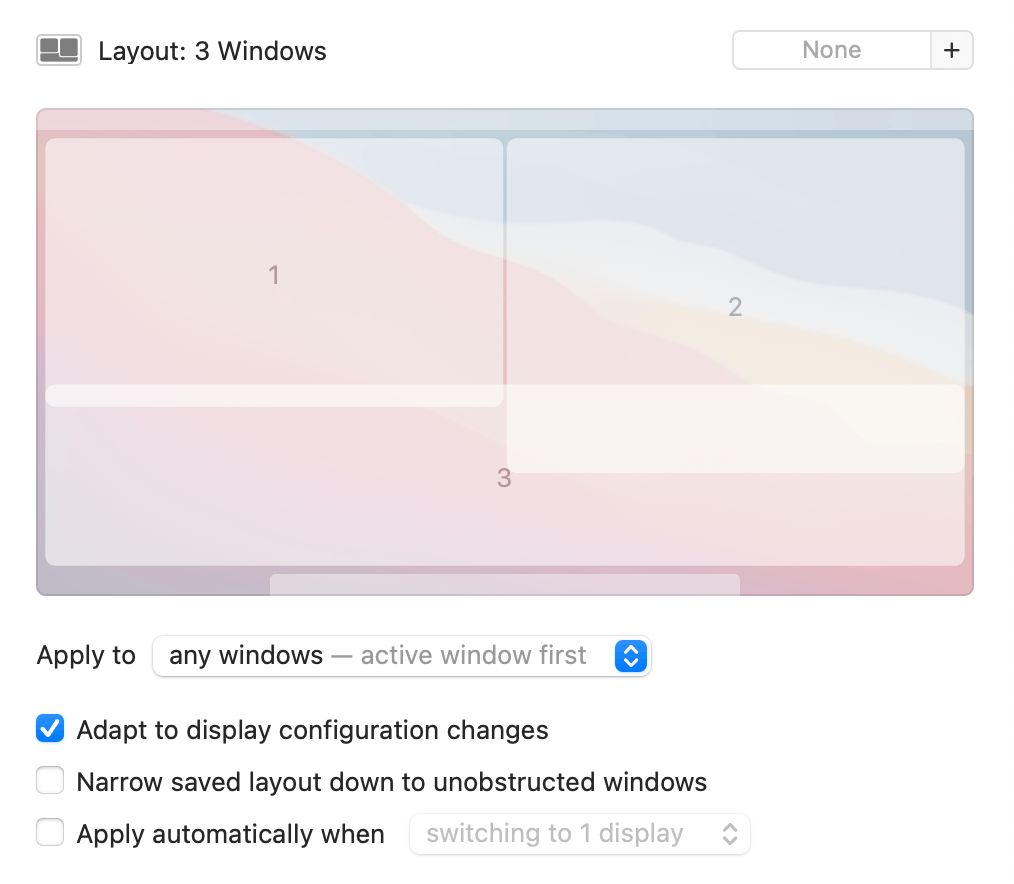
If this saved layout is used as a drop zone, the drop zone areas are determined by the window order and overlapping areas of the windows. In the above example, the lower window (3) is the furthest back (third of three windows), so windows 1 and 2 cut down on the drop area available for the third zone: A window dropped into the white areas of window 1 or 2 will wind up in one of those drop zones, not in that of window 3.
The small icon at the top left of the layout is a good approximation of how the drop zones will work in use—the darkened areas show exactly how much of each window is available.
Note that if you check "Narrow saved layout down to unobstructed windows," none of the above is applicable. In that case, window three won't be available as a drop zone, as it's behind both windows one and two, and will be removed when that box is checked.
Drop Zone Options
Drop zone options control how drop zones are activated, and which layouts are used when they are activated. (Activation via method one above, snap zones, is independent of the drop zone settings.)
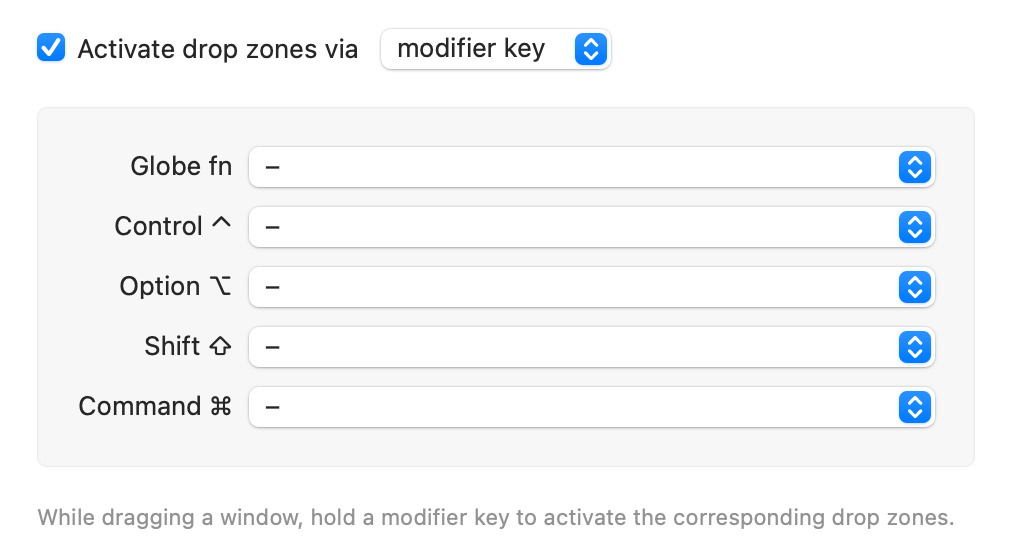
The first checkbox, ▢ Activate drop zones via enables drop zones, and it's checked by default. The pop-up menu to the right controls how drop zones are activated.
Modifier key drop zones
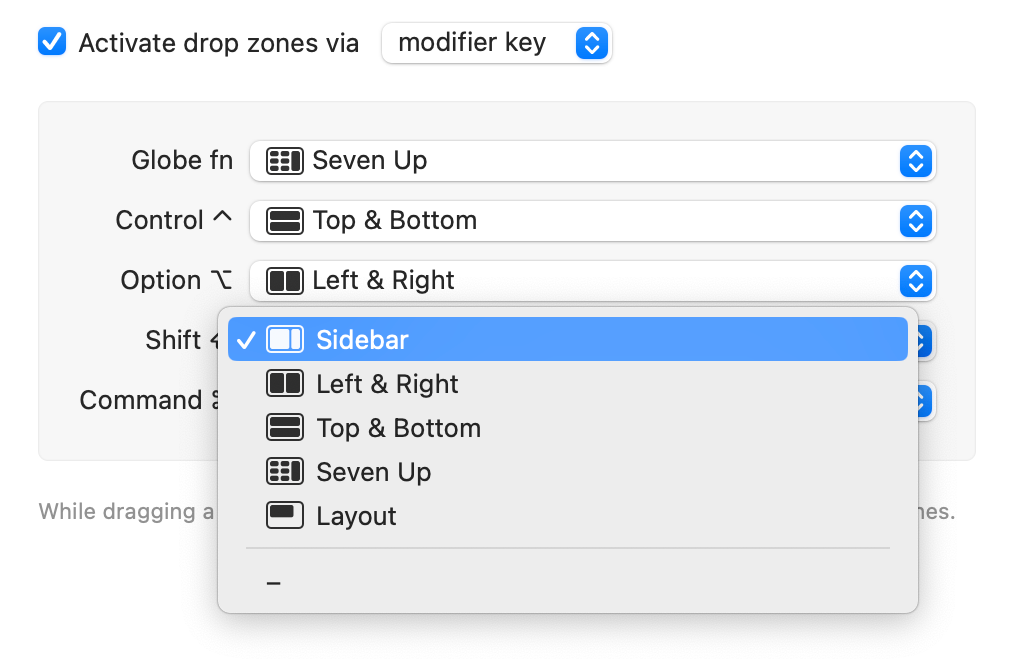
The default mode for drop zones is set to "modifier key," which allows you to define up to five separate layouts that will be triggered by pressing an associated modifier key while dragging a window. Before you can use it, you need to assign your chosen layout to each modifier key you'd like to use:
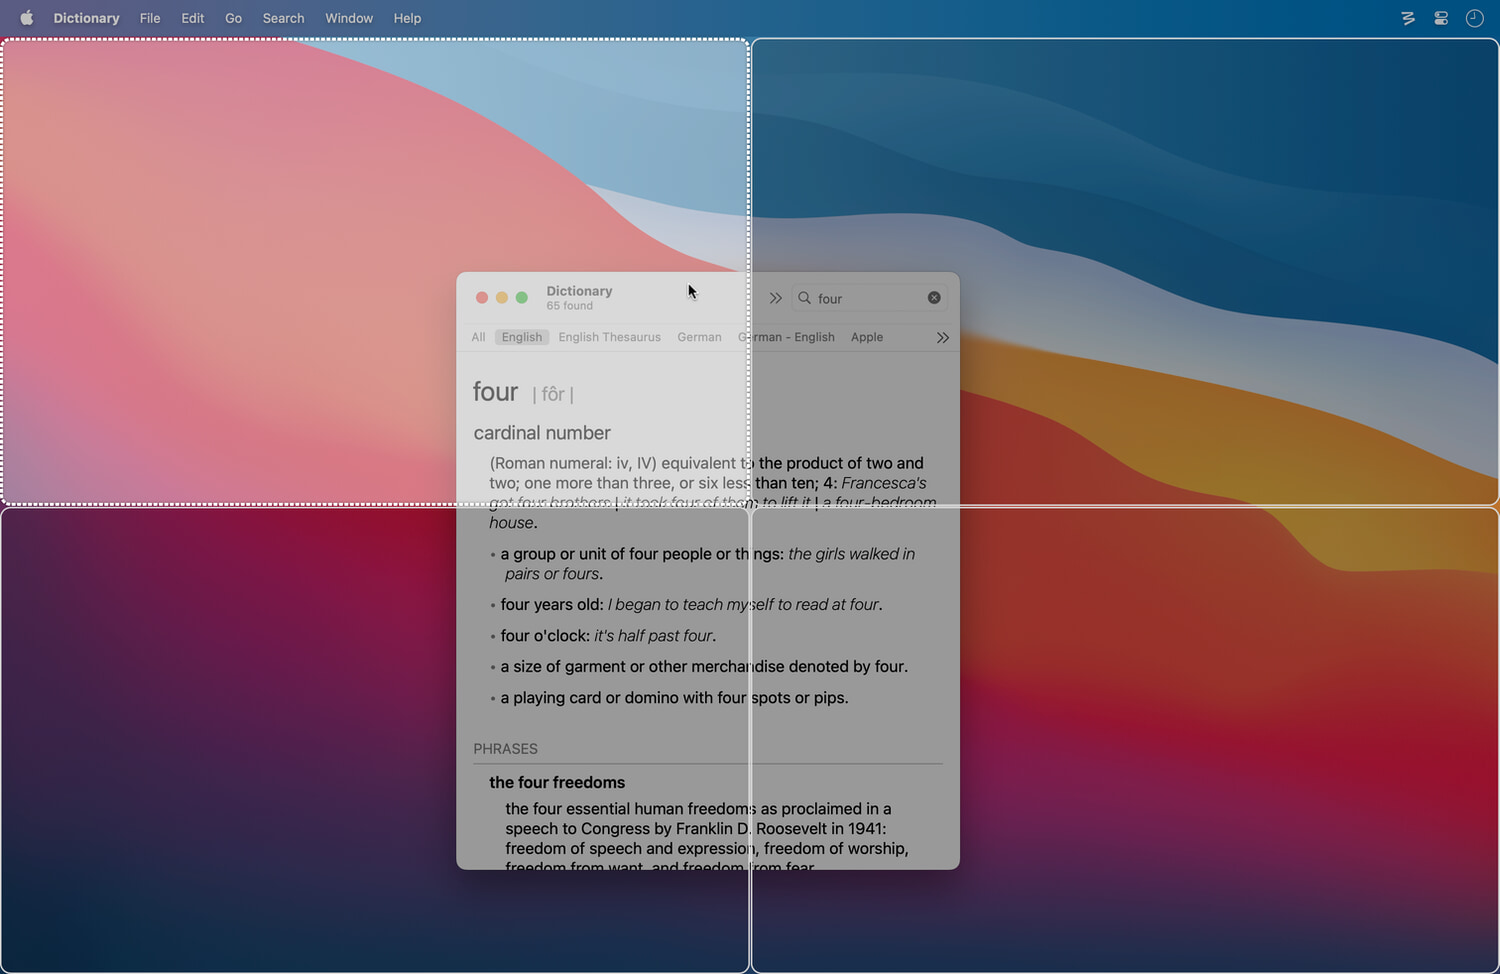
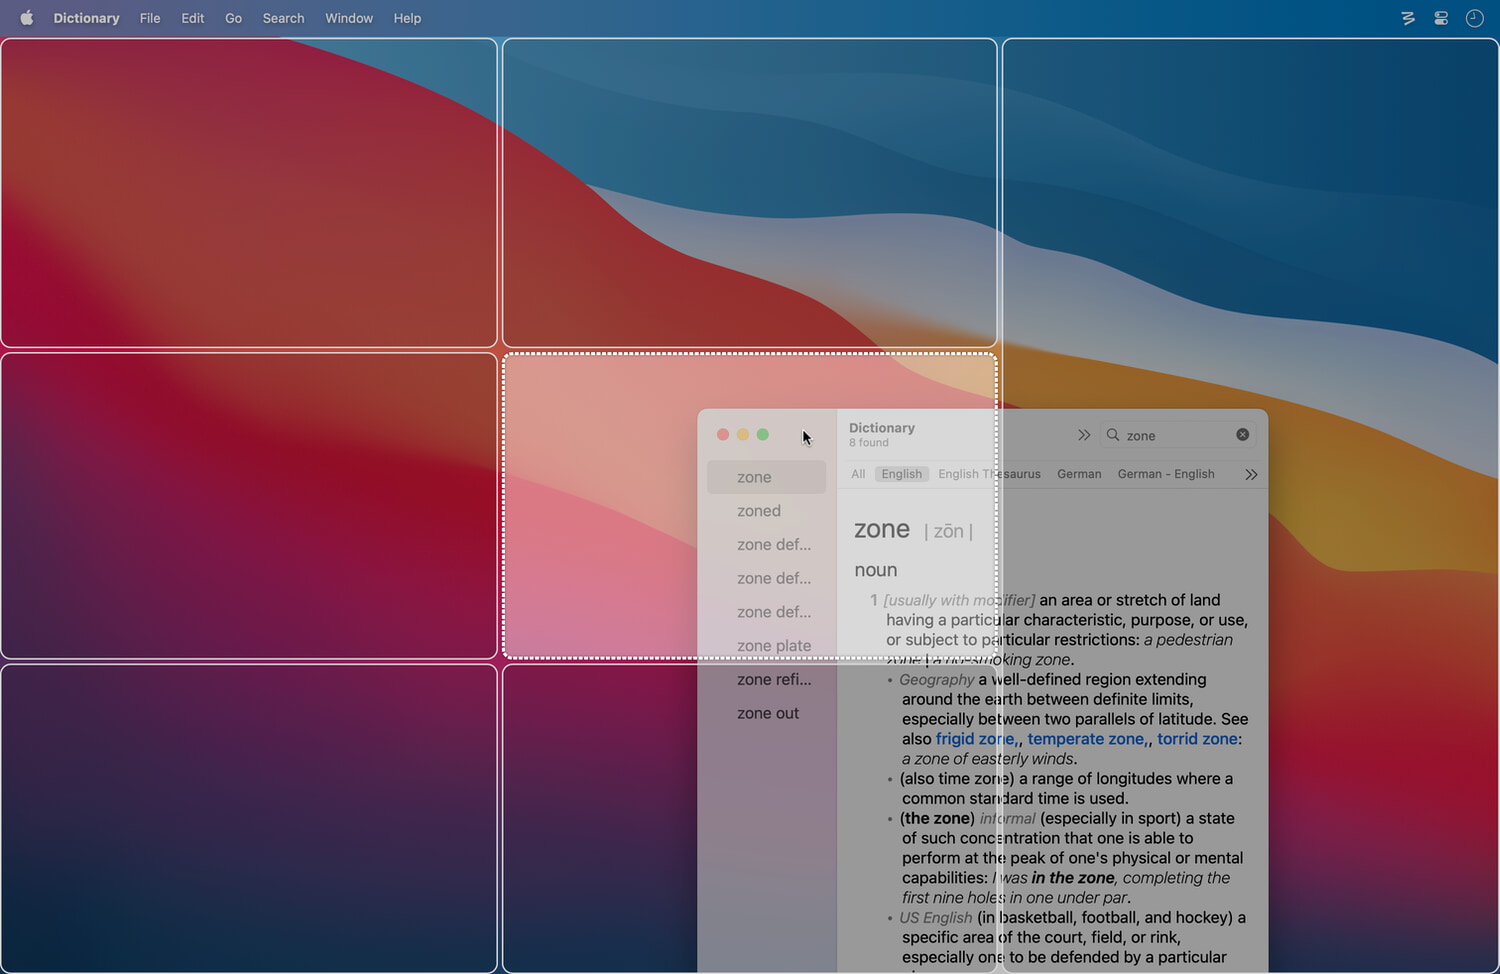
Start dragging a window, then hold down a defined modifier key, and the layout's saved window locations associated with that modifier key will appear. Drop the window when the desired zone highlights; here's the "Seven Up" layout as assigned to the fn key above, with the window about to be dropped:
To cancel a drop without moving or resizing your window, just release the modifier key.
You can also switch modifier keys mid-drag, so you can choose from any of your defined drop zone layouts on the fly.
Modifier key drop zones and Hover's move window mode
If you use Hover's move window mode to move windows around without dragging, there are two different ways this can work when using modifier key drop zones.
Instant drop zones: If you assign a layout to a modifier key, and that modifier key is also all or part of your Hover move trigger, then as soon as you start moving a window in Hover mode, you will instantly see that modifier key's drop zones appear.
If all modifiers in your Hover move trigger have layouts assigned, then the drop zones that appear will be those from the layout that's highest up in your list of custom actions in Moom's Settings window.
Hover-move and non-instant drop zones: You can use both these features together if you take care to not have overlapping modifier keys in both areas. For example, set Hover's move mode to use ⌃⌥, and then make sure not to assign any layouts to those keys in the drop zone setup area. Instead, assign them to fn, ⌘, and ⇧.
Now you can press and hold ⌃⌥ to hover-move a window, and while doing that, press any of the three other modifier keys to activate that modifier key's drop zones.
When set to use layout hot key modifiers, drop zones trigger solely based on the modifier keys in your saved layouts' keyboard combos, and the chosen layout is the highest-listed amongst those layouts that share those modifier keys. You may still be a bit confused by this, so consider this example.
You have four saved layouts, each of which has a keyboard shortcut based on ⌃ and ⌥–starting with "Seven Up" on ⌃⌥1, "Top & Bottom" on ⌃⌥2, etc. Because actions can be dragged in any order, your custom actions could appear in either of these variations, amongst others:
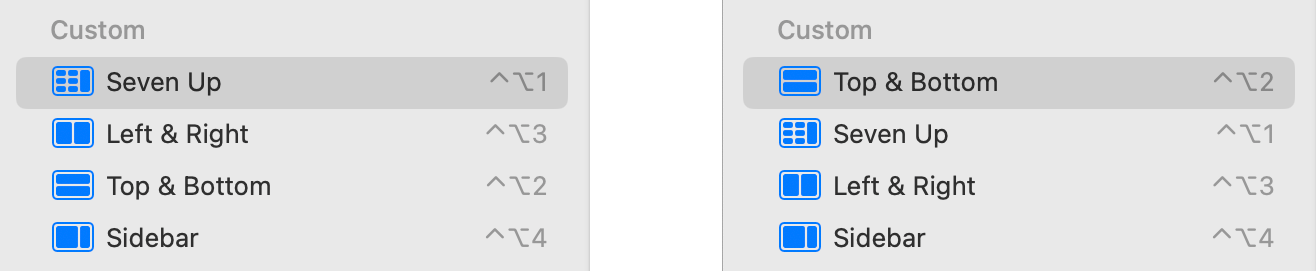
When using hot key modifiers for drop zones, with the arrangement shown in the left image, if you press and hold ⌃ and ⌥ while dragging a window, the Seven Up layout would be used for the drop zone. If your layouts are arranged as in the right image, then the Top & Bottom layout would be used.
This mode provides the power of using multiple saved layouts as drop zones without any configuration, as it all happens automatically. Just set your saved layout order in the sidebar so that the layouts you want to use are highest in the list, and you're set.
This mode lets you use combinations of modifier keys to activate drop zones, instead of just a single modifier key or a complete hot key shortcut.
(If you use select "Layout hot key modifiers" from the pop-up menu, the settings panel will redraw, as there's no need to pick layouts to use with the modifier keys.)
Layout hot key drop zonesWhen used in this mode, drop zones are activated by dragging a window and then pressing a layout's defined keyboard shortcut. For example, if the Seven Up layout from above was assigned to ⌃⌥1, if you press that key combination while dragging a window, the Seven Up layout's zones will appear.
Note that this mode is active even if either of the other drop zones modes are selected. The only caveat is that you can't change the modifier keys you're holding down before you drop-snap the window.
To use this mode effectively, you should assign simple keyboard commands that can be typed with your non-mouse (trackpad) hand.
However, you can simplify use of this mode by combining it with Hover. If you have Hover's move windows command set to run when ⌃ and ⌥ are pressed, for example, then you can start hover-moving a window with ⌃ and ⌥ held down. If you then press the 1 key while dragging, the Seven Up layout's drop zones will appear.
(If you select "Layout hot key" from the pop-up menu, the settings panel will redraw, as there's no need to pick layouts to use with the modifier keys.)
Generalizing drop zonesIf you like this concept in general, but wished it worked automatically for the frontmost n windows, where n matches the number of available zones from the saved layout, make sure you read up on the "any window" option for saved layouts in the Custom Actions chapter: That's exactly what an "any window" saved layout will do, and without any dragging.